 
 Main Menu
|
|
Nevada Classics
|
|
Advertise at CC
|
| S |
M |
T |
W |
T |
F |
S |
| |
|
|
|
|
1 |
2 |
| 3 |
4 |
5 |
6 |
7 |
8 |
9 |
| 10 |
11 |
12 |
13 |
14 |
15 |
16 |
| 17 |
18 |
19 |
20 |
21 |
22 |
23 |
| 24 |
25 |
26 |
27 |
28 |
29 |
30 |
| 31 |
|
|
|
|
|
|
|
|
CC Advertisers
|
|
 5Likes 5Likes

02-06-2005, 09:38 PM
|
|
Banned

|
|
|
Join Date: Oct 2003
Location: Yorba Linda,
CA
Cobra Make, Engine: SPF w/392CI stroker
Posts: 3,293
|
|

 Neutral
 Poor Man's Qwik Lift for $250.00 (look!)
So you've just spent some of your last dimes on obtaining a Cobra or getting it road worthy. Boy, wouldn't it be nice to have one of those Qwik Lift-type ramps to properly service your classic car without breaking out the floor jack and stands every single time? I really want a Qwik Lift....I just can't afford one right now.
Well, here's your solution that ANYONE can do by themselves with simple power tools, a little imagination and less than $250.00 complete! I got the idea during my Corvette days from another guy that built similar ramps for his C4 'Vette. I saved his photos and plans for a rainy day, and I finally decided to do something with them once I realized that keeping my Superformance spotless and mechanically sound required a lot of crawling underneath. At 6'3", even changing the plugs was a back-breaking exercise.
So if you have a 10 minutes and a cup of Joe in front of you, pull up a chair and I'll walk you through the process.
The first two shots below are of the completed ramps:

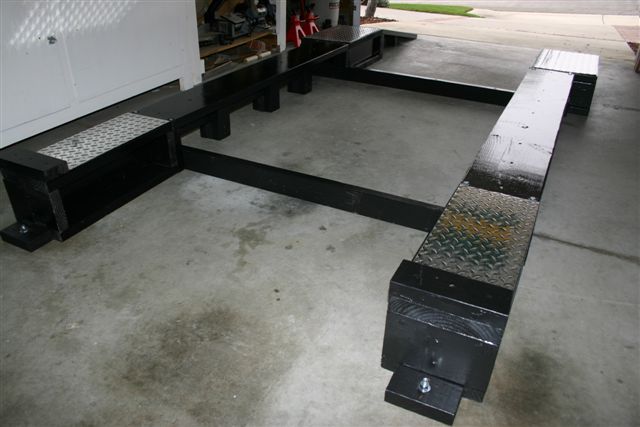
Construction materials consist of various lengths of 2x4, 2x6, 2x10 and 2x12, all coated in Kilz primer followed by flat black paint and then a two-coat topper of polyurethane (to keep the moisture out and, more importantly, to prevent splits). It's all tied together with 3" rough drywall screws, with the "through boards" pre-drilled to prevent splits when you "DeWalt them" to the receiving boards. Here are the basic pieces of the assembly:
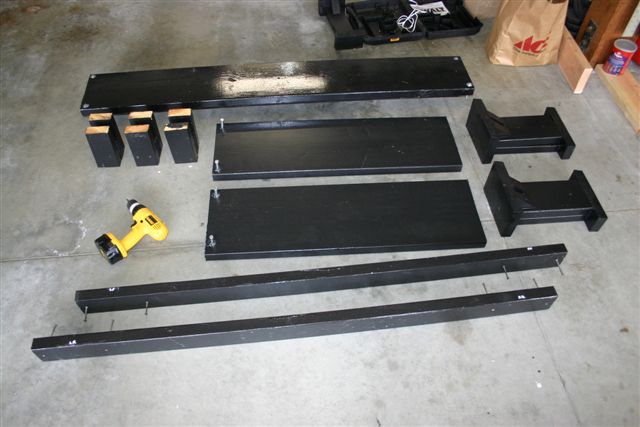
The front pedestals are built out of 2x6 (that form an "I" in the middle), with 2x10 on top and bottom. This yields a net lift height of 8.5" (from bottom of tire with a compressed suspension, as a 2x6 is actually 1.5x5.5 and the 2x10 is actually 1.5x9.5. Each front pedestal is 23" long and has a 2x4 "tire stop" for safety.
The rear pedestals are made a little different because.....THE REAR TRACK IS 4" WIDER THAN THE FRONT. So I had to get creative and used the 2x6s for the "I", but used three of them in the middle instead of just one. I also used 2x12 and turned them sideways, mounting two pieces side-by-side. This yielded the same overall length (23") as the front pedestals, but it gave me a pedestal width of 14" for the rears. All four pedestals were then covered with a piece of 1/16" aluminum diamond plate. This keeps the hot tires resting on a hard, non-peeling surface (versus polyurethane), plus I think they look trick! 
The "bridges" are 2x10 with a 2x4 "spine" right down the middle (you can't see it in this photo), with three trestles or center supports. The bridges attach to the pedestals with 3" long by.375" diameter bolts that I will call "pins" (since they just sit in the holes....you don't bolt it together....keep on reading why).
The cross supports are simple 2x4, cut to the proper wheel-center-to-wheel-center for your particular car (I believe these were cut to 62", as my front tires were 53.5" center-to-center, while the rears were 57.5"). Your measurements may vary, so triple check everything. I attach them with 2 drywall screws on each end, but I'm probably going to change this to something a little easier (perhaps threaded inserts with a bolt so that my air rachet can work them on/off easier - for now the DeWalt does the work).
The actual ramps are 2x12 cut to 38". The pin holes were drilled perpindicular to the ramps, meaning that the holes drilled into the rear of the rear pedestals were cut at a slight angle. The ramp supports were cut from scrap pieces of 2x10, 2x6 and 2x4. I don't have the exact measurements handy. I also coated the ramps with a non-slip agent on my last coat of polyurethane.
As you can see from the next photo, the assembly supports the car without any problems. Heck, our houses must support tons of roofing materials, so wood is extremely strong and rigid when cut right and engineered properly.
 Now the real beauty of this particular Poor Man's QL. With the pins removed, you can break down the whole ramp assembly.

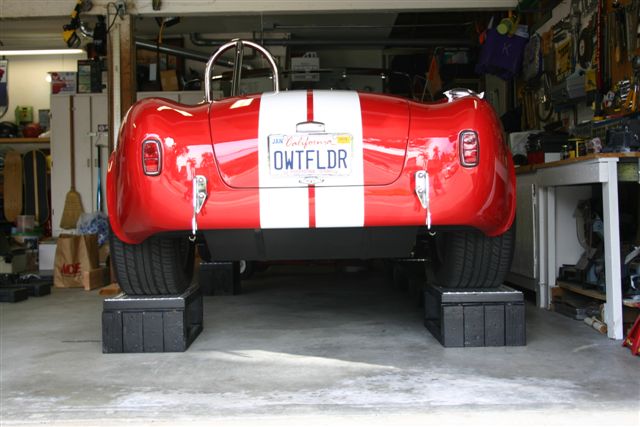
As you can clearly see, the bridges, cross-supports and rear ramps all break down with ease (under 5 minutes), and the assembly provides you with plenty of room to work underneath for general maintenance and cleaning. You also have lots of room to jack up the car higher for more serious maintenance efforts (clutch work), or for removing the wheels for brake and suspension R&R.
A couple precautions. You can see them in the first two pictures...make sure you sink a couple concrete lugs (with wood) in front of each forward pedestal. This will keep the whole assembly from walking forward on you. Also, make all your cuts so that the wood grain is always in compression (parallel to the floor). You can't do this with the top surface areas, but the "spines" in the middle take up the load.
To help me self-align myself when driving into the garage, I placed a tennis ball and a piece of string from the ceiling. The tennis ball helps me line up my approach and the string is a double-check about 1/2 way up to ensure that I'm still tracking straight. I had a neighbor help me on the initial two tries, but I now have the hang of it.
Someday I still hope to get a real Qwik Lift, but for now this little baby will work just fine. I can answer pretty much any question if you have one.
Regards,
-Dean
Last edited by RedBarchetta; 02-07-2005 at 09:18 AM..
|
02-07-2005, 05:02 AM
|
 |
Senior Club Cobra Member
|
|
|
Join Date: Dec 2001
Location: Shasta Lake,
CA
Cobra Make, Engine:
Posts: 26,618
|
|
Not Ranked
Dean,
That is a really nice set up and should work well. There was a retired machinest and engineer here that put a similiar set up in his garage a few years ago, but he was a nut about designing things and he had put in electric jacks of some kind at each corner so the bords, covered in steel, could be lifted to abut 12" high. I think he spend almost as much on it a a Kwick Lift, but for him it was the fun of designing it.
As for the floor jack and jack stands. I ony use the floor jack on my Kwik Lift. What are the stands used for? I have the bridge that I can put a jack on when the cars are on the lift if I want to remove wheels, etc. Anyway, great job and it works and that is what counts. 
Ron |
02-07-2005, 06:29 AM
|
 |
Member of the north
|
|
|
Join Date: May 2003
Cobra Make, Engine: A Cobra
Posts: 11,207
|
|
Not Ranked
DEAN!!!!
That is SOOOOOOOOOOOOOOOOOO cool.
I think I may be doing something like that. Thanks!
__________________
I'm a writer, feed the artist and buy a book.
|
02-07-2005, 07:15 AM
|
 |
CC Member
|
|
|
Join Date: Jan 2003
Location: Atlanta,
GA
Cobra Make, Engine: CAV GT40 with 331 KC
Posts: 2,187
|
|
Not Ranked
Way to go Dean!
Good out of the box thinking - how high do you think you can go?
|
02-07-2005, 08:30 AM
|
|
Banned
|
|
|
Join Date: Oct 2003
Location: Yorba Linda,
CA
Cobra Make, Engine: SPF w/392CI stroker
Posts: 3,293
|
|
Not Ranked
Quote:
Originally posted by PatBuckley
Way to go Dean!
Good out of the box thinking - how high do you think you can go?
|
Pat and all, thanks for the kind words.
To answer Pat's question, the limiting factor on maximum height isn't so much a function of strength, but more so the ramp angle. If you go too high, the top of the ramp will angle too sharply toward the pedestal/bridges and the car will bottom out. I actually drew a scale replica of the final ramp assembly and used a cardboard cutout of the wheelbase of the Cobra to make sure that my ramp angle was not going to be too aggressive. I wanted 36" long ramps but the "model" told me somewhere in the neighborhood of 38-40". So I chose the shorter length and it worked (keeps the ramps in the garage without having to take them off before closing the door).
As for more height, I think it's possible to go from the 2x6 "spine" structure to 2x8s, but you would have to add more 2x8s to spread the load. A 2x8 on it's side alone may not handle the stress, but a bunch of them screwed together would be just like driving up on cinder blocks.
-Dean
Last edited by RedBarchetta; 08-13-2007 at 07:41 AM..
|
02-07-2005, 09:13 AM
|
 |
CC Member
|
|
|
Join Date: Feb 1999
Location: Kansas City,
MO
Cobra Make, Engine: CRL, 351W, Tremec TKO
Posts: 2,299
|
|
Not Ranked
Just too cool!
One way to get a longer ramp and yet still have everything fit would be to split (or hinge) the ramp. For example, a ramp twice as long but split in the middle so that you could unhook the first part of the ramp and still be able to get the garage door closed.
petek
__________________
Pete K.
Who is John Galt?
|
02-07-2005, 09:44 AM
|
|
CC Member
|
|
|
Join Date: Jun 1999
Cobra Make, Engine: Three Cobras, one 351W, one 427SO, one 527BB & one GT-40 427R
Posts: 206
|
|
Not Ranked
Looks a little unfinished to me...
Sooooo, where are the cup holders for the beer? One on each corner I presume. And, where are the cork boards to hang the gurlie photos from (on the inside of the peditals, of course).
I bet one of those little 7" TV's would fit nicely in one of the pedistals, while the other three could be converted into coolers for the beer when your freinds come over to gaze upon your car while you're working on it.
Let me know when it's finished! In the mean time, looks pretty good.
/randall
|
02-07-2005, 09:48 AM
|
|
Banned
|
|
|
Join Date: Oct 2003
Location: Yorba Linda,
CA
Cobra Make, Engine: SPF w/392CI stroker
Posts: 3,293
|
|
Not Ranked
|
02-07-2005, 10:00 AM
|
|
CC Member
|
|
|
Join Date: Jun 1999
Cobra Make, Engine: Three Cobras, one 351W, one 427SO, one 527BB & one GT-40 427R
Posts: 206
|
|
Not Ranked
Voice Activated anti-theft beer doors
ohhh, I KNOW what to use as a phrase to prevent unwanted access from unauthorized beer drinkers... just have the voice activate the doors recognizing the phrase, "I'll Buy".
You will nver have to worry about anyone taking any beer, ever. At least not your friends... just the courteous strangers that may wander into your abode.
/randall
|
02-07-2005, 10:29 AM
|
 |
CC Member
|
|
|
Join Date: Oct 2003
Location: Hanover,
NH
Cobra Make, Engine: Shelby Cobra 427 S/C
Posts: 559
|
|
Not Ranked
Heck.. I can do it for less than $250- just need a couple 2x4's!
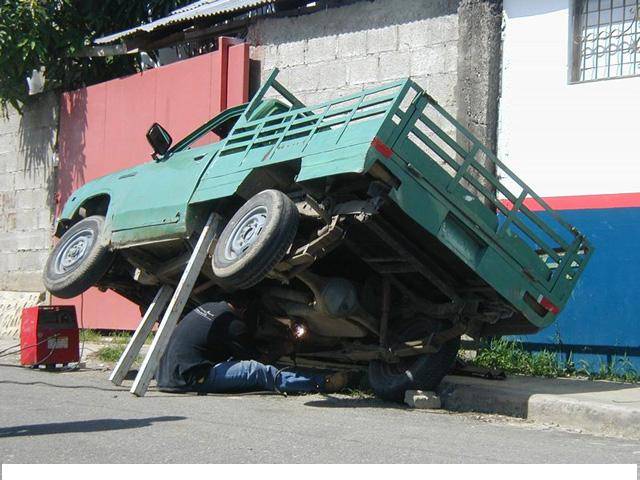
(Kids, don't try this at home!)
-John
__________________
I just wanna drive my car.
|
02-07-2005, 10:36 AM
|
 |
Canadian Gashole
|
|
|
Join Date: Mar 1999
Location: Quebec, Canada,
QC
Cobra Make, Engine: Johnex 427 S/C, 351W, 472 HP, 444 lbs. torque
Posts: 2,455
|
|
Not Ranked
Would those 2X4s be OSHA approved?
I wonder if that guy is trying to fix his truck or get a Darwin award?
Dean
Neat low cost setup you have there. I think that I would be making something similar if I wasn't getting a four post lift.
Wayne
__________________
Don't get caught dead, sitting on your seat belt.
|
02-07-2005, 10:40 AM
|
|
Club Cobra Member
|
|
|
Join Date: Aug 1999
Location: Boonville,
IN
Cobra Make, Engine: Rowen Replicar 351C wish it ran :) Anxiously awaiting delivery of my Road Serpent :)
Posts: 193
|
|
Not Ranked
Really clever but where are the soft drink can holders?
Rick |
02-07-2005, 10:49 AM
|
 |
CC Member
|
|
|
Join Date: Apr 2002
Location: Alpharetta,
GA
Cobra Make, Engine: Sold - Unique FIA - SA 396 Stroker
Posts: 2,440
|
|
Not Ranked
Damn slick Dean - Well done!
Randy
__________________
Sold the Unique - Bought a Porsche TT - Sold the TT - Bought a truck
|
02-07-2005, 04:57 PM
|
 |
CC Member
|
|
|
Join Date: Dec 2004
Location: Yorba Linda,
CA
Cobra Make, Engine: FFR, V8, Manual Trans, Htr, Wipers, Radio Delete
Posts: 327
|
|
Not Ranked
Congratulations Dean. That is really slick. I've often thought how handy something like that would be.
Frank
__________________
FFR - V8, Manual Trans, PS, Inop Wipers, No Radio, Gas Mileage so-so
|
02-07-2005, 05:12 PM
|
|
Banned
|
|
|
Join Date: Oct 2003
Location: Yorba Linda,
CA
Cobra Make, Engine: SPF w/392CI stroker
Posts: 3,293
|
|
Not Ranked
Quote:
Originally posted by Frank Messina
Congratulations Dean. That is really slick. I've often thought how handy something like that would be.
Frank
|
Frank, thanks. Sweet looking FFR you have there! My wife says she's been seeing a black Cobra with silver stripes tooling around YL the past week. I'll have to make some calls and figure it out.
I'm going to be out-of-pocket the next 3 weeks on business travel (ouch!), but I plan to call you and some others when I get back. We have enough Cobras in YL for a get-together. Maybe we can all meet at my place and you guys can see the ramps first hand?
-Dean |
04-01-2006, 03:36 PM
|
 |
CC Member
|
|
|
Join Date: Dec 2000
Location: Los Angeles,
CA
Cobra Make, Engine: E.R.A. FIA #2088 1964 289 w/Webers
Posts: 2,151
|
|
Not Ranked
great little garage setup! Thats awsome! That would make life so much easier. I hate having to jack my car up in my "very small" garage & having to manuever around it.
__________________
Hyde D. Baker
|
04-08-2006, 06:32 PM
|
|
CC Member
|
|
|
Join Date: Feb 2000
Location: Long Island New York,
NY
Cobra Make, Engine: SPF 974
Posts: 737
|
|
Not Ranked
Damn ! I can't stop staring at this !
My back feels better already .
Awesome Red.....
|
05-04-2005, 05:31 PM
|
|
Banned
|
|
|
Join Date: Oct 2003
Location: Yorba Linda,
CA
Cobra Make, Engine: SPF w/392CI stroker
Posts: 3,293
|
|
Not Ranked
ttt
Being bumped so that a few people that have e-mailed me on this can locate the original thread and make a determination if it's something they want to tackle themselves. It's really easy once you break down the components.
-Dean |
04-01-2006, 03:18 PM
|
|
CC Member
|
|
|
Join Date: Jan 2003
Location: Arapahoe County,
Co
Cobra Make, Engine: Unique 427
Posts: 173
|
|
Not Ranked
cool idea !
|
04-01-2006, 03:25 PM
|
 |
CC Member
|
|
|
Join Date: Mar 2005
Location: Orange County,
CA
Cobra Make, Engine: SPF Brock Coupe #88, Keith Craft 427w
Posts: 707
|
|
Not Ranked
Quote:
|
Originally Posted by RedBarchetta
ttt
Being bumped so that a few people that have e-mailed me on this can locate the original thread and make a determination if it's something they want to tackle themselves. It's really easy once you break down the components.
-Dean |
Dean,
You really should keep stuff like this confined to our secret SCOF forum.  Scramble to the secret channel!!!! 
Doug
__________________
Now back to my midlife crisis...
|
 Posting Rules
|
You may not post new threads
You may not post replies
You may not post attachments
You may not edit your posts
HTML code is Off
|
|
|
All times are GMT -7. The time now is 07:34 AM.
Links monetized by VigLink
|


 Hybrid Mode

