 
 Main Menu
|
|
Nevada Classics
|
|
Advertise at CC
|
| S |
M |
T |
W |
T |
F |
S |
| 1 |
2 |
3 |
4 |
5 |
6 |
7 |
| 8 |
9 |
10 |
11 |
12 |
13 |
14 |
| 15 |
16 |
17 |
18 |
19 |
20 |
21 |
| 22 |
23 |
24 |
25 |
26 |
27 |
28 |
| 29 |
30 |
31 |
|
|
|
|
|
|
CC Advertisers
|
|
 115Likes 115Likes

09-24-2023, 08:22 PM
|
 |
CC Member

|
|
|
Join Date: Oct 2017
Location: Baysville,
Ont
Cobra Make, Engine: Mine, small block FORD
Posts: 359
|
|

 Not Ranked
Mr. Bruce,
Thank you for the info on the hood skin,
I will check into shipping options. Everything is expensive these days, but I will need a hood.
I have thought about pulling a partial mold from my existing one and then "removing" the scoop then layup a new skin, hoping I can keep the curves looking ok. But honestly I think getting one of yours might just be a better idea. 
__________________
Yes, I know,....... but it's mine you see..... 
Perhaps he was always a shyster, but we just chose to over look it for awhile. 
You build what you like and I will build what I like...it's all good 
You know that guy,
The one in the neighborhood who likes to hang around the garage while you are working and talk about back when he had that killer 1977 Chevy Mustang
|
09-25-2023, 04:52 AM
|
|
CC Member
|
|
|
Join Date: Mar 1999
Location: penn.,
Posts: 2,566
|
|
Not Ranked
H, check with this outfit, never used them myself but have heard good reviews,- pirateship.com
|
10-10-2023, 07:45 PM
|
|
CC Member
|
|
|
Join Date: Oct 2017
Location: Baysville,
Ont
Cobra Make, Engine: Mine, small block FORD
Posts: 359
|
|
Not Ranked
 A tale of tubing......
Hello again to all.
Well another catch up post here. Again some of this to place over a longer time span as I worked on other things while I waited for parts but I thought it best to just edit this all into one section.
So then out with the bad air or an exhausting tale of tubing, or

So then,
I have been thinking about the exhaust for quite some time. I originally wanted to go with something like the AC factory cast iron Y type manifolds. Not for their amazing flow capabilities  but for the correct look and compact size, plus I knew they should fit Ok.
Someone on our little corner of the internet here mentioned the Mike McCluskey had a supply of them available. So I called to inquire, left a message and being the nice guy he is he called me right back to tell me that he did not have them anymore he sold the lot to David Kirkham. So I contacted him and after a couple of messages I was told they would see if they had any left to sell and then the line just sort of went dead, no more replies, so I took that as a no. Hey, I understand they want to take care of their main customers just like Superformance, they want to sell cars not parts, its just the way it is.
Another line of inquiry got me to Hawk cars in the UK. I was told they could supply them but Oh wow what a price  and then shipping, also from my time on the 289 register it seems they also tend to have some issues with delivering things in a timely manner.
I also considered building some out of precut flanges and heavy wall tubing, it could be done but probably only as a last resort.
I looked at lots of pictures of period correct headers and thought about building something like that. Then I was looking back at some great under hood pictures of CSX2000 when it was sold a few years back and really liked the rough shop made look to the exhaust manifolds on it.
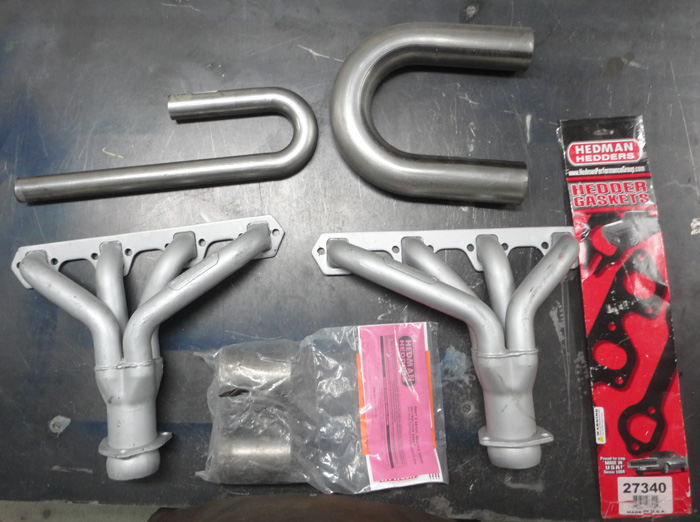
Coincidentally about the same time I came across an excellent deal on a set of Headman block hugger type headers for small block Ford. They were bought for a rod project, painted sliver and never used, the hardware and gaskets were still sealed, Oh, did I mention they were really cheap!
I thought if nothing else they were good parts, flanges, collectors, hardware etc. or they would end up in the collection of parts that I need to pass on to somebody else when this is over.
Of course they will not work for our applications, the exhaust must go outside of the chassis tubes not hug the block , bit of test fitting made me think differently about how to do this. If I put the right side one on the left and left on the right  It puts the collector in a much better spot. Sort of right in line with the engine mount towers and ahead of the foot boxes, then if I change the angle of the collector to outside the chassis that could work
. maybe 
I also decided to swap how the rear primary tube entered the collector moving it from the outside to the inside to give a bit more clearance to the foot box, yes I will be using new space age heat shielding but every bit helps keep those temperatures down.
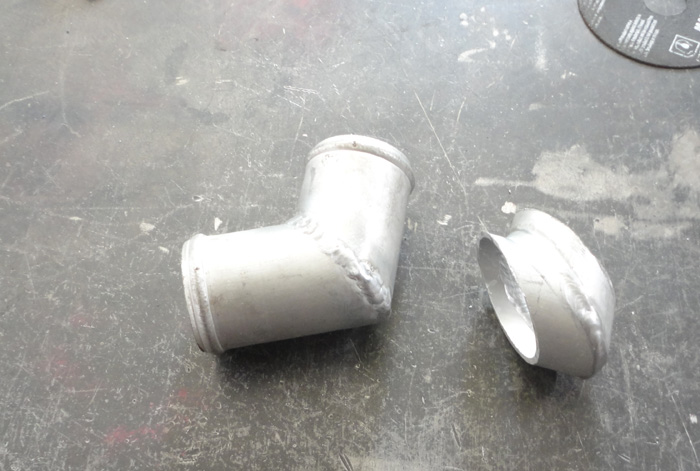
I also wanted to improve the area where the collector transitions to the exhaust pipes. If I leave the collector as it is I would need to have the tapered attachment flange pipe then immediately a smaller tight 90 bend to turn towards the rear of the car, not so good for flow or clearance around the engine mount area either. So I decided to extend the collector with a full size 90 degree bend and add the mounting flange after that.
I ordered up one U bend for the primary tube reworking and one for after the collector leaving me with this lot of parts.
My original idea had me just making some pie cuts to change the angle but after my decision to swap the rear tube placement there was a lot more cutting leaving only the front 2 tubes still connected for aligning purposes.
And in the end only the second tube was not cut completely apart. After I had the rear tubes sorted and tacked I cut the front tube and inserted a small piece to line things up better. Kind of a mess but they do fit in the space rather nicely.
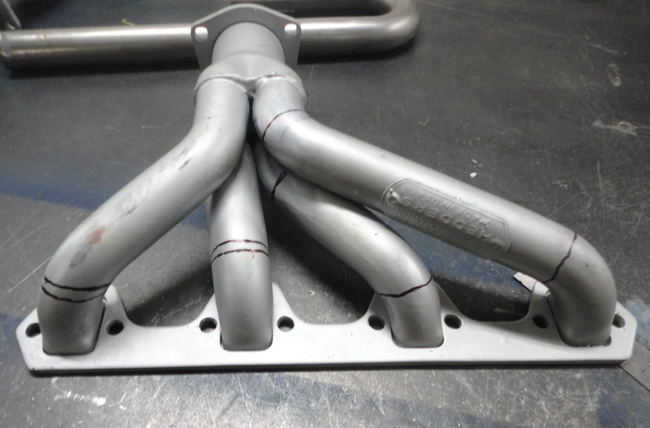


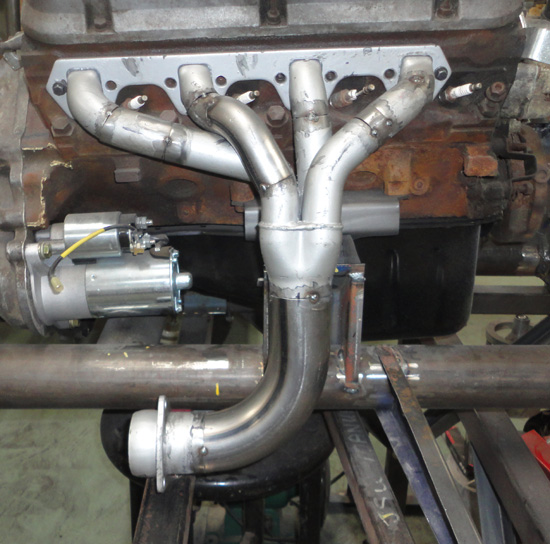
I then moved on to adding the elbow after the collector and getting the flange where I wanted it. The fit up still looks promising.
So after all that it was time to sit down and do some old school welding. I still enjoy this type of thing; it was the way I first learned way back when.
Also I was always told it is good for exhaust work because it does not tend to get hardened the way a fast electric process like MIG can. It is a slower more controlled way of doing it, adding just as much filler as you need.

My old Henrob / Dillon III torch is still nice to work with as well, I have had it since the early 90s and it has done a lot of work over the years.
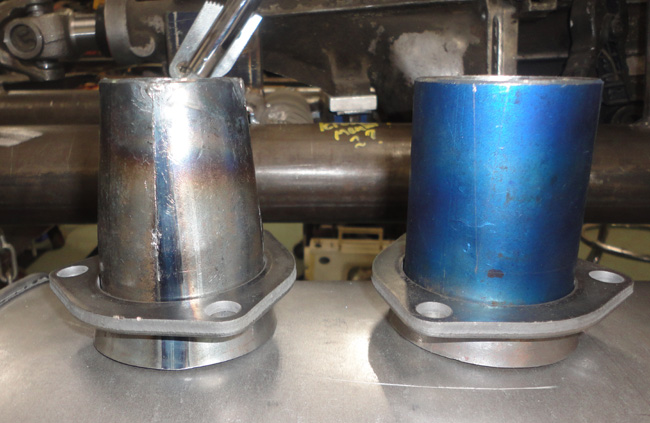
So with them all welded up and the flanges checked and adjusted a bit for straightness I am happy for now. It may not be the most conventional way to build some exhaust but I have hope for them. I am still not sure if I will put the Headman tags back on or not?
They look a bit grotty with the remnants of silver paint and the heat marks from welding but after a quick blast and some high heat paint ( whats your favorite?) they should do the job just fine. And they certainly have the rough shop made look I liked in CSX2000  . If not there will always be another option
.
Also after walking around it for a while I decided I could not abide by my crudely done 1 inch extension of the rear corner tubes and now that other tubes are bracing things I removed the extra tube and angled the rear tube forward to match it. In the end this is under the trunk liner and not seen but the corner tube will visible so better do it now

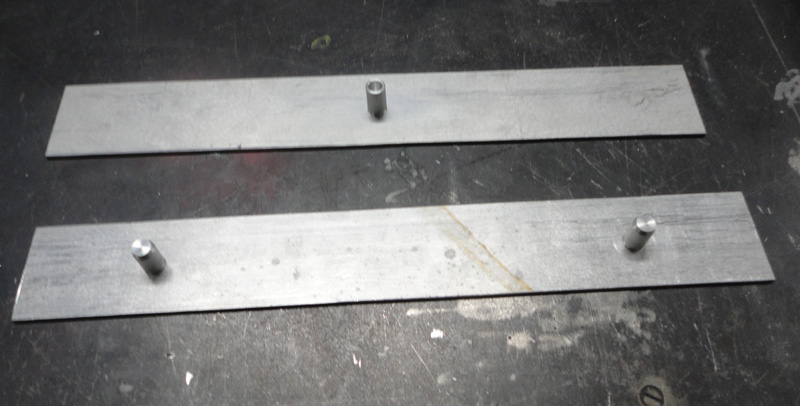
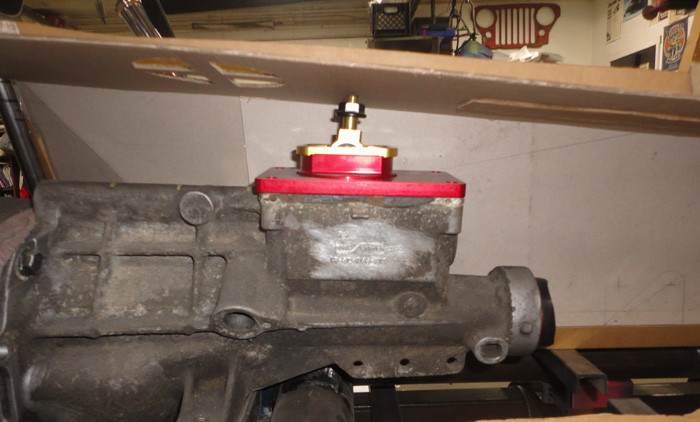
I knocked up the rad mounts too
..
So while I was still waiting on seats and things I decided to do the rest of the exhaust
After looking at many options I decided to keep it simple, old school and affordable. So what that really means is I went with 2 inch tubing with classic cotton reel type mounts and classic Thrush turbo mufflers.
The last decision was hard, I know the current trend is for the modern chambered exhaust sound but my lovely wife really hates it, one of her requests is that the car is somewhat quiet and I want her to enjoy riding in it so I went with the old school Thrush. We all had them back in the day, I know what they sound like and if we are not happy we can look for other options later but I think they should keep most people involved happy enough.
Also the size was very nice for this under car application; I dont want too much hanging down.
The tubing came from a great suppler here in Ontario called Lyells Stainless Exhaust Inc. they have a nice selection of tubing and bends and everything else you need, they even make their own line of B-52 classic mufflers that I did consider but just went with the pipe, U bends and sleeve type clamps from them. Their pricing is good too!
The mounts were added to one of my Moss Motors orders, cotton reel type ( Jaguar? ) for most of the hangers with a single vertical type in the rear that would fit a classic MGB and others.
So the first step was to take the Headman collector mounts and shrink them down to 2 inch. A bit of math told me the difference in circumferences and I made 4 wedge cuts and tapered the tube with a bit of hammer work over a T bar, looks good so far.

So then I needed to decide where the muffler was going to live and clamped it in place.
I havent made any exhaust systems in a long, long time and most of them were a lot shorter (VWs ). I bet there are new fancy tools to do this now but I just made up a cardboard template to show me the angle I am looking for in relation to a straight section of pipe and then a template to mark the U bend from.
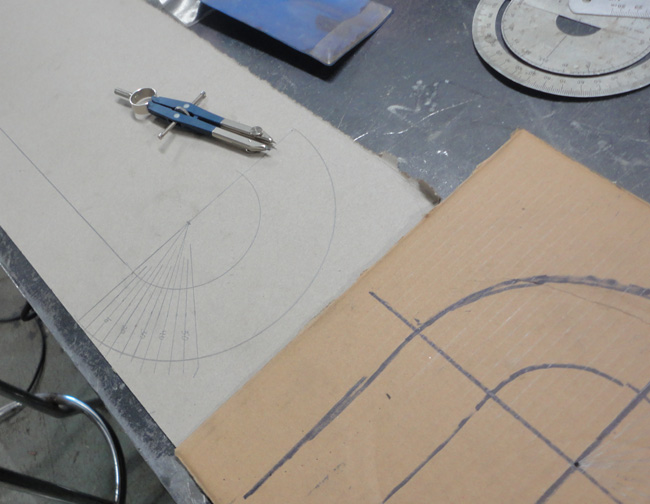

So once I figure out the angle and mark it I cut it in the handy shop made metal jigsaw and tack it in place and move on to the next one.

I also marked the pieces I made as I went along because I figured the left side of the car should be about the same
and I was right.
So front pipe


For the rear pipe I went with the newer (?) style that bends inwards to the main chassis tubes as it passes the rear suspension arms. I know the crude heat bent straight pipes are more period correct but I am not sure how they would work out with my suspension design and they do seem to hang down a lot t. Also they tend to be a bit on the ugly side of the ledger  .
So several bends cut and tack welded later I have a rear exhaust pipe, I then added the mounts, a pair at the front and rear of the muffler, then one on the inside corner of the bend to help with torsion forces and the vertical mount at the rear.


Then I went ahead with the left side and other than a small variation around the pedal box, everything else was a mirror image of the right side, and my markings saved a lot of time.
Then it was time for another classic welding session and reassemble to check the fit.


Everything looks right to me so far, in the future I will blast and paint everything and possibly add the classic chrome tips but perhaps not.
And thats all for now other than I would like to ask the group
What is your favorite High heat paint? In the past I have used VHT and Tremclad ? I have been looking at the POR 15 brand stuff but have never tried it, have you?
Let me know your thoughts.
Cheers,
Hudson
.
__________________
Yes, I know,....... but it's mine you see.....
Perhaps he was always a shyster, but we just chose to over look it for awhile.
You build what you like and I will build what I like...it's all good
You know that guy,
The one in the neighborhood who likes to hang around the garage while you are working and talk about back when he had that killer 1977 Chevy Mustang
Last edited by old willy; 10-10-2023 at 07:48 PM..
|
10-11-2023, 05:02 AM
|
 |
CC Member
|
|
|
Join Date: Aug 2013
Location: Canandaigua,
NY
Cobra Make, Engine: SPF MKII Riverside Racer FIA
Posts: 2,507
|
|
Not Ranked
Hudson,
Nice work! Gas-N from the Boston area came out to make the headers for my race car and the 289 Superformance road cars and built the headers in a similar way as you did. They placed the flange against the block and through trial and error made the pipe bends using various short pieces until they fit. This was going to be their template for future sets so that they could use the pipe bender.
If at some point you have to take the engine out of the car after the body is on, when it comes time to put the engine back in you will have to put the headers in before dropping the engine in, as they will not fit in there afterwards due to the forward strut tubes and interference from the steering assembly and pedal box. On my car you can remove the forward strut tubes and so the only header that has to go in before the engine is the driver's side one due to the steering mechanism and pedal box.
Jim
__________________

|
10-15-2023, 02:46 PM
|
|
CC Member
|
|
|
Join Date: Oct 2017
Location: Baysville,
Ont
Cobra Make, Engine: Mine, small block FORD
Posts: 359
|
|
Not Ranked
Hi Jim,
As always, thank you for you insights on these matters. I have added this to my growing list of things not to forget when reassembling the car. There is certainly going to be an order of operations to be followed. So many things that will suddenly just be inaccessible once something else is installed, I am certain many bad words will be uttered along the way
__________________
Yes, I know,....... but it's mine you see.....
Perhaps he was always a shyster, but we just chose to over look it for awhile.
You build what you like and I will build what I like...it's all good
You know that guy,
The one in the neighborhood who likes to hang around the garage while you are working and talk about back when he had that killer 1977 Chevy Mustang
|
01-07-2024, 08:17 PM
|
|
CC Member
|
|
|
Join Date: Oct 2017
Location: Baysville,
Ont
Cobra Make, Engine: Mine, small block FORD
Posts: 359
|
|
Not Ranked
Happy new year and all that! a quick question too ....
Hello all.
Happy New Year!
Merry Christmas too,
if I did not mention it before.
All is well here in the semi-frozen north, and it time for another update.
I am still working on the roadster when I can, but things just seem to be a bit more stressed as of late, long day at work then when I do get home and things squared away, it seems my ambition to wander out to the shop has already wandered off somewhere else, weekends seem to get filled up with other things as well but when the stars do align things are happening
This time around I wanted to mention my radiator, suffice to say I did a lot of looking around, I know the early cars had a 62 Corvette rad and tank so that was one option, there is also a nice reproduction of the later McCord rad available from CSX parts but me being me I looked for the harder option ")
I read somewhere the Corvette rad is about 17 x 22 inches, I could not find a size on the later rads but knew they were made to fit in the same hole. I did not really want to go with a Corvette rad as I want to use the cast heater switch elbow and the vette rad has a very unique angled lower outlet that I felt would not line up very well.
I did consider modifying one but was not sure how it would go. In my looking around for another suitable donor hoping for something old school with brass tanks I could modify, I discovered a company called Northern Radiator, they sell blank aluminum radiator kits.
I am not the best aluminum welder but I can do it so I ordered what was listed as a 22 x 16 inch rad kit. I went through one of their distributors here in Canada called Truck Parts superstore ( no problems to deal with) and received the pre welded and pressure tested basic radiator unit plus inlet and outlet fittings, filler neck and drain fitting, all for about $300 Canadian dollars.
I also ordered an extra 1 ¾ elbow for the lower outlet.
I made up the upper and lower mounts from 1/8th aluminum and turned the “pins” from aluminum rod , I made the upper one appear to be hollow to match the pictures I could find.

I attached ( tig welded) them to the upper and lower core supports and tried the fit.
I needed to adjust the upper mount a bit as I am sure this rad is a slight bit shorter but I don’t think it is to noticeable. I slipped in the lower cast elbow that holds the fan switch and started figuring out the angles.

Turns out I needed to modify the elbow I ordered as it could be smaller and less than 90 degrees.
Then I checked the angle and added the upper hose tube.
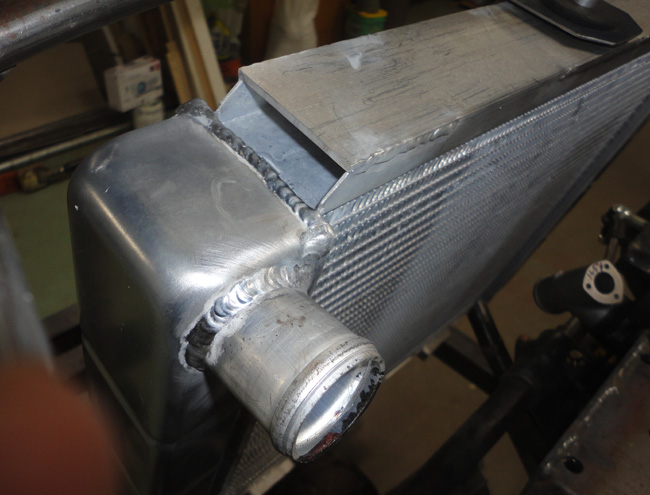
Also , with much fussing and test fitting sorted out the lower hose tube to align as best as I can to the cast elbow.
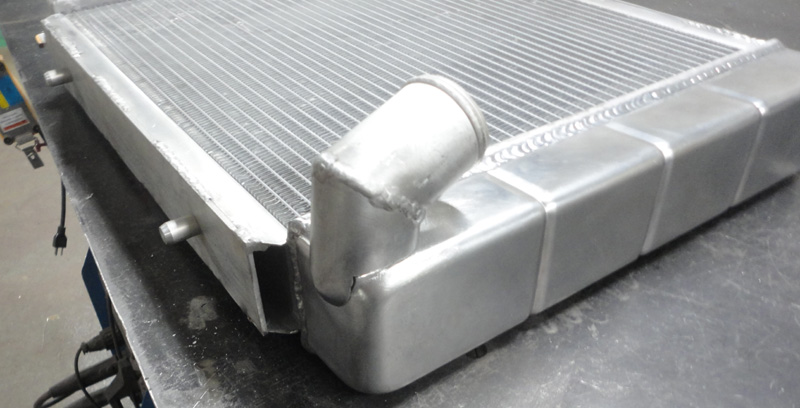
After everything was welded up I plugged the holes and pressure tested the assembly and happily there were no leaks that I could find.
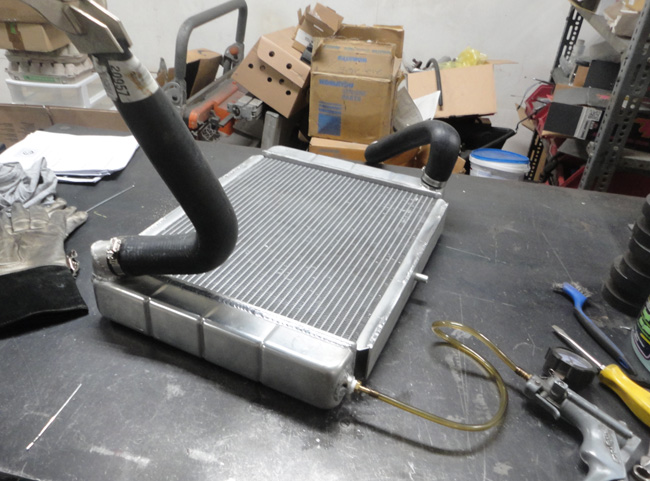
I think the radiator is done for now, However I might change the air bleed from the top of the tank now as I have since changed my mind about a rear mounted puller fan.
From a previous parts order I had the water pump to expansion tank tube, it was not what I wanted as I intend to run a heater so while the welder was set up I decided to try and change that.
I made a tube with a rib and welded it to the existing part and drilled the hole through on the inside, problem solved….. I hope.

I also made a repair to the expansion tank I acquired, the upper bleed hose tube was missing and when I pressure tested it the swaged lower tube was leaking too, so now it’s welded to the tank. But seems I did not take any pictures.
Then while I still had the welder set up I wanted to fix my intake manifold. It’s the classic Edelbrock F4B, apparently a copy or version of the Shelby or Ford label ones.
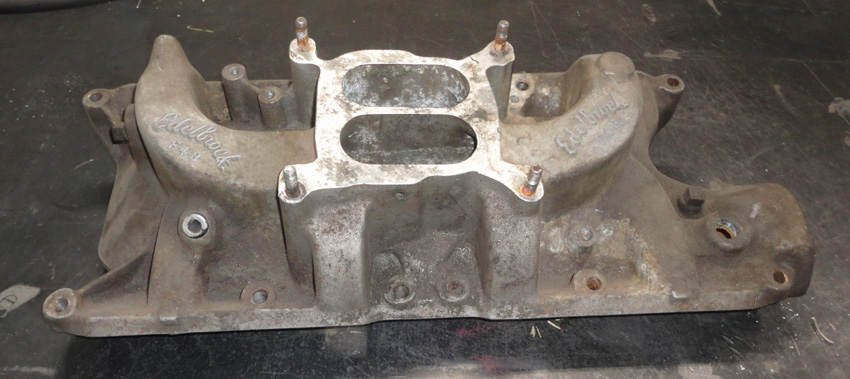
I picked this up a couple of years ago, a “barn find” I guess, it was used and dirty but in fairly solid shape. There was one odd thing however.
On either side of the plenum there is about a 3/16th hole drilled at a slight downward angle clean through making a fairly large vacuum leak. My best guess is somebody had some sort of cheater nitrous system or was planning on a system.
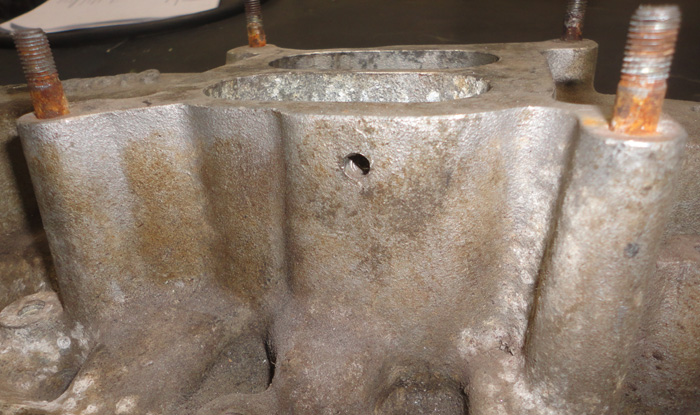
So I quickly cleaned up the spots and made a couple of plug welds.

I linished the area and then gave the whole manifold a sandblast to blend it all in, looks pretty good in the end so I gave the whole thing a satin clear coat and moved on to something else.

So that’s it for now, work continues and I will post again soon my friends.
However if I could ask anyone who might know……
What is the approximate center to center measurement of the soft top bow ferrules? I am talking about across the cockpit, is it about 48 inches? More, less ?
I am currently working on the cockpit area tubing and need a good reference to compare to my body shape. I know things are wonky there and I am trying to correct it as best as I can.
Thanks folks!
Stay warm,
Hudson
.
__________________
Yes, I know,....... but it's mine you see.....
Perhaps he was always a shyster, but we just chose to over look it for awhile.
You build what you like and I will build what I like...it's all good
You know that guy,
The one in the neighborhood who likes to hang around the garage while you are working and talk about back when he had that killer 1977 Chevy Mustang
Last edited by old willy; 01-07-2024 at 08:24 PM..
|
01-08-2024, 05:59 AM
|
|
CC Member
|
|
|
Join Date: Aug 2013
Location: Canandaigua,
NY
Cobra Make, Engine: SPF MKII Riverside Racer FIA
Posts: 2,507
|
|
Not Ranked
Hudson,
Nice work with the radiator! Looks great. $300 Canadian for it, how much is that, about $1.50 US? I think all of us have a hard time staying motivated when the days get short and winter sets it. Keep up the good work.
Jim
__________________
|
01-09-2024, 01:19 AM
|
|
CC Member
|
|
|
Join Date: Jul 2003
Cobra Make, Engine: Unique Motorcars 289 USRRC, 1964 289 stroked to 331, toploader
Posts: 1,135
|
|
Not Ranked
 Nice!
Nice!
Great work on both the rad and F4B! I plan to run an F4B on my temporary engine, until I collect the stamps for the Weber setup on a 289 Hipo. Supposedly it is not much of a performance improvement over the cast iron factory unit, but looks much better!
__________________
Paul
Unique Motorcars 289 USRRC
1964 289 5-bolt block
Toploader and 3.31 rear
|
01-21-2024, 11:51 AM
|
|
CC Member
|
|
|
Join Date: Oct 2017
Location: Baysville,
Ont
Cobra Make, Engine: Mine, small block FORD
Posts: 359
|
|
Not Ranked
Yes I agree, I was not really going for the big performance upgrade, I am really trying to build another time machine So ya, really more about the looks.
I was just going to order a new Edelbrock 2121 but this one was going for super cheap, almost free to a good home, so how could I say no
The only thing I am concerned about is clearance with the hood but my latest mock up would indicate it should be OK, very close but OK.
If it really is an issue I will go with a stock cast one or the new lower profile Edelbrock one. Time will tell.........
Thanks for the encouragement, it's January in Canada and I need it
__________________
Yes, I know,....... but it's mine you see.....
Perhaps he was always a shyster, but we just chose to over look it for awhile.
You build what you like and I will build what I like...it's all good
You know that guy,
The one in the neighborhood who likes to hang around the garage while you are working and talk about back when he had that killer 1977 Chevy Mustang
|
01-29-2024, 10:58 AM
|
|
CC Member
|
|
|
Join Date: Jan 2024
Cobra Make, Engine:
Posts: 63
|
|
Not Ranked
Old Willy you are a MASTER.
I AM VERY IMPRESSED.
And believe me to impress me it has to be something serious.
I am myself a very tallented person according to my car friends and I ve done cars that appeared in pages of magazines but I would not have the courrage a patience to do what your doing with this project.
I'm totally in awe.
Too bad you're a bit far from me because I would visit you to see it.
Would you build a frame for me ? 🤣
|
02-08-2024, 09:06 AM
|
|
CC Member
|
|
|
Join Date: Oct 2017
Location: Baysville,
Ont
Cobra Make, Engine: Mine, small block FORD
Posts: 359
|
|
Not Ranked
Thanks for your kind words, those are the sort of things that help keep me going sometimes.
As for building for anybody else, time will tell.......
I started this project with the intention of it being my last "big one" as I have other interests and my time to do them will run out someday.
I really had not done any of this type of work for a long time, but as I go along I really do enjoy it, sometimes it is just as simple as stepping back and seeing some progress has been made, something exists where it did not before.
My focus for many years has mostly been working to make a home and family but as that daily grind sort of thing looks like it may actually wind down in the foreseeable future There could be room to build for others again.
But seriously, no promises are being made yet.
Again, thank you for your kind words, I will get another post up soon as work keeps progressing but I am always lagging behind with the updates.
.
__________________
Yes, I know,....... but it's mine you see.....
Perhaps he was always a shyster, but we just chose to over look it for awhile.
You build what you like and I will build what I like...it's all good
You know that guy,
The one in the neighborhood who likes to hang around the garage while you are working and talk about back when he had that killer 1977 Chevy Mustang
|
03-21-2024, 05:50 PM
|
|
CC Member
|
|
|
Join Date: Oct 2017
Location: Baysville,
Ont
Cobra Make, Engine: Mine, small block FORD
Posts: 359
|
|
Not Ranked
If at first you don't succeed......
Well hello everybody,
Its been a while again since I threw in an update, so here goes
..
The snow is melting and I am still working away on things, some parts are definitely going better than others but its all part of the fun I guess. 
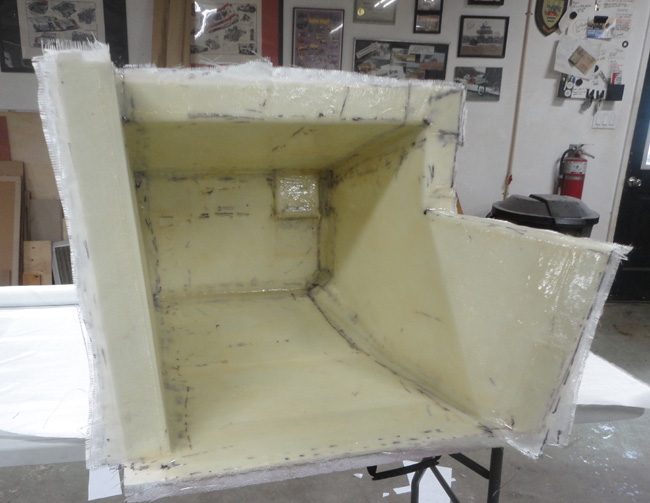
So after all the figuring and reworking on the cowl tube a couple of episodes back I finally got back around to the fiberglass parts I need to make. So I brought out what I previously created and after fixing a couple of dings in my trunk liner mould I waxed it up with some trusty old paste wax.
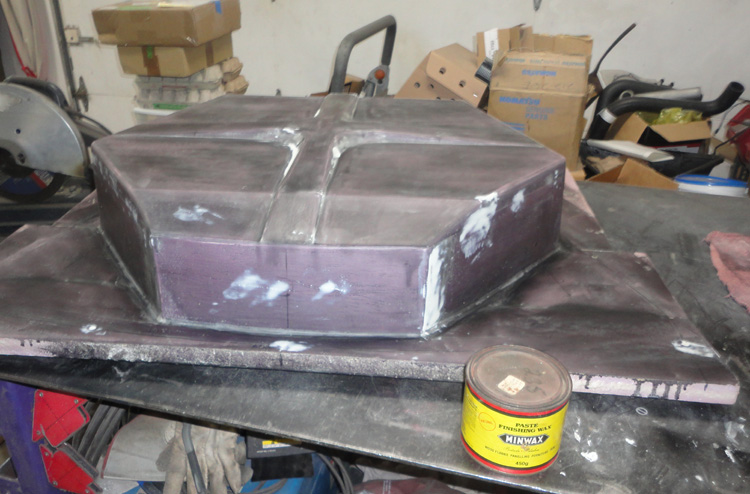
Then I applied a coat of PVA mould release and sprayed the gel coat and let it set up.
The PVA may seem like overkill, the wax should be enough and I did say this was a onetime mould. However I think the PVA also helps with the surface finish too, so long as it lays down nicely with no runs.

Then I layed it up with resin and cloth, adding some extra along the stiffeners. Also the area where the spare tire hold down attaches, I may add a reinforcing plate here too.
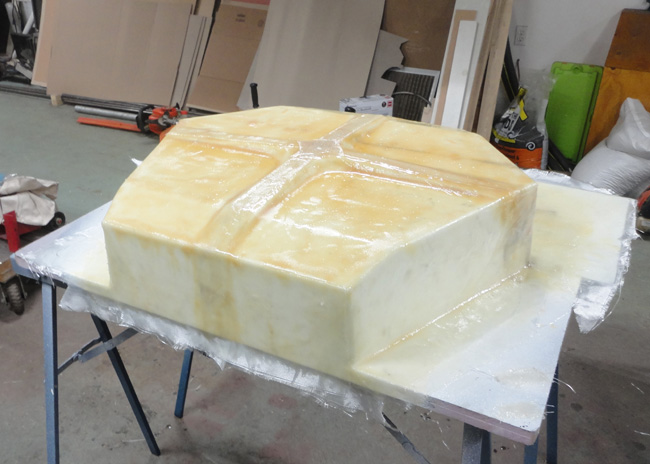
After curing I used a couple of wedges and the air nozzle to loosen it and off it popped!

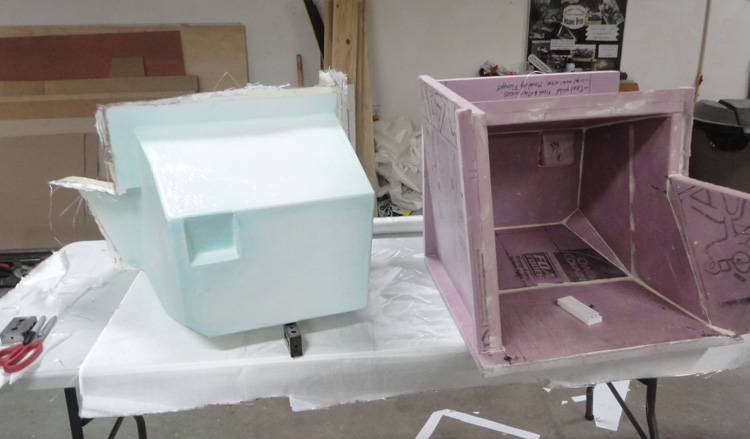
I just had to test the fit with a wheel and tire
..Yep, fits nice.

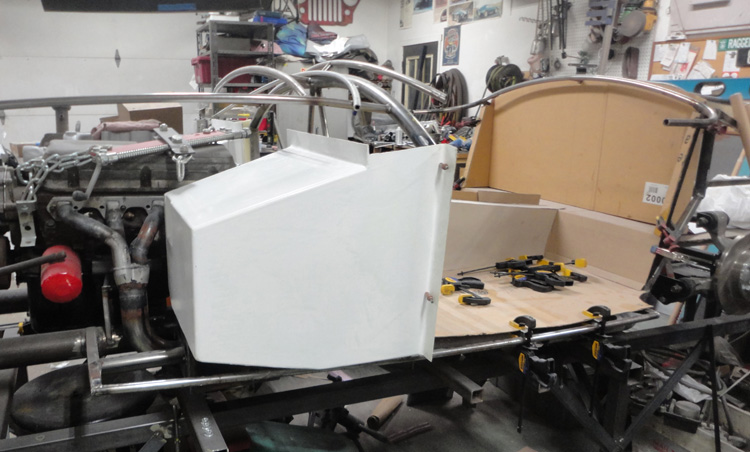
I trimmed it up a bit and set it to the side for now, then on to the foot boxes
.
But first I really need to figure out some of the the interior, so I printed out the pieces for the floor section patterns and started building things up in CAD again.
The sharp eyed among you will notice that I have changed things a bit at the rear of the tunnel. This is because I need to accommodate the MDL offset shifter.
It really only raises it up just over an inch but that means changes at the rear and most importantly at the front where it meets the foot boxes, they need to be a little taller too.
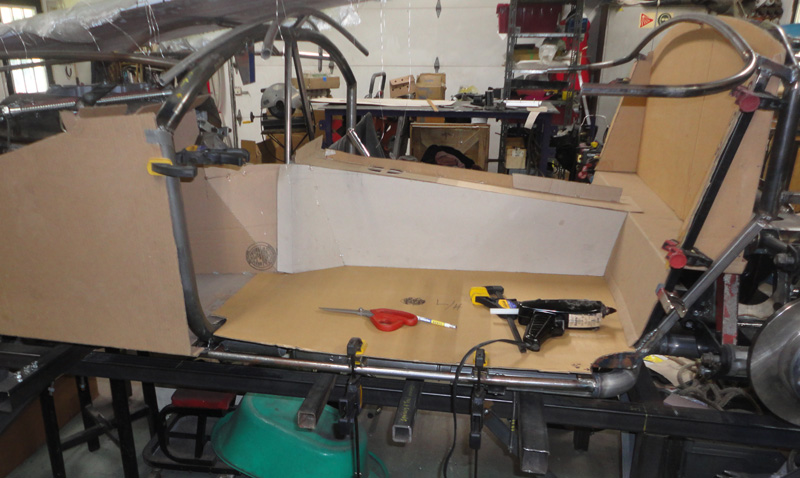
I know I could just stick the shifter straight up like so many others but it is always one of the things I notice first when I see a picture of a 289 interior and I see the shifter is too far back and in the center of the tunnel, I just know its a modern 5 speed. But I really do want the T5 for cruising so this is the compromise I am making.
So after I was happy with the way that looked I got out the foot box moulds and modified / finished them.
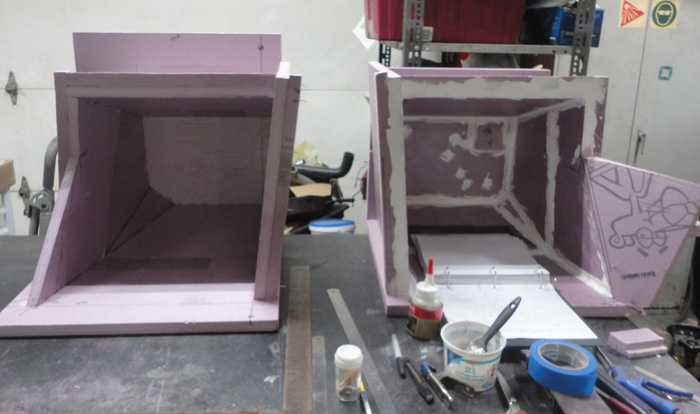
Much filling and sanding later
..
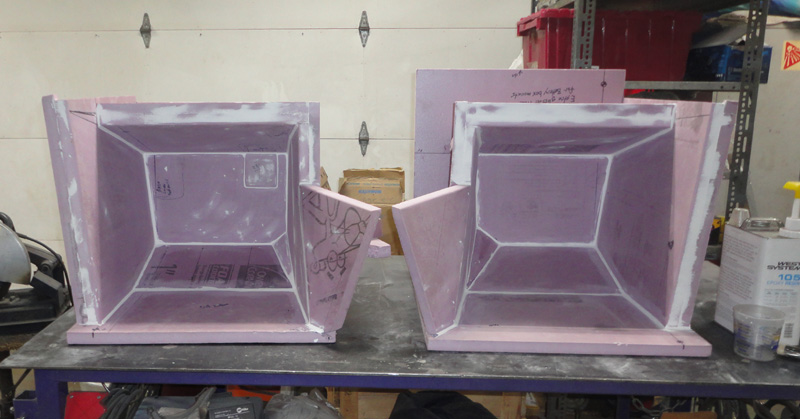
Waxed and a coat of PVA release agent applied
..
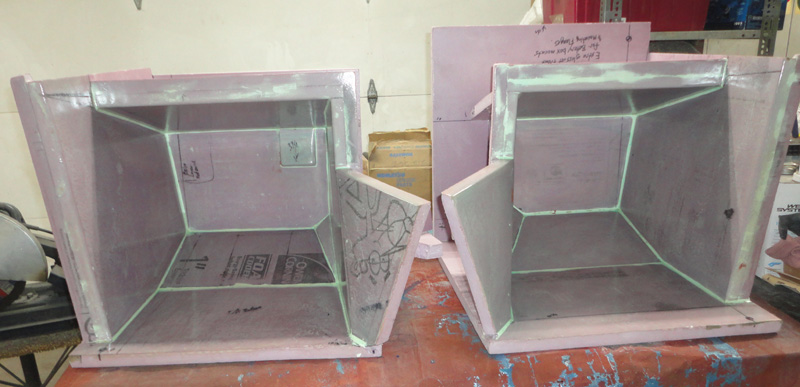
Then gel coat
..
And fiberglass and resin layup
..
And then again, a couple of wedges and a bit of shop air applied and POP!
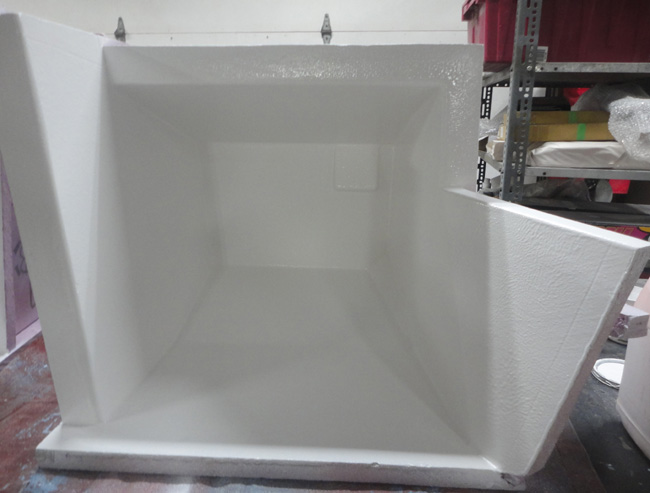
It was very satisfying, both parts came out of the moulds cleanly , The blue green is the PVA and it is meant to come out with the part, it washes off with water, great stuff, always works..
I trimmed the boxes up and checked the fit
..
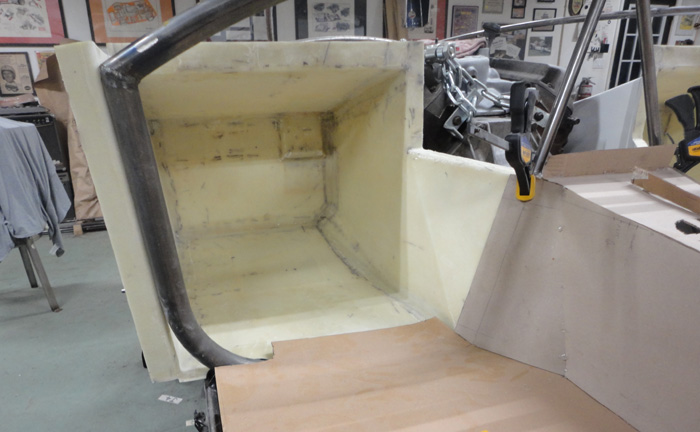

Very nice, I think it looks a lot like the pictures I have seen in books and on line, the only references I have really.
So thats it for now, Yes I have done more but again my posts are lagging behind just not as much.
Next time It will be back to fun metal fabricating and body stuff!
Cheers,
Hudson
.
__________________
Yes, I know,....... but it's mine you see.....
Perhaps he was always a shyster, but we just chose to over look it for awhile.
You build what you like and I will build what I like...it's all good
You know that guy,
The one in the neighborhood who likes to hang around the garage while you are working and talk about back when he had that killer 1977 Chevy Mustang
|
03-25-2024, 12:23 AM
|
|
CC Member
|
|
|
Join Date: Jul 2003
Cobra Make, Engine: Unique Motorcars 289 USRRC, 1964 289 stroked to 331, toploader
Posts: 1,135
|
|
Not Ranked
Wow!
Marvelous! It looks marvelous!
__________________
Paul
Unique Motorcars 289 USRRC
1964 289 5-bolt block
Toploader and 3.31 rear
|
07-22-2024, 09:06 AM
|
|
CC Member
|
|
|
Join Date: Oct 2017
Location: Baysville,
Ont
Cobra Make, Engine: Mine, small block FORD
Posts: 359
|
|
Not Ranked
Work continues ..........
Well hello again,
Another long, overdue update here.
I am still beavering away on the roadster when I can and thought I would take another short time out on the project as it is summer and there are always other things I need/ must attend to.
I will try and keep things a bit more brief, this time too.
So after making the fiberglass parts I did fit up on the spare tyre well and then with some help dropped the body back on to try and get more serious about cutting and fitting things up.

As I said before I knew I needed to make some modifications around the cockpit area so it was time to get at it.
Again I am not really sure of the origins of this body my best guess is it is a Johnex, and that mould was made from an Aurora body ( modified) and the Aurora body mould was created from a mould off an early original 260 car
.or so the story goes.
Its all a bit complicated and I have not had the chance to examine either version to be sure but there are a few telltale signs I can discern from photos. Whatever the case, this is the body I have and it will work, with a bit of help.
So taking a cue from the drawing notes I created and added the door hinge mounts and straightened things out from there.
A new cowl tube was formed and the cowl area cut to clear the tube. I will reform the fiberglass in this area to match the tube for a more pleasing / correct shape than the body had before.

I then cut the rear area and tried moving it forward to more match the dimensions given in the drawings. In the end I think I will do the same as the front and form the new glass over the tube, but thats a bit later. For now the cut piece was needed to help understand where the door opening needed to be.

So it I needed to start connecting the points together. The upper corners are quite tight and I did try to bend these without help but I knew that the thin wall ¾ tube would not allow that small a radius empty. So first I tried some sand but still no luck, I just cant pack it tight enough so I needed some Cerrobend or woods metal something I learned abut way back when I was an apprentice. I finally located some from an alloy supply outfit on the west coast, too bad about the distance because its heavy stuff to ship but it really makes all the difference for this kind of thing.

The tube on the left is the sand filled one and the one on the right is the cerrobend filled one otherwise the exact same bender was used.
Really quite amazing stuff
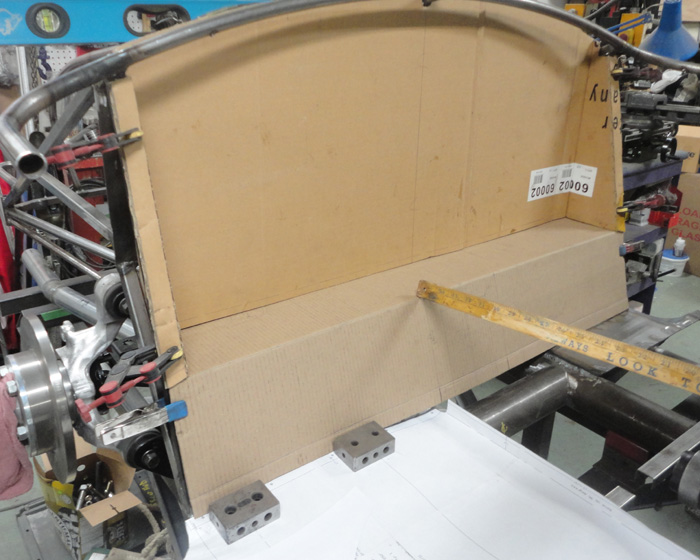
I fit up the windshield to its brackets ( no holes drilled yet ) and did a mock up of the soft top and offered up the side curtains I have to better determined what I needed to do about the door openings.


I am not 100 percent on the windshield rake right now but I do know what the door opening should be as taken from an original car and when I apply that figure to mine the side curtain lines up nicely so it was time to cut.
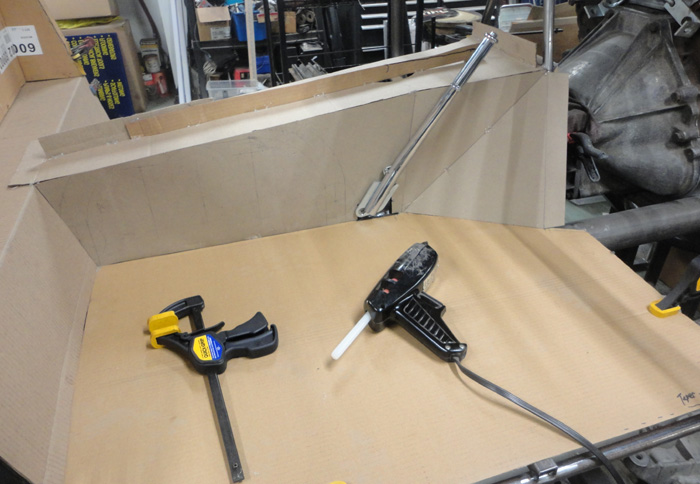
I just needed to ease things forward and wanted to keep the shape so a nice long cut and a series of relief cuts allowed me to move the rear edge forward a bit and keep a nice gentle curve.


Then I filled in the resulting gaps with some new fiberglass and rechecked things, its a bit crude at the moment but once things are properly framed I can grind out most of this and lay in some better glass work.

So being happy with the result for now I smoothed things out a bit, removed and boxed up the windscreen and top parts and decided it was time to figure out the doors.
OH BOY!
Stay tuned my friends.
Hudson
.
__________________
Yes, I know,....... but it's mine you see.....
Perhaps he was always a shyster, but we just chose to over look it for awhile.
You build what you like and I will build what I like...it's all good
You know that guy,
The one in the neighborhood who likes to hang around the garage while you are working and talk about back when he had that killer 1977 Chevy Mustang
|
07-22-2024, 10:11 AM
|
 |
Senior Club Cobra Member
|
|
|
Join Date: Mar 2005
Location: Manchester,
NH
Cobra Make, Engine: AK1085 (302 Street), HTM111 (427 Comp), CSX2375R (289 Comp) and COB5999 (427 S/C)
Posts: 19,111
|
|
Not Ranked
Awesome job!
|
07-22-2024, 12:10 PM
|
|
CC Member
|
|
|
Join Date: Aug 2013
Location: Canandaigua,
NY
Cobra Make, Engine: SPF MKII Riverside Racer FIA
Posts: 2,507
|
|
Not Ranked
You're getting there Hudson. Once it's all together and registered, you should take it across the border. I know a nice town that you could visit and a winemaker that makes some mighty nice wines.....
__________________
|
07-24-2024, 10:35 PM
|
|
CC Member
|
|
|
Join Date: Jul 2003
Cobra Make, Engine: Unique Motorcars 289 USRRC, 1964 289 stroked to 331, toploader
Posts: 1,135
|
|
Not Ranked
You have grit, Hudson! Nice progress, and looking good!
__________________
Paul
Unique Motorcars 289 USRRC
1964 289 5-bolt block
Toploader and 3.31 rear
|
08-12-2024, 07:53 PM
|
|
CC Member
|
|
|
Join Date: Oct 2017
Location: Baysville,
Ont
Cobra Make, Engine: Mine, small block FORD
Posts: 359
|
|
Not Ranked
Time, time time, see what's become of me........
Hello all,
Thanks so much for your kind words, work continues but for now I thought I would post another quick update.
A bit of a side project really but still needed.
Awhile back I bought a nice looking Smiths clock for the project, while not 100 percent correct it was much closer looking than what I was seeing in the new Smiths range.
The seller said / thought it was working and I didnt really know anything about the inner workings of old Smiths electric dash clocks. I thought, perhaps it would just need a clean and lube and
.

Well it turns out this vintage of Smiths clock is a bit of an orphan. The earlier CE type clocks can be repaired with a new circuit board that some clever fellow is selling to replace a contact point system they had but alas this is the later CTE type and had a strange transistorized pulsing electromagnet type drive that powered a balance wheel set between 2 permanent magnets then driving a cheap plastic clockwork.
From what I read (after the fact ) they were not very robust and mostly just failed in short order. The laminated balance assembly with the magnet windings falls apart and sadly there really is no fix for that.
So it goes without saying that of course my clock did not work and upon inspection the balance was the issue and honestly I would say I was not the first person to have checked so
But you dont know, what you dont know, I guess. Buyer beware? or advice along those lines...
I figured my best answer was to remove the internals and figure out how to mount the dial and hopefully the hands onto a modern quartz movement and try and make it all fit. I am certainly not the first person to think of this, many old wall and mantle clocks get resurrected this way.
There are a lot of dash clock options available so I found one that looked compact enough, was good quality and was reasonably priced too as it was not going to survive this process either way. I have never heard of KUS brand of gauges before and they seem to be marketed to the marine industry.

It is a well-made item and sealed for marine use, this also means it has a remote mounted button for adjusting the time which I think turned out to be a bonus.
So first I took the old Smiths clock apart, all I really needed was the main case, dial, hands, crystal and knobs.

Then I opened the KUS clock and removed its inner workings .

So it is a quartz oscillator type circuit driving a small motor for the hands, the setting is accomplished by somehow driving the motor into hyper speed, whipping the hands around until the time is correct
.cool
I cut some scrap styrene to make spacers to support the new drive unit in relation to the dial and then the correct depth in the case, using the same screws that held the old Smiths guts in place. Trust me this was much easier said than done, but it fits.


I was able to resize the Smiths hands to fit the new shafts too to help keep the original look although the KUS hands would have been somewhat OK too.
I made some cut outs to let the light around the dial as the old smiths one did and then found a fairly small momentary contact switch in my electronics junk collection and was able to make the old setting knob function as the new setting button. The old regulation screw was added for looks but thats all it does now.

So time to test it, I hooked it up to a power supply and let it run for a day.

So happy with that result I gave it a last dusting and closed the case up.


I think in the end it looks pretty good and should be right at home in the dash with the other new Smiths gauges, I guess all their internals have been upgraded over time so why not this one too.
Till next time
..
Hudson
__________________
Yes, I know,....... but it's mine you see.....
Perhaps he was always a shyster, but we just chose to over look it for awhile.
You build what you like and I will build what I like...it's all good
You know that guy,
The one in the neighborhood who likes to hang around the garage while you are working and talk about back when he had that killer 1977 Chevy Mustang
Last edited by old willy; 08-12-2024 at 07:57 PM..
|
08-13-2024, 03:20 AM
|
|
CC Member
|
|
|
Join Date: May 2020
Cobra Make, Engine:
Posts: 93
|
|
Not Ranked
Your work and skill levels are very impressive, sir.
|
08-13-2024, 03:49 AM
|
|
CC Member
|
|
|
Join Date: Aug 2013
Location: Canandaigua,
NY
Cobra Make, Engine: SPF MKII Riverside Racer FIA
Posts: 2,507
|
|
Not Ranked
Hudson,
Nice work! Maybe you shouldn't cross the border and come visit. I am afraid that some cobra builder over here in the states will Kidnap you and lock you in a garage having you build cobras all day long.
Jim
__________________
|
 Posting Rules
|
You may not post new threads
You may not post replies
You may not post attachments
You may not edit your posts
HTML code is Off
|
|
|
All times are GMT -7. The time now is 10:02 PM.
Links monetized by VigLink
|


 Linear Mode


