 
 Main Menu
|
|
Nevada Classics
|
|
Advertise at CC
|
| S |
M |
T |
W |
T |
F |
S |
| |
1 |
2 |
3 |
4 |
5 |
6 |
| 7 |
8 |
9 |
10 |
11 |
12 |
13 |
| 14 |
15 |
16 |
17 |
18 |
19 |
20 |
| 21 |
22 |
23 |
24 |
25 |
26 |
27 |
| 28 |
29 |
30 |
|
|
|
|
|
|
CC Advertisers
|
|
 12Likes 12Likes

01-16-2014, 02:05 PM
|
|
CC Member

|
|
|
Join Date: Oct 2003
Posts: 4,078
|
|

 Not Ranked
Nothing but a DA will remove that. Take it down to the gelcoat and finish with spatter paint. Do the trunk and doors shells.
Edit: -and how come the driver door was not carpeted?
__________________
Chas.
Last edited by ERA Chas; 01-16-2014 at 03:50 PM..
|
01-16-2014, 02:18 PM
|
 |
CC Member
|
|
|
Join Date: Dec 2011
Location: West Chester,
PA
Cobra Make, Engine: ERA #795 427 S/C completed Jan. '14 - '68 FE 427 side oiler
Posts: 1,064
|
|
Not Ranked
If you're planning on putting the carpet/door pouches back, you only have the top area to deal with. Acetone might cut the glue. It will also soften the paint, but if you're careful, you can get away with it in an area like that. Worth a try before refinishing.
__________________
"Anyone who drives faster than you is a maniac and anyone who drives slower than you is an idiot" - George Carlin
|
01-16-2014, 05:12 PM
|
|
CC Member
|
|
|
Join Date: Sep 2012
Location: Portland,
OR
Cobra Make, Engine: ERA - B2Motorsports Dart 331
Posts: 464
|
|
Not Ranked
A different adhesive was used thru out the car (including the drivers door) which was very easily removed.
I am not going to run any carpet.
chr
|
01-16-2014, 05:13 PM
|
|
CC Member
|
|
|
Join Date: Sep 2012
Location: Portland,
OR
Cobra Make, Engine: ERA - B2Motorsports Dart 331
Posts: 464
|
|
Not Ranked
Kevin - already tried acetone - came to your conclusion. Better for me to to let a pro deal with it.
chr
|
01-16-2014, 05:13 PM
|
|
CC Member
|
|
|
Join Date: Oct 2003
Posts: 4,078
|
|
Not Ranked
Spatter paint-it's no weight.
__________________
Chas.
|
01-16-2014, 05:15 PM
|
 |
CC Member
|
|
|
Join Date: Apr 2009
Location: Little Rock area,
AR
Cobra Make, Engine: ERA Street Roadster #782 with 459 cu in FE KC engine, toploader, 3.31
Posts: 4,533
|
|
Not Ranked
For some reason I can't see the photos but if you need to remove set contact adhesive, get a can of 3M Adhesive Remover and try it. It will soften most adhesives with some soaking. Usually still takes a lot of rubbing to get it off but urethane should be up to it and can be buffed out afterwards.
|
01-16-2014, 05:18 PM
|
|
CC Member
|
|
|
Join Date: Sep 2012
Location: Portland,
OR
Cobra Make, Engine: ERA - B2Motorsports Dart 331
Posts: 464
|
|
Not Ranked
Quote:
Originally Posted by ERA Chas

Spatter paint-it's no weight.
|
Yea I see it - interesting.
Dan - I used the 3M remover on all of the other adhesive - worked like a charm.
This guy - not so much.
chr |
01-16-2014, 08:59 PM
|
|
CC Member
|
|
|
Join Date: Sep 2012
Location: Portland,
OR
Cobra Make, Engine: ERA - B2Motorsports Dart 331
Posts: 464
|
|
Not Ranked

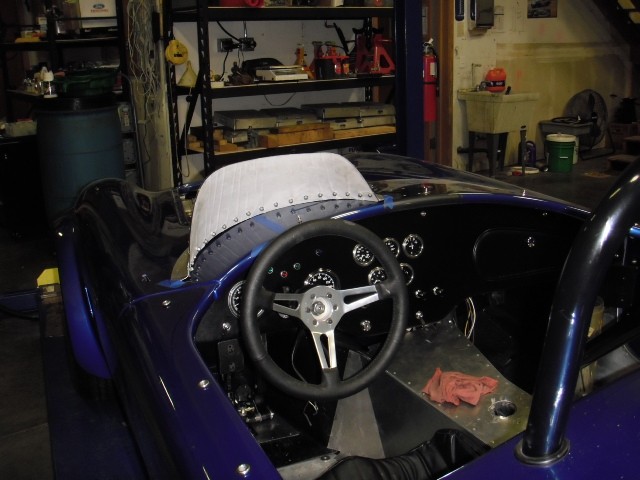
Temporarily refitted the dash and the steering column. The column does have a lot of longitudinal adjustment. I hope there is just a tad more but I had to stop. The seating position with the pedals and wheel are very close to really good.
The steering column is angled up and it would really help if I could lower it. The top of the wheel is above the plane of the coach work which interferes with my vision. I do not want to look at the steering wheel.
Bob probably needs to answer this, but the clamp cross bolts securing the column to the dash bracket are at the bottom of the vertical bracket slots. I would like to extend the slots towards the bottom of the bracket as far as I can.
What I am unsure of is by reducing the vertical angle
1) Would any unwanted stress be expected on the forward footbox where the column passes thru the spherical bearing?
2) Would there be any expected binding in the steering joints in the engine compartment?
ref FIA manual page 101.
Just down the road
Maryhill Road Hill Climb 2012 Aerial Reel on Vimeo
x-chr
Last edited by ERA2076; 01-16-2014 at 09:18 PM..
|
01-17-2014, 03:53 AM
|
|
CC Member
|
|
|
Join Date: Apr 2009
Location: Little Rock area,
AR
Cobra Make, Engine: ERA Street Roadster #782 with 459 cu in FE KC engine, toploader, 3.31
Posts: 4,533
|
|
Not Ranked
The spherical bearing and the u-joint on the engine side of the foot box will take care of any angle changes w/o problem. But I think you might have to modify the brackets on the dash support where the column is secured in order to lower it any further. It's set up to raise with spacers but not to lower further.
It might be possible to fashion a a Z-bracket to bolt to the dash brackets through the upper leg with the other leg down and forward. Then with the clamp positioned a little further forward of it's stock position on the column, it cold be screwed through the lower leg of the Z-bracket to drop the column position down. the upper leg might have to be clearanced a little in the center to clear the column tube. I would have to climb under my dash though to see if there would be any interference with something like this. You might get 3/8 of an inch of drop of so before hitting the bottom of the slot in the dash panel - but that might be as much as 1/2 inch at the wheel. But - you probably do need Bob's take on something like this.

|
01-17-2014, 05:52 AM
|
|
CC Member
|
|
|
Join Date: Nov 2003
Location: New Britain,
CT
Cobra Make, Engine: Size 10 Feet
Posts: 3,031
|
|
Not Ranked
The support bracket was changed in 2006 to shift the mounting holes down and forward for more vertical adjustment. It can be retrofitted. E-mail sent.
|
01-17-2014, 06:14 AM
|
|
CC Member
|
|
|
Join Date: Sep 2012
Location: Portland,
OR
Cobra Make, Engine: ERA - B2Motorsports Dart 331
Posts: 464
|
|
Not Ranked
Quote:
Originally Posted by DanEC
The spherical bearing and the u-joint on the engine side of the foot box will take care of any angle changes w/o problem. But I think you might have to modify the brackets on the dash support where the column is secured in order to lower it any further. It's set up to raise with spacers but not to lower further.
It might be possible to fashion a a Z-bracket to bolt to the dash brackets through the upper leg with the other leg down and forward. Then with the clamp positioned a little further forward of it's stock position on the column, it cold be screwed through the lower leg of the Z-bracket to drop the column position down. the upper leg might have to be clearanced a little in the center to clear the column tube. I would have to climb under my dash though to see if there would be any interference with something like this. You might get 3/8 of an inch of drop of so before hitting the bottom of the slot in the dash panel - but that might be as much as 1/2 inch at the wheel. But - you probably do need Bob's take on something like this.
|
Savvy play 
x
|
01-17-2014, 06:16 AM
|
|
CC Member
|
|
|
Join Date: Sep 2012
Location: Portland,
OR
Cobra Make, Engine: ERA - B2Motorsports Dart 331
Posts: 464
|
|
Not Ranked
Quote:
Originally Posted by strictlypersonl
The support bracket was changed in 2006 to shift the mounting holes down and forward for more vertical adjustment. It can be retrofitted. E-mail sent.
|
Thanks Bob - I''ll check when I get to the shop. |
01-17-2014, 07:25 AM
|
|
CC Member
|
|
|
Join Date: Apr 2009
Location: Little Rock area,
AR
Cobra Make, Engine: ERA Street Roadster #782 with 459 cu in FE KC engine, toploader, 3.31
Posts: 4,533
|
|
Not Ranked
I was just under the dash of mine working on my charging problem - what I discussed above should work if Bob's solution doesn't fully meet your needs. I think the only negative drawback is that the further from that dash support that you position the wheel, the less rigidly mounted the steering column is going to feel. My column is down as low as it can go (#782) and there is plenty of slot left in the dash panel to go lower if you do so.
|
01-17-2014, 09:49 AM
|
|
CC Member
|
|
|
Join Date: Sep 2012
Location: Portland,
OR
Cobra Make, Engine: ERA - B2Motorsports Dart 331
Posts: 464
|
|
Not Ranked
Thanks Dan - we are looking at reinforcing the steering in at least 2 places.
1) directly to the bottom of the horizontal cowl support
2) between the two steering joints
I hear you though, it still leaves a long moment out to the wheel
chr
|
01-17-2014, 12:43 PM
|
|
CC Member
|
|
|
Join Date: Oct 2003
Posts: 4,078
|
|
Not Ranked
Cliff, what diameter wheel will you use? I ran a 13" Momo for a couple of seasons and liked it. Really quickens the feel of the ratio although you don't want it too sensitive to input.
__________________
Chas.
|
01-17-2014, 02:29 PM
|
|
CC Member
|
|
|
Join Date: Sep 2012
Location: Portland,
OR
Cobra Make, Engine: ERA - B2Motorsports Dart 331
Posts: 464
|
|
Not Ranked
Perfect timing - I have a 14 in there now. I have tried to find a 2 turn rack but have been unsuccessful. I spoke to Howe about a circle Track quickener but they were cold (would leave us 1.3 lock to lock and stiff as hell).
I like the idea of quicker ratio, but am unsure of stiffness with the 13. I have a 13 Momo in the SVT maybe I will take a look at that.
Seems my bracket is already the latest design so hack it is. I pulled the clamp blocks out of bracket and let it go as low as it can. It is so close to perfect I can taste it, but still needs to go lower so we are going to pull the dash and fab as needed. We are fitting the comp screen. The fit is really coming along.
We are very close to the feel of the seating, pedals, and wheel in the SVT except the Kirkey tilted at max is whole step beyond. I let several of our young guy's try it as they are very near my size - wet!
|
01-17-2014, 03:25 PM
|
|
CC Member
|
|
|
Join Date: Nov 2003
Location: New Britain,
CT
Cobra Make, Engine: Size 10 Feet
Posts: 3,031
|
|
Not Ranked
Are you sure you've got the later bracket?
 |
01-17-2014, 04:22 PM
|
|
CC Member
|
|
|
Join Date: Sep 2012
Location: Portland,
OR
Cobra Make, Engine: ERA - B2Motorsports Dart 331
Posts: 464
|
|
Not Ranked
Great drawing - confirms we have latest design.
x-chr
|
01-18-2014, 03:27 PM
|
|
CC Member
|
|
|
Join Date: Sep 2012
Location: Portland,
OR
Cobra Make, Engine: ERA - B2Motorsports Dart 331
Posts: 464
|
|
Not Ranked
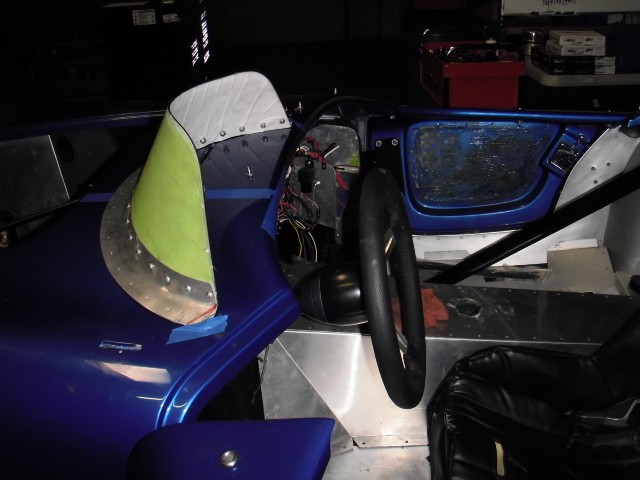
We got the bracket out of the car. Bob your mem serves you well - we do not have the latest design.
We cut to the line and extended the slots
Stock - before cut lowered as far as we could.
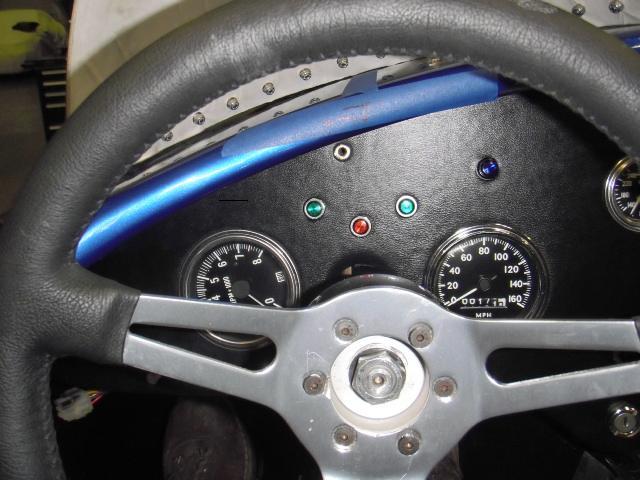
Side note - Please take a look at the gauges. I like the street dash and want to keep it because I will leave enough controls to keep it streetable but we are building more in the club racer space than trying to replicate a Shelby works car. , but the street is kind of a secondary effort. I am seriously considering moving the indicators to the dropped section of dash and using toggles. I would place the appropriate indicator over the appropriate toggle in the dropped section. The blinkers would also operate with a toggle and a single green indicator just to let one know they were flashing.
The reason I want to do this is 1
1) the indicators have nothing to do with driving fast
2) I could use that real estate to raise the speed and tach though I would reverse their positions. As I look at the picture I think I will just stuff the tach in that area and leave the speed where it is.
If one were to to try this how would they go about modifying to raise the gages i.e re-glass & re-cut - or ?
After cut - we still have all the upwards travel but as I said before we are going to hard mount to bottom of cowl support once we have the height established so it won't be quite as easy to adjust as delivered from ERA.
A few pics of Nicks comp screen. I have a mid 30 something that runs our manual machine shop. He has a lot of fab experience, has paid some serious dues to get some really good old school techiniques, and teaches me lots. Some guy's are just born to do it.
Fully tape the bottom of the cowl flange
Locate the center of the arc and mark on flange
Use pair of calipers to locate and scribe the circumferential centers of the flanges
A a pair of dividers to scribe the hole locations on the flange centers
Dimple at each location using a punch
Start at the middle drilling two holes at a time on either side of center.
Add bolts to the two holes and snug down
Drill next two holes
Repeat as necessary til we get to end.
When we were done the plexi is lined up with the flange ends.
Very nice Nick - thanks.

We taped a piece of blue tape on the cowl that is axially aligned with the steering column then placed the center line marked on the screen flange with the center of the tape.
We can not install to cowl until column has been final located, but it all fits together so we need to be able to move all the pieces together.
If anyone has ideas on the dash change, please share.
x-chr
|
01-18-2014, 04:30 PM
|
|
CC Member
|
|
|
Join Date: Oct 2003
Posts: 4,078
|
|
Not Ranked
Not any different dash idea but an old tip I just shared with DanEC; while you got it all hangin' down, paint the underdash and cowl area flat white. Big help when working with droplight on wiring or gauges with dash in place. Reflects light without glare.
__________________
Chas.
|
 Posting Rules
|
You may not post new threads
You may not post replies
You may not post attachments
You may not edit your posts
HTML code is Off
|
|
|
All times are GMT -7. The time now is 10:07 AM.
Links monetized by VigLink
|


 Linear Mode


