 
 Main Menu
|
|
Nevada Classics
|
|
Advertise at CC
|
|
May 2026
|
| S |
M |
T |
W |
T |
F |
S |
| |
|
|
|
|
1 |
2 |
| 3 |
4 |
5 |
6 |
7 |
8 |
9 |
| 10 |
11 |
12 |
13 |
14 |
15 |
16 |
| 17 |
18 |
19 |
20 |
21 |
22 |
23 |
| 24 |
25 |
26 |
27 |
28 |
29 |
30 |
| 31 |
|
|
|
|
|
|
|
|
CC Advertisers
|
|

04-24-2013, 08:50 PM
|
|
CC Member

|
|
|
Join Date: Aug 2012
Location: Grand Rapids, MI,
MI
Cobra Make, Engine: StreetBeasts, 331 Stroker
Posts: 149
|
|

 Not Ranked
 Paint Prep - Sanding
HI Guys!
Very excited to be working toward a mid summer completion with the cobra. I'm wondering if I could get some feedback from some members or professionals with paint experience.
I have a streetbeast kit - which means the fiberglass is very structural, heavey, and thick - and the gelcoat finish is very, well, ... lets just say inconsistent.
I'm starting to do the initial prep sanding. This will be followed by a Dupont system epoxy sealer, several coats of build primer as needed, another seal epoxy, color then clear.
My principal question is should I be sanding with a DA or with sanding blocks? I prefer the DA because it's quicker and a bit less labour intensive, however I'm concerned to over use the DA because they have some tendencies to make small waves larger and small low spots deeper. (using a 6" disk)
Is it OK to use a DA and only touch sand with blocks? I purchased a set of Durablocks just in case in order to use the large long blocks, however the car is so full of curves it's sometimes difficult to see how these will be helpful.
Anyhow, any replies and advice well accepted. Thanks!

|
04-24-2013, 09:07 PM
|
 |
CC Member
|
|
|
Join Date: Oct 2003
Location: Golden Isles,
GA
Cobra Make, Engine: Butler Cobra. 350 Chevy Engine, blueprinted, heads cc'd, ported, polished, manifolds matched, big valves, 1.6 roller rockers, TB Injected, mild cam, MSD crank trigger electronic ignition. TKO-600 transmission. XKE Jaguar rear. IFS by Fast Cars
Posts: 558
|
|
Not Ranked
I would guess that you could do some sanding with the DA. If you are an exponent with powered sanders you may be able to sculpt the body to eliminate some imperfections. If you're not an expert users you could end up an even bigger problem.
For perfection you'd have to use various boards and perhaps some custom shape sanding blocks too. It's a small car and withe the right grit papers and some elbow-grease you have it licked in a reasonable amount of time.
Don't forget the guide coat to expose the low areas.
Good luck, Arthur
|
04-25-2013, 12:42 PM
|
|
CC Member
|
|
|
Join Date: Feb 2012
Location: Harrison,
TN
Cobra Make, Engine: Scratch-built 427 MR
Posts: 58
|
|
Not Ranked
Redeye- There's a reason people pay $10-15k to have their cars painted. MOST of the money is spent on bodywork. But you can do it. I've been doing bodywork ( as a hobbyist) since '67 and my current car took me 4 months to get right- and the body was better than most when I started. Clean the car with lacquer thinner at least 4 times. Use 120 grit on the DA just to break the glaze then lay on a coat of high build primer like Feather fill G2. Use the long block to get a feel for the amount of work needed. Harbor Freight has a nice 17" block for about $20, and it is very flexible and will follow the curves better than a stiffer one. Expect to use a gallon or 2 of filler, and a couple gallons of the high build primer. Remember- you can't beat out dents and high places in fiberglass- you must grind or fill them .I hope this isn't a discouraging post, but expect to spend a LOT of time on bodywork- It will be the most rewarding part of the build. Remember-you CAN do it. Good luck, Bill
|
04-25-2013, 05:33 PM
|
|
CC Member
|
|
|
Join Date: Aug 2012
Location: Grand Rapids, MI,
MI
Cobra Make, Engine: StreetBeasts, 331 Stroker
Posts: 149
|
|
Not Ranked
Quote:
Originally Posted by bill37341

Redeye- There's a reason people pay $10-15k to have their cars painted. MOST of the money is spent on bodywork. But you can do it. I've been doing bodywork ( as a hobbyist) since '67 and my current car took me 4 months to get right- and the body was better than most when I started. Clean the car with lacquer thinner at least 4 times. Use 120 grit on the DA just to break the glaze then lay on a coat of high build primer like Feather fill G2. Use the long block to get a feel for the amount of work needed. Harbor Freight has a nice 17" block for about $20, and it is very flexible and will follow the curves better than a stiffer one. Expect to use a gallon or 2 of filler, and a couple gallons of the high build primer. Remember- you can't beat out dents and high places in fiberglass- you must grind or fill them .I hope this isn't a discouraging post, but expect to spend a LOT of time on bodywork- It will be the most rewarding part of the build. Remember-you CAN do it. Good luck, Bill
|
Hi Bill, et all,
Thank you for the direction and words of encouragement. I think the main idea I'm gathering is to NOT over use the DA or else risk major problems... right?
Thanks guys!
|
04-25-2013, 08:03 PM
|
 |
CC Member
|
|
|
Join Date: Sep 2009
Location: Dallas,
tx
Cobra Make, Engine: FFR track car, SL-C track car
Posts: 1,262
|
|
Not Ranked
Quote:
Originally Posted by RedEye
Hi Bill, et all,
Thank you for the direction and words of encouragement. I think the main idea I'm gathering is to NOT over use the DA or else risk major problems... right?
Thanks guys!
|
I'd go easy on the DA for sure, especially on the curvy areas. And almost everything is a curvy area.
Most guys recommend washing the body with something to remove the mold release agents, like a good wax remover or even Comet cleaner before you start to sand.
Whatever high build primer you decide on, read the spec sheet to see what grit sanding they recommend prior to spraying that on.
Like bill said, the high build primer is where you are going to succeed or fail on the finished look. That's where you will do your main block sanding to get the smooth base to lay color on. I used Slick Sand and thought it worked really well. It builds up well and sands easily.
I highly recommend the 3M dry guidecoat when you are block sanding your high build primer. It really helps you see the high and low spots.
You will need lots of different shapes and sizes of sanding blocks to get in all the valleys, nooks and crannies. I used a set like this
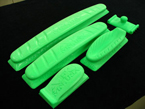
plus things like a rolled up magazine and other odd shapes.
I had to apply 4 different coats of the high build primer and turned most of it into expensive driveway dust. But it came out pretty good in the end. Just take your time and don't rush the prep work.
|
04-26-2013, 03:49 AM
|
|
CC Member
|
|
|
Join Date: Oct 2006
Location: tauranga,
tga
Cobra Make, Engine: southern roadcraft (UK) 350 edelbrock performer rpm
Posts: 17
|
|
Not Ranked
Hi there I have been a car painter for 30 years an unfortunately there is no substitute for hard work, you should steer well clear of the DA sander as they are designed for flat surfaces and that rules out your cobra. You will just create lots of lows in the surface as it runs so fast , you need to take your time .Use a selection of rubbing down blocks and start with 180 grit when rubbing down the epoxy spray filler (do not use water when rubbing this down you must use dry sanding paper) then 240 grit to finish. When finished spray your primer filler on (3 or 4 coats)and rub that with 320 .Apply further coats of primer filler and block that down with 800 grit. Always use a guide coat on the surface before starting to rub down, the best stuff to use is 3M Guide coat powder, its easy to use and can be easily applied .You are now ready for base coat and clearcoat.
|
04-26-2013, 07:42 AM
|
|
CC Member
|
|
|
Join Date: Aug 2012
Location: Grand Rapids, MI,
MI
Cobra Make, Engine: StreetBeasts, 331 Stroker
Posts: 149
|
|
Not Ranked
Thanks everyone. I really appreciate it.
Plan is to use PPG epoxy sealer - build primer (3-4X) - PPG epoxy sealer, and then base and clear. Going to start prepping for the epoxy this weekend, I'll get some photos posted once along. Planing to do a nice Blue/Red/White FIA variant.
|
04-26-2013, 07:50 AM
|
|
CC Member
|
|
|
Join Date: Sep 2009
Location: Dallas,
tx
Cobra Make, Engine: FFR track car, SL-C track car
Posts: 1,262
|
|
Not Ranked
Quote:
Originally Posted by RedEye
Thanks everyone. I really appreciate it.
Plan is to use PPG epoxy sealer - build primer (3-4X) - PPG epoxy sealer, and then base and clear. Going to start prepping for the epoxy this weekend, I'll get some photos posted once along. Planing to do a nice Blue/Red/White FIA variant.
|
If you use Slick Sand you do not need the sealer under it. (if the surface is properly prepared.)
http://evercoat.com/imgs/pis/SLICKSANDPIS.pdf |
04-26-2013, 10:53 AM
|
|
CC Member
|
|
|
Join Date: Mar 2012
Location: DC,
MD
Cobra Make, Engine: Everett Morrison
Posts: 90
|
|
Not Ranked
Here you go " the other guys had great advice also
Here some advice from my experiences through the years .
#1 buy real material glasurit high build is the best period 285-81
Block car by hand Follow these steps
Block Block. Block. Block. Block. Block. Block block
Block. Block. Keep blocking. Block block. Block .
Take car outside and let the weather beat the snot out if it for a week. grab da sander to sand off the calicoes on your hands , put da sander away
Return to step one. Now by this time you are so sick of blocking you want to torch the car
Because you are now realizing what it takes to create the finish people drool over.
Okay your half way done . Call or hire body real body guy. Pay him for his time to
Feel your car and make comments . Drink yourself silly because real body guy just found
200 imperfections .
At this phase of the project wife and family even friends are starting to question your sanity.if your friends are coming over to see your progress but always show up in clean nice clothes and good shoes on , well that's a pretty good sign they are placing bets on your sanity and the quality of the finished vehicle . If they bring beer also that is a guarantee you are being used for there entertainment and possible financial gain.
Now when your wife aks you why she finds you having 2+ hour conversations with a chunk of fiberglass simply say" baby at this point I will do anything to finish this car and it seems to like when I talk to it and it loves to listen to AC/DC while we spend our days nights and weekends together. Perhaps you coud book that vacation you always wanted you and your mom to go on. This will allow at least another 60 hours of quality time blocking.
Also important If you have chosen a name for your car based on a past or present crush this would not be the time to share this information.
but get ready It's a sad day when your standing there going ,this will be the straightest sickest car ever, and real old schooler body man 20 plus years in the biz feels your car top to bottom and enlightens you to how much you still have left to do.
At this point it's best to start imagining color sanding and polishing " ohhh wait that sucks also
It's kinda like step one but you get to make the entire garage a beyond complete mess.
Better to start dreaming of cruising . A good indicator that you moving forward is the weight you loose and muscle mass in the upper body you build.
Best of luck to you I'm sure it will come out great .
|
04-26-2013, 11:40 AM
|
|
CC Member
|
|
|
Join Date: Sep 2009
Location: Dallas,
tx
Cobra Make, Engine: FFR track car, SL-C track car
Posts: 1,262
|
|
Not Ranked
Quote:
Originally Posted by avdcav
Block car by hand Follow these steps
Block Block. Block. Block. Block. Block. Block block
Block. Block. Keep blocking. Block block. Block .
|
You left out a few. That's a good start, but it won't be enough.
Oh wait... I just saw this: 
Quote:
Okay your half way done . Call or hire body real body guy. Pay him for his time to feel your car and make comments .
Drink yourself silly because real body guy just found 200 imperfections .
|
|
04-27-2013, 03:12 PM
|
 |
CC Member
|
|
|
Join Date: Apr 2009
Location: Little Rock area,
AR
Cobra Make, Engine: ERA Street Roadster #782 with 459 cu in FE KC engine, toploader, 3.31
Posts: 4,533
|
|
Not Ranked
I will add to the chorus - no DA sanders. Use sanding blocks and get as many of different length, width and contour as you can justify. I painted this myself and a mechanical sander never touched the body.
 |
04-28-2013, 03:06 AM
|
 |
CC Member
|
|
|
Join Date: Jan 2011
Cobra Make, Engine: AK427 BB Chevy454
Posts: 86
|
|
Not Ranked
Hi Red Eye,
same advice as above-no D/A! I used the 3M dry guide coat-great product, and much quicker than spraying a guide coat; 3M 05861 Dry Guide Coat Cartridge and Applicator Kit - 50 g : Amazon.com : Automotive
Here's mine in the booth using dry guide coat, and end result.
good luck, Mark
__________________
AK427 Chevy 454ci 550BHP smokin! 
|
04-28-2013, 05:32 AM
|
|
CC Member
|
|
|
Join Date: Apr 2009
Location: Little Rock area,
AR
Cobra Make, Engine: ERA Street Roadster #782 with 459 cu in FE KC engine, toploader, 3.31
Posts: 4,533
|
|
Not Ranked
A few other sanding aids to consider: A swimming pool float can be cut to various lengths and works well for sanding inside corners like at the top where the fenders sweep into the main body. I have what I remember to be a 17 inch board sander but for the doors and the front fender sides I wanted something a little longer. I bought the straightest piece of 2x2 by 4 ft poplar at Lowes I could find. I used one of their levels to check it by. I cut it to the length I wanted (about the length of the door) and marked the absolute straightest and flattest side on it for fastening self-adhesive sandpaper to. Using it in a criss-cross fashion really straightened out the sides. A few replica bodies (FFR anyway) do not have flat sides, instead having a gental curve, so they would not need such a long board for sanding. A variety of short pieces of rubber hoses in various sizes work for tight inside corners such as where the fender flares meet the body. For sculpting the rolled cockpit edges I experimented with several self-made contraptions. The one that worked best was to use a whole saw of proper radius to drill a hole in a piece of 2x4 which I then cut in half to end up with a half circle. I used it to both screed my filler on the rolled edge and then I used it to hold SA sandpaper and sand the radius uniform.
|
04-28-2013, 09:14 AM
|
 |
CC Member
|
|
|
Join Date: May 2009
Location: American Fork,
Ut
Cobra Make, Engine: 66 Cobra
Posts: 930
|
|
Not Ranked
Doing bodywork on a fiberglass car is a whole 'nother animal. Don't take advise from those that have not done it. Even if they have years experience with metal cars. It's' all about feel. There is tons of info over on the FFR forum. Everyone has their own process. I started to write the steps here but each step in pretty involved and a summary does not do it justice. Read as much as you can and don't quit until it's right.
Most popular products for fiberglass cars are:
Filler- Evercoat Rage Gold
Heavy build primer-Evercoat FeatherFill G2 or Evercoat SlickSand.
You will need a primer gun with a bigger tip to spray these, 2.0-2.5. Only mix what you can spray in the times given or they set up in your gun. You can get bigger tip guns at TCP Global for cheap. Priming with a high build primer is part of the bodywork process on a fiberglass car. These are polyester; the same as most fiberglass resin.
If you want to talk detail send me an email and we can talk on the phone.
__________________
Wayne
"Everything is alive. If you get angry at a vehicle or the trans, it won't fix until you apologize and say you are sorry." "The vehicle always knows what it is doing and what the cause of it's bad feeling is. If you ask it humbly what the problem is, it will tell you. Then you and it will both be happy."
Gil Younger
|
04-28-2013, 10:36 AM
|
|
CC Member
|
|
|
Join Date: Jul 2003
Cobra Make, Engine: Unique Motorcars 289 USRRC, 1964 289 stroked to 331, toploader
Posts: 1,144
|
|
Not Ranked
 Eggshells!
Also, dont miss an important step with the Streetbeast. They used a chopper gun to lay up that body, and they typically didn't do a very good job  . They did not roll it out. Any, and I repeat any, of the tight/sharp corners on the body may not have anything substantial behind them. I suppose the flat areas could have issues, too, but it's less likely. Basically, what happens is the gelcoat gets sprayed on and forms an eggshell-like layer. When they spray the glass/resin mix (high resin content), small cavities form behind the gelcoatwith no resin or glass behind it. This leaves a brittle shell that can fracture easily when bumped... and some are not small at all.
My brother has had two of their Speedster kits, and this was a serious problem on both. You need to go around the whole body with a sharp hammer to find and fill these imperfections before they show up in the freshly finished body. It is scary work  ! Door edges and casings, as well as fender-flairs and lights are notorious problem areas.
Hopefully, yours isn't too bad... good luck!
__________________
Paul
Unique Motorcars 289 USRRC
1964 289 5-bolt block
Toploader and 3.31 rear
|
04-29-2013, 12:41 AM
|
|
CC Member
|
|
|
Join Date: Jan 2011
Cobra Make, Engine: AK427 BB Chevy454
Posts: 86
|
|
Not Ranked
Here's a tip on getting the bodywork round around front light.
I made a round disc out of laminate, and clamped it on.
Mark
__________________
AK427 Chevy 454ci 550BHP smokin!
|
05-02-2013, 07:56 AM
|
|
CC Member
|
|
|
Join Date: Mar 2012
Location: DC,
MD
Cobra Make, Engine: Everett Morrison
Posts: 90
|
|
Not Ranked
That's a good idea " clever
|
 Posting Rules
|
You may not post new threads
You may not post replies
You may not post attachments
You may not edit your posts
HTML code is On
|
|
|
All times are GMT -7. The time now is 04:09 PM.
|


 Hybrid Mode

