 
 Main Menu
|
|
Nevada Classics
|
|
Advertise at CC
|
| S |
M |
T |
W |
T |
F |
S |
| |
|
|
|
|
1 |
2 |
| 3 |
4 |
5 |
6 |
7 |
8 |
9 |
| 10 |
11 |
12 |
13 |
14 |
15 |
16 |
| 17 |
18 |
19 |
20 |
21 |
22 |
23 |
| 24 |
25 |
26 |
27 |
28 |
29 |
30 |
| 31 |
|
|
|
|
|
|
|
|
CC Advertisers
|
|
 3Likes 3Likes

05-16-2006, 07:52 PM
|
 |
CC Member

|
|
|
Join Date: Feb 2006
Location: IGH, MN,
mn
Cobra Make, Engine: scratch build self design 4.6l DOHC
Posts: 769
|
|

 Not Ranked
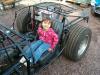
 Fasterpatricks Custom Cobra
Last edited by fasterpatrick; 11-26-2007 at 08:14 PM..
|
05-17-2006, 10:40 AM
|
 |
CC Member
|
|
|
Join Date: Jun 1999
Location: Portsmouth,
OH
Cobra Make, Engine: Undecided, 289
Posts: 200
|
|
Not Ranked
Very Nice!  I'm wondering what spindles you are using up front? I have looked through some of your older post, but didn't see anything mentioned.
Jay Little |
05-17-2006, 02:47 PM
|
|
CC Member
|
|
|
Join Date: Aug 2004
Location: Tarpon Springs,
fl
Cobra Make, Engine: scratch building
Posts: 182
|
|
Not Ranked
 Fasterpatricks Custom Cobra
And the fun begins...tank after tank of argon...and a lot of reading and figuring.....Keep us posted with your progress..
Al
|
05-17-2006, 03:26 PM
|
 |
Senior Club Cobra Member
|
|
|
Join Date: Aug 2004
Location: Near Phila. (Collegeville),
PA
Cobra Make, Engine: CSX2498 has been in our family garage since '68....Scratch built aluminum bodied 427SC Cobra, 427FE, CSX3000 chassis specs, 95% finished, only needs paint.
Posts: 642
|
|
Not Ranked
have fun Pat.
keep posting photos & have fun, Karl
|
05-17-2006, 07:13 PM
|
|
CC Member
|
|
|
Join Date: Feb 2006
Location: IGH, MN,
mn
Cobra Make, Engine: scratch build self design 4.6l DOHC
Posts: 769
|
|
Not Ranked
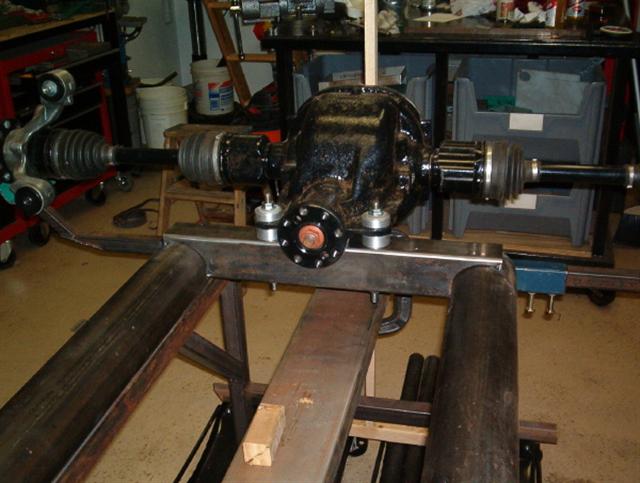
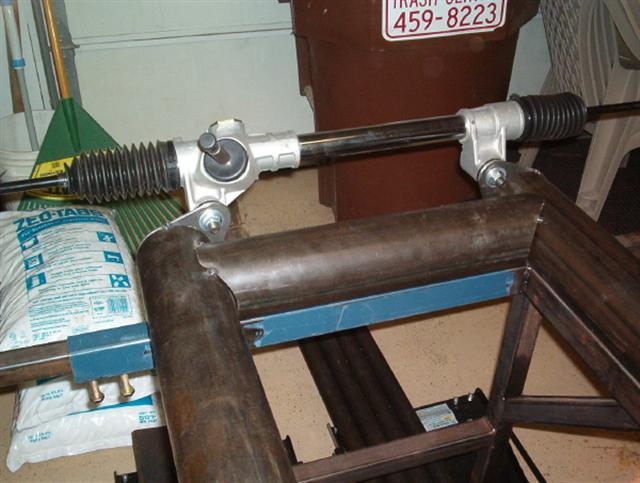
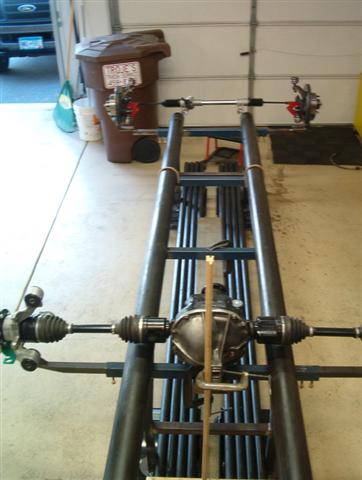
Front end parts are mustang II repo units with 11" rotors and manual rack, All from speedway motors. Got the whole works spindels, rotors, brakes, ball joints, steering rack, tierod ends, and assorted hardware for just over $700. Not a bad deal. It's pretty much what they use for modified stock circle track cars. Pat
|
05-30-2006, 07:38 PM
|
|
CC Member
|
|
|
Join Date: Feb 2006
Location: IGH, MN,
mn
Cobra Make, Engine: scratch build self design 4.6l DOHC
Posts: 769
|
|
Not Ranked
I have a question, which would be better solid aluminum steering rack bushings or should I use delerin(Poly). I will be machining the myself and stock for both. Just a survey question. Pat
|
06-05-2006, 08:29 PM
|
|
CC Member
|
|
|
Join Date: Feb 2006
Location: IGH, MN,
mn
Cobra Make, Engine: scratch build self design 4.6l DOHC
Posts: 769
|
|
Not Ranked
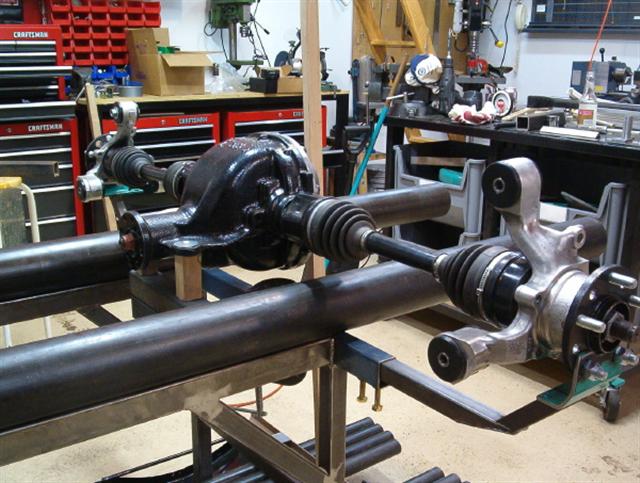
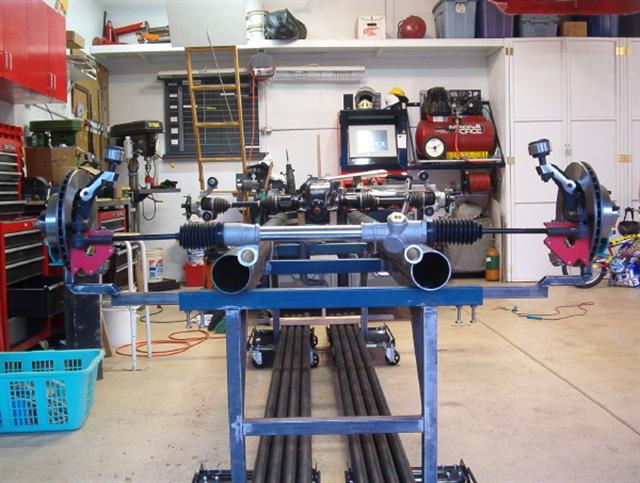
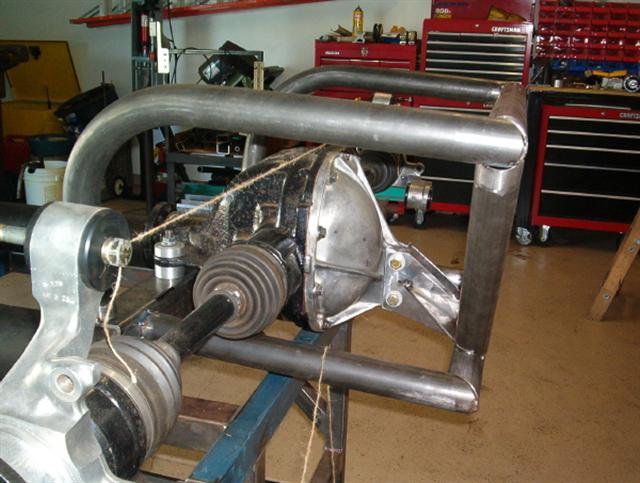
Hey everyone,
Look what happened, while everyones out driving around I'm in the shop working. Just a few photos of what I've been up to  Pat.

Last edited by fasterpatrick; 11-26-2007 at 08:14 PM..
|
06-05-2006, 10:21 PM
|
|
Banned
|
|
|
Join Date: Oct 2003
Location: Yorba Linda,
CA
Cobra Make, Engine: SPF w/392CI stroker
Posts: 3,293
|
|
Not Ranked
You have skills. 
-Dean |
06-09-2006, 06:09 AM
|
|
CC Member
|
|
|
Join Date: Apr 2004
Cobra Make, Engine: Scratch Build
Posts: 15
|
|
Not Ranked
Awesome, Patrick, now I really want to get moving. I love your table, and wish I saw it sooner. I am almost done with mine. It is made of 7 nine foot 6 inch I-beams. It is too much table for my single bay garage.
I will try to finish it this weekend and make my first cut on the 4 inch tubes.
Thanks for the inspiration.
Iggy
|
06-09-2006, 08:23 AM
|
|
CC Member
|
|
|
Join Date: Apr 2004
Cobra Make, Engine: Scratch Build
Posts: 15
|
|
Not Ranked
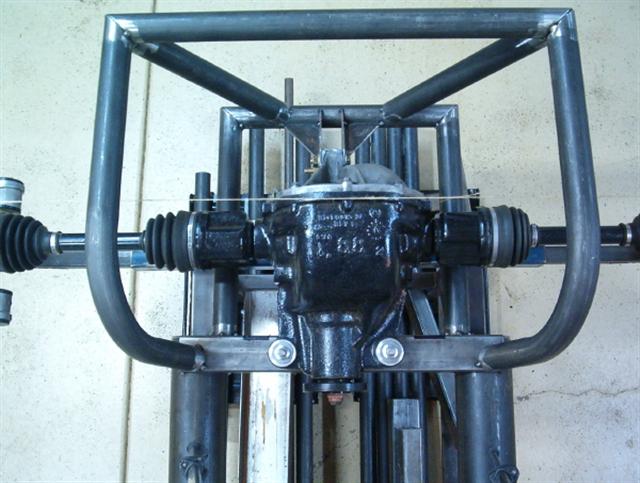
Patrick, this may only add weight, but do you think that it would help to drill out a hole in the front pumkin cross piece where the bolts go and weld in a section of pipe. The pipe would be flush top and bottom, also it would be welded top and bottom. So the cross piece would hold it steady, but never see compression. The bolts would just fit in the pipe. Just thinking that now you could tighten the pumpkin untill the bolts break without any stress on the parts.
I do see that the cross piece is so thick that this might be overkill.
Iggy
|
06-09-2006, 07:47 PM
|
|
CC Member
|
|
|
Join Date: Feb 2006
Location: IGH, MN,
mn
Cobra Make, Engine: scratch build self design 4.6l DOHC
Posts: 769
|
|
Not Ranked
Iggy,
I have done that many times in the past but with lighter stock. this crosmember is 3/16ths thick so yes it would be overkill. Was thinking about making the bottom hole large enough to tuck the bolt up inside the crossmember. That would make for a much cleaner look. Pat
|
06-25-2006, 09:51 PM
|
|
CC Member
|
|
|
Join Date: Feb 2006
Location: IGH, MN,
mn
Cobra Make, Engine: scratch build self design 4.6l DOHC
Posts: 769
|
|
Not Ranked
rear suspension drawings
Hey guys,
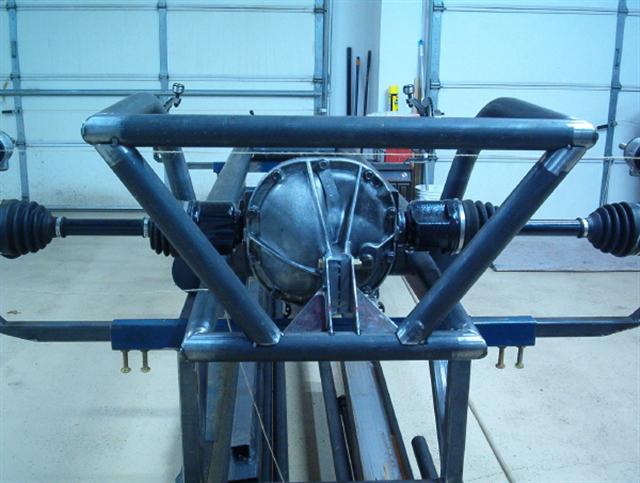
Well I'm back, took the family to see dead presidents carved in stone. Black hills camping vacation, long drive but worth it, good time. Been getting more parts together and lots of cad time.

PLease tell me what you think of this for rear suspension layout nothing is set in stone yet. Will work in shock mounts when the shocks arive so I can get them drawn in the computer.  Pat |
06-26-2006, 09:10 PM
|
 |
CC Member
|
|
|
Join Date: Jun 2006
Cobra Make, Engine:
Posts: 92
|
|
Not Ranked
Patrick
Since you are still in the design stage you might look at the rear cover from an 8.8 Explorer, I like the mounting much better. I can get them for anyone interested for about $35 to $40. I believe with a load your arms would bend at the curve. I'm going to adapt the Locost Roarty plans for the 8.8 IRS. I know it is a Lotus 7 type but the general Idea would be the same. http://locost7.info/files/suspension...RSAssembly.pdf
 |
06-27-2006, 09:57 PM
|
|
CC Member
|
|
|
Join Date: May 2006
Cobra Make, Engine: scratch built aluminum chassis/bb
Posts: 6
|
|
Not Ranked
Hey Pat,just a quick observation on your great work. I usually wait untill last to permanently mount the rack, this saves lots of time when sorting out any bump-steer.
|
06-28-2006, 05:08 AM
|
|
CC Member
|
|
|
Join Date: Apr 2004
Cobra Make, Engine: Scratch Build
Posts: 15
|
|
Not Ranked
Pat it looks good. To Hesss'es point, you could diagonal the lower back arm (vs curve). The upper arm on many (Jag, FFR) is a single arm. The FFR uses an angled lower rear arm. The Heim joint hits at the same angle. Also the Lower rear mount is set 3 degrees lower than the front. I am told that both of these add anti-squat. I think that the angle binds the joints under power and tends to add anti-squat and toe-in (a desirable thing). I do not remember how the original was setup (I don't think it had the 3 degree down angle), but will look tonight. I also have a book somewhere that gives some guidance I’ll check this out. I also have seen where people use spherical bearings vs bushings as they may move more than the arms flexing.
Iggy
|
06-28-2006, 12:44 PM
|
|
CC Member
|
|
|
Join Date: Jun 2006
Cobra Make, Engine:
Posts: 92
|
|
Not Ranked
FWIW I have been researching how to setup the IRS. I plan on using Rorty as general directions. I plan on using Stock Car Products links which are DOM and threaded for 3/4 rod ends. I like and will probably use Rock Krawler rod ends which have a 14 mm trunion bolt but they have a 10mm sleeve for them.

$30.00 Per Assembly for 3/4 Shank
+/- 20 degrees
60,000 Pound Radial Load Capacity
8,800 Pound Axial Load Capacity
Rebuild Kits $5.00 (New Poly Races)
Fits Clevis widths of 2.375"
14 mm Bore
I also believe I have found a cheap way to put spherical bearings in the spindle. Currie makes a johnnie joint which is a sleeve that looks like it would be a direct fit into the spindle.

2" Johnny Joint w/ Greaseable bolt
2 x 1.5 shell
2 trunion
CE-9112 Our Price: $37.95
Description: For fabricators and suspension system builders. Currie's Johnny Joints offer 30 degrees of unrestricted movement in any direction as compared to 22 degrees on a common heim joint. The bushings in the Johnny Joint rod ends are made with a high-density, "tough 88" urethane that encases the inner ball. It is a very durable material, and is impervious to weather. The special ball is heat-treated steel for extra strength, and is cross-drilled for thru-bolt lubrication. The outer shell is .180" DOM tubing, and the retaining washers are heat-treated steel. This 2" joint also includes a 7/16" greasable thru-bolt.
Unit of Measure: Each
http://www.currieenterprises.com/ces...nnyjoints.aspx
Last edited by hssss; 07-04-2006 at 11:58 PM..
|
06-28-2006, 04:54 PM
|
|
CC Member
|
|
|
Join Date: Feb 2006
Location: IGH, MN,
mn
Cobra Make, Engine: scratch build self design 4.6l DOHC
Posts: 769
|
|
Not Ranked
Jetlag,
Bumpsteer problems huh? Set my jig at ride height and will work all pick up points accordingly. that will hold bumpsteer to what I hope is a negligable amount.
Everyone else, the curves at the back of the arms are for shock locating there will be additional bracing and gussetts. Just waited for shocks to arive so that I could measure them properly. Just recived my shocks and all the hiems today so as soon as I have proper drawings I can start fabing everything up. Patrick
|
06-30-2006, 06:47 AM
|
|
CC Member
|
|
|
Join Date: May 2006
Cobra Make, Engine: scratch built aluminum chassis/bb
Posts: 6
|
|
Not Ranked
Pat-Sounds like you're on the right track. I temporary clamp the rack untill everything else is done,including caster/camber adjustment. With chassis at ride height,front tires on turn-tables,no front coilovers, run the suspension thru full travel and check for bump-steer with a dial indicator. At this point you may be amazed at how small a rack position correction will make everything 170MPH purfect !
|
07-01-2006, 07:47 AM
|
|
CC Member
|
|
|
Join Date: Feb 2006
Location: IGH, MN,
mn
Cobra Make, Engine: scratch build self design 4.6l DOHC
Posts: 769
|
|
Not Ranked
Here we go again,
New revised drawing submitited for your approval. I added the shocks and mounting but will still need additional braceing. Hope these revisions will satisfy some concerns about the geometry. Patrick
 |
07-10-2006, 08:43 PM
|
|
CC Member
|
|
|
Join Date: Feb 2006
Location: IGH, MN,
mn
Cobra Make, Engine: scratch build self design 4.6l DOHC
Posts: 769
|
|
Not Ranked
Last edited by fasterpatrick; 11-27-2007 at 05:57 PM..
|
 Posting Rules
|
You may not post new threads
You may not post replies
You may not post attachments
You may not edit your posts
HTML code is Off
|
|
|
All times are GMT -7. The time now is 06:39 AM.
Links monetized by VigLink
|


 Linear Mode


