Absolute Pace

Go Back   Club Cobra > Club Forums > Australian Cobra Club

Welcome to Club Cobra!  The World's largest non biased Shelby Cobra related site!

  •  » Representation from nearly all Cobra/Daytona/GT40 manufacturers
  •  » Help from all over the world for your questions
  •  » Build logs for you and all members
  •  » Blogs
  •  » Image Gallery
  •  » Many thousands of members and nearly 1 million posts! 

YES! I want to register an account for free right now!  p.s.: For registered members this ad will NOT show

MMG Superformance
Nevada Classics
Main Menu
Nevada Classics
Nevada Classics
MMG Superformance
Keith Craft Racing
Advertise at CC
Banner Ad Rates
MMG Superformance
Keith Craft Racing
MMG Superformance
April 2024
S M T W T F S
  1 2 3 4 5 6
7 8 9 10 11 12 13
14 15 16 17 18 19 20
21 22 23 24 25 26 27
28 29 30        

Kirkham Motorsports

Reply
 
LinkBack Thread Tools Rate Thread Display Modes
  #1 (permalink)  
Old 02-22-2010, 04:00 AM
stephen low's Avatar
CC Member
Visit my Photo Gallery

 
Join Date: Aug 2001
Location: Melbourne, Australia, Vic
Cobra Make, Engine: G-Force Mk I, 5L Windsor, TKO 600, enhanced Jag / Koni suspension & LSD Diff.
Posts: 2,298
Not Ranked     
Default The long and winding road.....again

We'll I've finally winkled the car out of Marty's shed to try and move it along on its rebuild.

A few pics and already a few questions folks.

Had Marty move the coil packs to the rear of the engine as seen below.


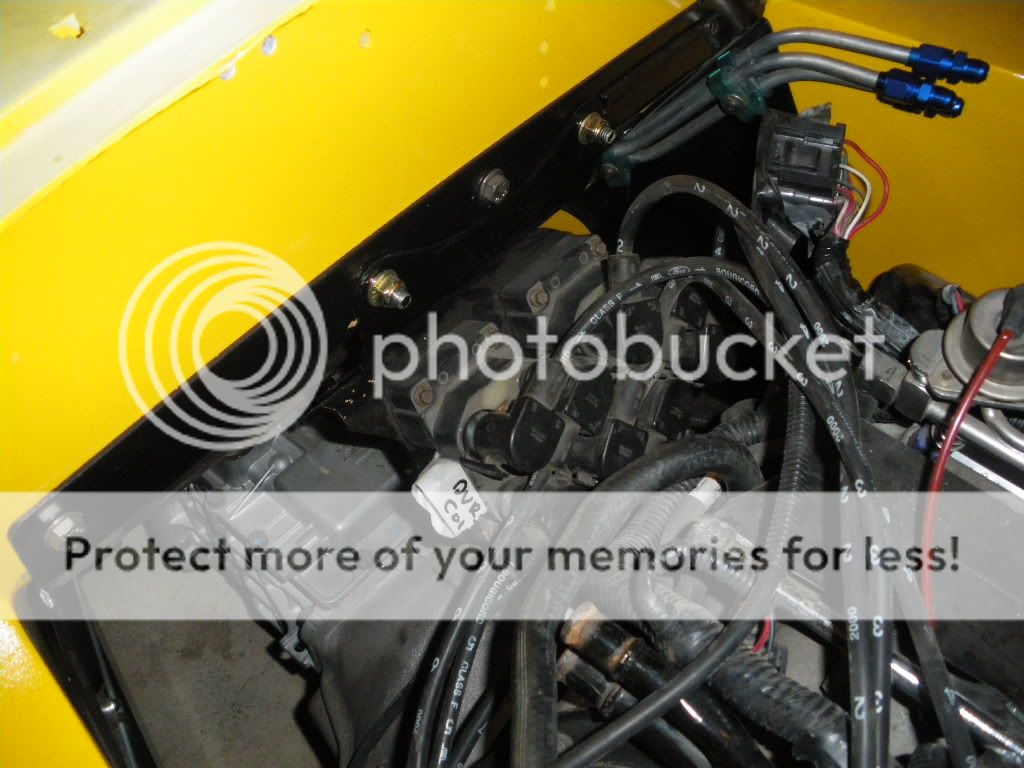
So I started stripping the engine loom to allow the coil plugs to be brought back to the coils. Had thought about cutting and resoldering the wires to reduce the loom but not so sure. Am I better to just retape the relocated plugs without cutting the wires?

Also found one of the injector press on plugs had its retaining clamp snapped off. Am I better in this case to find a new plug and cut and resolder the wires so that I get positive contact atop the injector body?

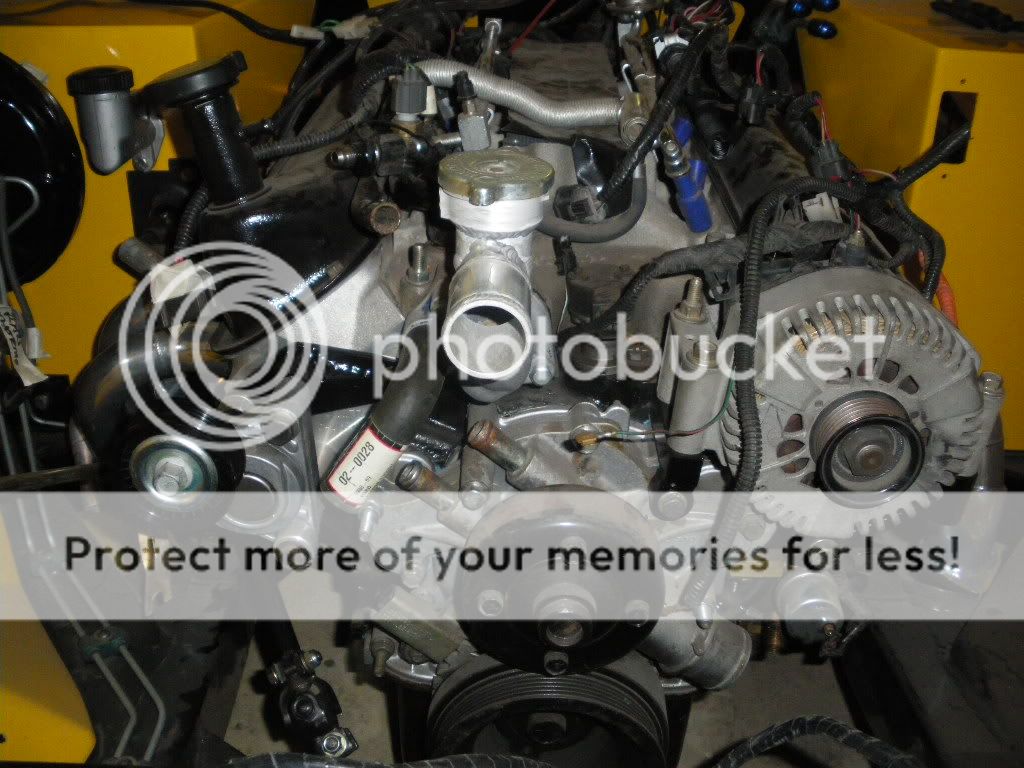
The front view of the engine shows the accessory swap with the alternator to the passenger side and a better quality serpentine tensioner than I started with. This was done to allow fitting of the amended thermostat housing that now doubles as the radiator cap point. I can't recall which of you guys gave me that fitting anyone want to put up their hand?


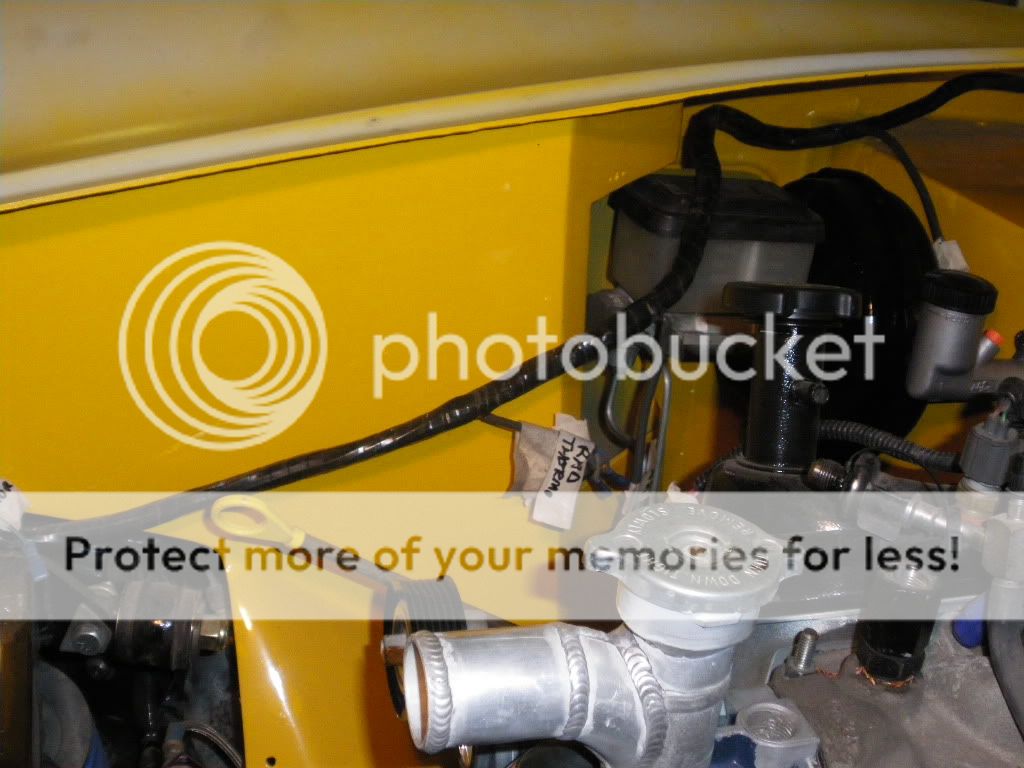
Part of the rebuild will involve hiding the wiring but wanted to know how you attach the cable to the fibreglass on an external skin such as adjacent to the driver's footbox as in the picture below. Any clues?


The suggestion was to run it under the bonnet edge lip inside the engine bay but the cable will be quite visible as it rounds the rear of the front guard as per this picture.

I've also gone to a hydraulic clutch and will run some braid down to the clutch slave.


So I'm thinking of running inside the wheel arches, P clamped up high so that all that is visible in the engine bay would be shiny dome heads under the lip instead. Interested in comments on this idea.

So it's a long way to go but at least I can work on it whenever I can get into the shed.

Cheers
__________________
slowy
Reply With Quote
  #2 (permalink)  
Old 02-22-2010, 01:21 PM
gjkrv8's Avatar
CC Member
Visit my Photo Gallery

 
Join Date: Apr 2008
Location: Melbourne, VIC
Cobra Make, Engine: Classic Revival CR 3505, LS1, T56 6 Speed, VE 3.45 LSD Rear, 6 Spot AP Fronts, 4 Spot Wilwood Rears
Posts: 1,121
Not Ranked     
Default

Hi Slowy, Looking good, must be good to have it back home now. Regarding the loom I would try and re-tape rather than cut and resolder - one less thing to go wrong/fail/bugger up. Also regarding securing the loom, you could use those stick on pads that have a little eylet for cable ties. But you would need to use an adhesive i.e. sicaflex etc as the stick on adhesive is crap. Then you can tie the loom up with ties out of sight but can unclip it if you ever need to. I did that in a couple of places seems to work ok.
Rgds Gregg
Reply With Quote
  #3 (permalink)  
Old 02-22-2010, 04:34 PM
CC Member
Visit my Photo Gallery

 
Join Date: May 2004
Location: Melbourne, Vic
Cobra Make, Engine: Cobra RMC 377ci Windsor, Harrison Daytona Coupe, Ford XC Coupe.
Posts: 1,588
Not Ranked     
Default Alpine Run

Slowly,


I know 1 Cobra that will not be going...........

I hope your brother is open to loaning you the Merc ....


STIFFY
Reply With Quote
  #4 (permalink)  
Old 02-22-2010, 04:59 PM
stephen low's Avatar
CC Member
Visit my Photo Gallery

 
Join Date: Aug 2001
Location: Melbourne, Australia, Vic
Cobra Make, Engine: G-Force Mk I, 5L Windsor, TKO 600, enhanced Jag / Koni suspension & LSD Diff.
Posts: 2,298
Not Ranked     
Default

Stiff

The use of the Merc was arranged months ago as I saw that risk as a no-brainer.

Hopefully the next time it will be in the real car!

Gregg

Yes know the ones. My electrician used them for the single wire down to the handbrake for tidiness during my engineering without carpets and of course they fell off thereafter.

But not the prettiest of attachment methods though and hoping someone can suggest another means.

Cheers
__________________
slowy
Reply With Quote
  #5 (permalink)  
Old 02-22-2010, 06:44 PM
sambo's Avatar
CC Member
Visit my Photo Gallery

 
Join Date: Jan 2007
Location: Melbourne, VIC
Cobra Make, Engine: Harrison, 6.0L Chev
Posts: 2,513
Not Ranked     
Default

Slowy, must be great having it home now. Is that new tensioner a GM item? Heaven forbid!

I'm using those adhesive cable tie pads that Gregg mentions, fixed to the inside of the guards with hot glue and running the wires through a some large diam heat shrink before cable tying. The Harrison has a decent lip which mostly hides the heat shrink. Another idea that Pecal used - run a piece of aluminium angle as a channel of sorts. Perhaps that method could work for you? Paint it the same colour as your engine bay.

And I hope the cats aren't getting stuck into your leather seats again!

Paul
Reply With Quote
  #6 (permalink)  
Old 02-22-2010, 07:07 PM
stephen low's Avatar
CC Member
Visit my Photo Gallery

 
Join Date: Aug 2001
Location: Melbourne, Australia, Vic
Cobra Make, Engine: G-Force Mk I, 5L Windsor, TKO 600, enhanced Jag / Koni suspension & LSD Diff.
Posts: 2,298
Not Ranked     
Default

Paul

Yes I've been enbracing my long lost friend the last couple of nights now and plan to continue to remain intimate until she makes some sensual noises!!!

Well spotted too but I suspect you might be using similar bits given your power plant.

I'm starting to get GM practice as our company has just won the tender to provide waste management into GM Melbourne and S.A. Will have to hide the Ford when I turn up on site I guess.

But other than having the preferrence for a Ford donk, like many I can say bitsa.

Bitsa this and bitsa that from jag, GM, Mitsu, Yota, Mazda, BMW, Subi, Hyundai, mini, mg, lancia, hillman and even ford and trailer parts - lol!!

As to the channel attachments a good idea but too late, I'm not going to attempt adding bulk bits post paint. If these cable ties are the real option then that is where I'll end up I guess.

And for the moment my seats are hidden in the back shed away from sharp claws. As much as I'd like to strangle them I suspect I'd be strung up myself by the rest of the family. However you should see what our couches look like too, it's nasty and they are the first cats to do this in earnest!!

Folks

One question has come to mind though, when I retape my engine loom, is there a heat resistant tape I should be using?

The tape I've stripped off is too plasticy for electrical tape but I don't know if you first wind in leccy tape then oversleeve with a more heat resistant material.

Also still keen for feedback on my one buggered injector cap issue.

Any auto sparkies care to comment here?

Cheers
__________________
slowy
Reply With Quote
  #7 (permalink)  
Old 02-22-2010, 07:41 PM
Aussie Mike's Avatar
CC Member
Visit my Photo Gallery

 
Join Date: Jan 2001
Location: Sunbury, VIC
Cobra Make, Engine: Rat Rod Racer, LS1 & T56
Posts: 5,391
Not Ranked     
Default

You can buy heat shrink tape. I'm not keen on electrical tape as the adhesive is nasty slimy stuff to deal with when the tape has been on there for a while. The heat is hard on it in the engine bay combined with fumes etc I reckon it breaks down..

You just wrap the heat shrink tape like normal electrical tape but it has no adhesive. Once you get the the end of the loom or spur you tie it of and then run a heat gun over it. the tape shrinks down tight and seals against itself and makes for a tidy finish. I usually cover this with some of that split flexable conduit. It's available in various sizes to match the size of the buch of wires and provides some mechanical protection to your loom.

The other option for a bit of mechanical protection is spirawrap. It looks OK when applied but is time consuming to wrap.

For loom that runs near hot stuff I then wrap it in aluminum flashing tape. This is self adhesive backed and available from Bunnings. I used this on my land rover for all the wiring that ran near the turbo and exhaust. All the original conduit and tape had been dammaged by the heat and even the wires looked a bit worse for wear. The flashing tape reflects a bit of the heat and should protect the loom underneath.

You can see it here where the oil pressure sender loom runs past the back of the turbo:


And here where the A/C loom runs near the top of the exhaust mainfold.


I've probably got some spare aluminum tape if you need it.


Cheers
__________________
Mike Murphy
Melbourne Australia


Last edited by Aussie Mike; 02-22-2010 at 07:51 PM..
Reply With Quote
  #8 (permalink)  
Old 02-22-2010, 08:02 PM
stephen low's Avatar
CC Member
Visit my Photo Gallery

 
Join Date: Aug 2001
Location: Melbourne, Australia, Vic
Cobra Make, Engine: G-Force Mk I, 5L Windsor, TKO 600, enhanced Jag / Koni suspension & LSD Diff.
Posts: 2,298
Not Ranked     
Default

Thanks Mike

The loom mainly sits atop the head - manifold interface so would gain normal engine heat temperatures but really is segregated from the exhaust so very high temperature protection isn't needed.

Sounds like I'll do small amounts of binding with leccy tape just to get the lom manageable then properly bind with the heat shrink tape. Where can I buy the heat shrink tape?

As to cutting and resoldering wires, what are your thoughts on that, where it can be avoided and for the injector cap, where I think I do need to do this?

Cheers
__________________
slowy
Reply With Quote
  #9 (permalink)  
Old 02-22-2010, 08:19 PM
boxhead's Avatar
CC Member
Visit my Photo Gallery

 
Join Date: Feb 2002
Location: Alice Springs, central Australia, NT
Cobra Make, Engine: Classic revival kit (CR3181), gen III engine, T56 6 speed box, AU XR8 lsd diff
Posts: 5,699
Send a message via Yahoo to boxhead
Not Ranked     
Default

I would steer clear of cutting and soldering, generally soldering only induces an area that at some stage can crack/break.

How many soldered joints do you see on factory looms?
__________________

Cruising in 5th


---------------------------------------------
Never be afraid to do something new, Remember, Amateurs built the Ark: Professionals built the Titanic.
Reply With Quote
  #10 (permalink)  
Old 02-22-2010, 08:20 PM
sambo's Avatar
CC Member
Visit my Photo Gallery

 
Join Date: Jan 2007
Location: Melbourne, VIC
Cobra Make, Engine: Harrison, 6.0L Chev
Posts: 2,513
Not Ranked     
Default

Slowy instead of soldering perhaps get some good 2/4/6-way connectors and a decent crimping tool?
Reply With Quote
  #11 (permalink)  
Old 02-22-2010, 08:22 PM
Aussie Mike's Avatar
CC Member
Visit my Photo Gallery

 
Join Date: Jan 2001
Location: Sunbury, VIC
Cobra Make, Engine: Rat Rod Racer, LS1 & T56
Posts: 5,391
Not Ranked     
Default

I've cut and resoldered wires many times and it can be done reliably. I use a small piece of heat shrink tube over the join.

Cut the wire and strip back about 1cm of each. Make sure the copper is nice and clean or it won't solder well.

Slip a length of heat shrink tube over one of the wires and slide it back away from where the solder joint is or it will shrink before you need it. I sometimes use 2 pieces and shrink one over the joint and then slide the next along and shrink it over the first.

Twist the wires together inline, not at a T to the original wires. This makes for a neater looking join that can be almost invisible one heatshrinked.

Use some good quality electronics flux cored solder and a soldering iron. I don't like using a torch on electrical soldering as it makes a mess of the insulation.

Heat the joint with the tinned tip of the iron. Once it's heated the joint enough feed the solder into the intersection of the tip and the joint. The solder should wick into the joint. If it doesn't then you haven't tinned your iron properly or applied enough heat. Once the solder wicks into the joint you can apply the solder directly to the joint. Don't use too much though as you don't want the solder wicking along the wire and making it rigid. You don't want a big blob of solder blob at the joint, just enough that the copper color dissapears but you can still just see the shape of the wire strands.

Remove the heat and hold the wire till the solder hardens. This is the mistake often made that when the iron is removed the joint moves around and you end up with a dry joint.

Slide the heat shrink tube along and shrink it down with a heat gun. make sure you have about a cm over each side of the joint.

Cheers
__________________
Mike Murphy
Melbourne Australia

Reply With Quote
  #12 (permalink)  
Old 02-22-2010, 08:34 PM
stephen low's Avatar
CC Member
Visit my Photo Gallery

 
Join Date: Aug 2001
Location: Melbourne, Australia, Vic
Cobra Make, Engine: G-Force Mk I, 5L Windsor, TKO 600, enhanced Jag / Koni suspension & LSD Diff.
Posts: 2,298
Not Ranked     
Default

I've got to do the injector plug so I'll see what sort of mess I make of that first.

Did note a factory resined heat shrink join on one of the passenger side coil plug wires where it joined with another single wire. This single wire also ran to a single electrical plug also mounted on the coil frame. Note sure if that was an earth or similar to the metal coil holder. Anyone know?

Interestingly noted that the factory loom wires were wound back on themselves in spots, presumably as the ends of the loom run were wrapped first and excess cable on certain wires occurred.

I can certainly downsize the loom a little if I do cut and shut but am still gauging the worth of the exercise versus the risk.
__________________
slowy
Reply With Quote
  #13 (permalink)  
Old 02-22-2010, 10:19 PM
sambo's Avatar
CC Member
Visit my Photo Gallery

 
Join Date: Jan 2007
Location: Melbourne, VIC
Cobra Make, Engine: Harrison, 6.0L Chev
Posts: 2,513
Not Ranked     
Default

Nice explanation Mike.
Reply With Quote
  #14 (permalink)  
Old 02-22-2010, 10:52 PM
Gav's Avatar
Gav Gav is offline
CC Member
Visit my Photo Gallery

 
Join Date: Apr 2006
Location: Mildura, vic
Cobra Make, Engine: FFR Coupe, 416ci of LS goodness
Posts: 2,349
Not Ranked     
Default

The only reason production wiring looms are not soldered is that it is too expensive.
A well soldered and insulated joint will out last the loom, unless of course it is in a high temp or vibration position.
Solder melts at 170 odd degrees!
__________________
Powered by Cu
Reply With Quote
  #15 (permalink)  
Old 02-22-2010, 10:56 PM
Merv and Sharon's Avatar
CC Member
Visit my Photo Gallery

 
Join Date: Jun 2007
Location: Sunshine Coast Qld, QLD
Cobra Make, Engine: Harrison # 80; Ford 5.0L HO Trickflow heads, cam and rockers and MassFlow EFI
Posts: 3,482
Send a message via Skype™ to Merv and Sharon
Not Ranked     
Default

Stephen in my Harrison I placed many of the wire bundles under the body mouldings and the others in shrink wrapped sections as others described. I did reduce some of the excess when I asked the auto electrician to check the loom. It is still not perfect but that will be it until I start fitting the MassFlo later this month. Then it should look something like this:

__________________
Merv

Ford Cobra
Harrison #80.
Peregian Beach
Sunshine Coast Qld.
Reply With Quote
  #16 (permalink)  
Old 02-22-2010, 11:27 PM
CC Member
Visit my Photo Gallery

 
Join Date: Nov 2003
Cobra Make, Engine: RCM, 4 wheels, two doors
Posts: 704
Not Ranked     
Default

The late model ford injector plugs are crap. A few had broken on my loom but they didn't come off the injectors either so if yours don't come off easily I would suck it and see. How easy/hard to get are Ford injector plugs?
Reply With Quote
  #17 (permalink)  
Old 02-23-2010, 12:47 AM
stephen low's Avatar
CC Member
Visit my Photo Gallery

 
Join Date: Aug 2001
Location: Melbourne, Australia, Vic
Cobra Make, Engine: G-Force Mk I, 5L Windsor, TKO 600, enhanced Jag / Koni suspension & LSD Diff.
Posts: 2,298
Not Ranked     
Default

Al

I'd probably be best sourcing these on the ford forum. Did see an engine loom two weeks ago for $80 but its gone of course.

Guess I wouldn't have noticed my damaged plug either if I hadn't been removing them.

Just would be nice to change over now while it is all accessible and relatively easy.
__________________
slowy
Reply With Quote
  #18 (permalink)  
Old 02-23-2010, 12:55 AM
Aussie Mike's Avatar
CC Member
Visit my Photo Gallery

 
Join Date: Jan 2001
Location: Sunbury, VIC
Cobra Make, Engine: Rat Rod Racer, LS1 & T56
Posts: 5,391
Not Ranked     
Default

You can buy those standard injector plugs new ans a kit you can crimp on yourself.

I deal with this company a bit with work and they may have the ones to suit your loom.

http://www.amgv.com.au/

I have the crimper to suit them too.

Cheers
__________________
Mike Murphy
Melbourne Australia

Reply With Quote
  #19 (permalink)  
Old 02-23-2010, 04:23 AM
stephen low's Avatar
CC Member
Visit my Photo Gallery

 
Join Date: Aug 2001
Location: Melbourne, Australia, Vic
Cobra Make, Engine: G-Force Mk I, 5L Windsor, TKO 600, enhanced Jag / Koni suspension & LSD Diff.
Posts: 2,298
Not Ranked     
Default

Mike

When you say crimping, you mean as per normal wire joining or is it a tool for that sort of fitting?

Looking at all the fittings generally tonight I'd love to be able to shorten the loom by being able to re-insert shortened cable into each fitting but I think they are each one time made and hence not reusable.

You've got my attention - tell me more.

Cheers
__________________
slowy
Reply With Quote
  #20 (permalink)  
Old 02-23-2010, 05:18 AM
Aussie Mike's Avatar
CC Member
Visit my Photo Gallery

 
Join Date: Jan 2001
Location: Sunbury, VIC
Cobra Make, Engine: Rat Rod Racer, LS1 & T56
Posts: 5,391
Not Ranked     
Default

Quote:
Originally Posted by stephen low View Post
Mike

When you say crimping, you mean as per normal wire joining or is it a tool for that sort of fitting?
I've collected a few different styles of wire crimp tool over the years.

The one you are probably familiar with is the one with the red blue and yellow sleeves on them for the different wire sizes. A good quality crimp tool for these is worth the investment.

Another style that is less common is the crimper for terminating the bare terminals onto the end of a wire. These fold the two sides of the crimp over and force them back down into the crimp. You sometimes get people trying to crimp these terminals with a set of pliers but they just don't grip the wire. I have a good quality set of these crimps. They should terminate those injector plugs fine.

Cheers
__________________
Mike Murphy
Melbourne Australia

Reply With Quote
Reply


Posting Rules
You may not post new threads
You may not post replies
You may not post attachments
You may not edit your posts

BB code is On
Smilies are On
[IMG] code is On
HTML code is Off
Trackbacks are On
Pingbacks are On
Refbacks are On


All times are GMT -7. The time now is 02:03 PM.


Powered by vBulletin® Version 3.8.0
Copyright ©2000 - 2024, Jelsoft Enterprises Ltd.
Search Engine Friendly URLs by vBSEO 3.6.0
The representations expressed are the representations and opinions of the clubcobra.com forum members and do not necessarily reflect the opinions and viewpoints of the site owners, moderators, Shelby American, any other replica manufacturer, Ford Motor Company. This website has been planned and developed by clubcobra.com and its forum members and should not be construed as being endorsed by Ford Motor Company, or Shelby American or any other manufacturer unless expressly noted by that entity. "Cobra" and the Cobra logo are registered trademarks for Ford Motor Co., Inc. clubcobra.com forum members agree not to post any copyrighted material unless the copyrighted material is owned by you. Although we do not and cannot review the messages posted and are not responsible for the content of any of these messages, we reserve the right to delete any message for any reason whatsoever. You remain solely responsible for the content of your messages, and you agree to indemnify and hold us harmless with respect to any claim based upon transmission of your message(s). Thank you for visiting clubcobra.com. For full policy documentation refer to the following link: CC Policy