 
 Main Menu
|
|
Nevada Classics
|
|
Advertise at CC
|
| S |
M |
T |
W |
T |
F |
S |
| |
|
|
1 |
2 |
3 |
4 |
| 5 |
6 |
7 |
8 |
9 |
10 |
11 |
| 12 |
13 |
14 |
15 |
16 |
17 |
18 |
| 19 |
20 |
21 |
22 |
23 |
24 |
25 |
| 26 |
27 |
28 |
29 |
30 |
|
|
|
|
CC Advertisers
|
|
 3Likes 3Likes

09-13-2011, 03:58 AM
|
 |
CC Member

|
|
|
Join Date: Aug 2009
Location: Adelaide,
SA
Cobra Make, Engine: AP 289FIA 'English' spec.
Posts: 13,152
|
|

 Not Ranked
Tim - I read somewhere about some sort of top hat shaped adaptor that dropped the base of the air cleaner (so that you could use a deeper air cleaner for better flow and filtration). Would an adaptor like that be suitable for gaining you some clearance?
Cheers,
Glen
|
09-13-2011, 09:16 AM
|
|
Senior Club Cobra Member
|
|
|
Join Date: Dec 2007
Cobra Make, Engine: ERA FIA 'Street' Build
Posts: 2,129
|
|
Not Ranked
Glen,
Great idea ... you are right about the dropped air cleaner bases ... just came across that myself in a current hood clearance thread ... is Club Cobra great or what.
Just ordered a K&N air cleaner base with 7/8" drop, that should be just about right. The only other thing I will need to do is shorten the wing nut stud.
As best as I can measure, there is about 1/4" to 3/8" clearance between the air cleaner and the hood. This is with the motor not running ... I am sure there will be some movement of the motor as it vibrates and torques over under load. Ideally I would think about 3/4" clearance would be better.
The other option would be to reduce the carb spacer from 1" to 3/4" or even 1/2"... but I would assume that will reduce the performance of the motor. This would be a last resort, the air cleaner is a simpler fix.
Should have the part by the end of the week, we'll see how it looks and most of all how it works.
|
09-13-2011, 03:44 PM
|
 |
CC Member
|
|
|
Join Date: May 2006
Location: Portland,
OR
Cobra Make, Engine: ERA FIA, 1964 289->Webers
Posts: 3,689
|
|
Not Ranked
Open exhaust had to have a few people calling the local authorities!!! Ha, Love it!
__________________
ERA FIA 2088
|
09-14-2011, 08:35 PM
|
|
Junior Member
|
|
|
Join Date: Dec 2000
Location: Corralitos,
CA
Cobra Make, Engine: 1980 Arntz 427W, Webers, TKO600, Jag IRS
Posts: 476
|
|
Not Ranked
Tim, Would you consider putting in a bung for an A/F reader into the exhaust system? I've been tuning today and it sure helps.
__________________
Tom
|
09-15-2011, 12:29 PM
|
|
Senior Club Cobra Member
|
|
|
Join Date: Dec 2007
Cobra Make, Engine: ERA FIA 'Street' Build
Posts: 2,129
|
|
Not Ranked
Tom,
Good suggestion. The carb was dialed in on the dyno, so any adjustments on the car should be minor. My inclination is to leave the manifolds as is, and any dyno tuning could be done with a tail pipe sniffer. If I was racing or running EFI ... I would put them on for sure. Hope to see you at a meet soon, once my car is done!
- Tim
|
09-15-2011, 04:29 PM
|
 |
CC Member
|
|
|
Join Date: Aug 2011
Location: Trabuco Canyon,
CA
Cobra Make, Engine: Factory Five Mark 2, 5.0 L Cobra jet EFI
Posts: 8
|
|
Not Ranked
Tim,
Decided to check your progress and congrats on getting her running. Bet you can't wait to get in on the street. Getting ready to start taking some things apart on mine to start changing thinks they way I want it. Once Istart I may be off the road for a while so I'm reluctant to start. Can't wait until we can get togther for a ride in the Cobras
Last edited by ZwickFF; 09-15-2011 at 04:33 PM..
Reason: New to forum
|
09-15-2011, 09:55 PM
|
|
Senior Club Cobra Member
|
|
|
Join Date: Dec 2007
Cobra Make, Engine: ERA FIA 'Street' Build
Posts: 2,129
|
|
Not Ranked
Glenn,
First off, welcome to Club Cobra!
Car is getting pretty close, a bit more fabrication & final assembly, then ready to go! Look forward to drives together, just like old times. Keep us posted if you start digging into your car, lots of good ideas and advice can be found here.  |
10-14-2011, 12:47 AM
|
|
Senior Club Cobra Member
|
|
|
Join Date: Dec 2007
Cobra Make, Engine: ERA FIA 'Street' Build
Posts: 2,129
|
|
Not Ranked
Time for an update. Finally got the car over to a friend's place and onto a lift. To get a little more room to work, we cut up a 2x6 and screwed the pieces together into blocks. Used a floor jack to get the car off the ground then put the blocks on the lift pads
and up she goes. It will be so much easier working on a lift, than on the floor!
The plan is to set the muffler in place then determine how much to shorten the collector to get the head pipe to fit, then weld on the tabs for bolting the pipes together. The tricker part will be cutting and setting the location of the tail pipe and coming up with a rubber isolated tail pipe hanger.
There are a number of different options, hoping to find a way that does not involve drilling into the frame or if we need to, making the minimum number of holes. This will take a little while to get done, as our mutual work schedules make car time hard to arrange
but we will get it done. Can't wait to get the car on the road! 

 |
10-14-2011, 12:58 AM
|
|
CC Member
|
|
|
Join Date: Aug 2009
Location: Adelaide,
SA
Cobra Make, Engine: AP 289FIA 'English' spec.
Posts: 13,152
|
|
Not Ranked
Hi Tim. You're up late.
How do I say this?.....nice rear end there, buddy!
Cheers,
Glen
|
10-14-2011, 01:04 AM
|
|
Senior Club Cobra Member
|
|
|
Join Date: Dec 2007
Cobra Make, Engine: ERA FIA 'Street' Build
Posts: 2,129
|
|
Not Ranked
Why thank you ... it's an impressive arrangement of bits and pieces  |
10-14-2011, 01:40 AM
|
|
CC Member
|
|
|
Join Date: Aug 2009
Location: Adelaide,
SA
Cobra Make, Engine: AP 289FIA 'English' spec.
Posts: 13,152
|
|
Not Ranked
Just to clarify, I was talking about the 289FIA. 
Cheers,
Glen |
10-14-2011, 01:50 AM
|
|
Senior Club Cobra Member
|
|
|
Join Date: Dec 2007
Cobra Make, Engine: ERA FIA 'Street' Build
Posts: 2,129
|
|
Not Ranked
ERA builds some very nice stuff |
10-14-2011, 03:38 AM
|
|
CC Member
|
|
|
Join Date: May 2006
Location: Portland,
OR
Cobra Make, Engine: ERA FIA, 1964 289->Webers
Posts: 3,689
|
|
Not Ranked
Get some undercoating on that spare tire tub, quick! Other than that it looks awesome!
__________________
ERA FIA 2088
|
10-15-2011, 11:45 AM
|
 |
CC Member
|
|
|
Join Date: Sep 2011
Cobra Make, Engine:
Posts: 144
|
|
Not Ranked
Geez, that's beautifully done. This is one of those "slip a mirror underneath" cars, when you happen to show it.
|
10-17-2011, 05:53 AM
|
 |
CC Member
|
|
|
Join Date: Mar 2003
Location: McConnellsburg,
PA
Cobra Make, Engine: ERA FIA #2124
Posts: 687
|
|
Not Ranked
Quote:
Originally Posted by tkb289

The plan is to set the muffler in place then determine how much to shorten the collector to get the head pipe to fit, then weld on the tabs for bolting the pipes together. The tricker part will be cutting and setting the location of the tail pipe and coming up with a rubber isolated tail pipe hanger.
|
Tim:
Here is what the hanger looks like that is off the second "outrigger" from the main fraime rail on my car. It's just a two-ply section of thick rubber:
Hopefully you can see the location easy enough. The box hanging down just up from this location by the first "outrigger" is the pedal box on the driver's side.
- Allen.
Last edited by Fullchat289; 10-17-2011 at 05:56 AM..
|
10-17-2011, 07:57 AM
|
 |
CC Member
|
|
|
Join Date: Nov 1999
Location: White Plains,,
NY
Cobra Make, Engine: ERA140, ERA 267, ERA GT2038, ERA FIA 2045, ERAGT2077 ERA2893000EXP
Posts: 1,117
|
|
Not Ranked
Oops. Wrong thread.
Last edited by Jim Holden; 10-17-2011 at 07:59 AM..
|
10-17-2011, 09:30 AM
|
|
Senior Club Cobra Member
|
|
|
Join Date: Dec 2007
Cobra Make, Engine: ERA FIA 'Street' Build
Posts: 2,129
|
|
Not Ranked
Quote:
Originally Posted by Fullchat289
Tim:
Here is what the hanger looks like that is off the second "outrigger" from the main fraime rail on my car. It's just a two-ply section of thick rubber:
Hopefully you can see the location easy enough. The box hanging down just up from this location by the first "outrigger" is the pedal box on the driver's side.
- Allen. |
Allen,
This is very helpful
By chance do you have other photos that show attachment to the muffler / tailpipe ? Thanks! |
10-17-2011, 10:03 AM
|
|
CC Member
|
|
|
Join Date: Mar 2003
Location: McConnellsburg,
PA
Cobra Make, Engine: ERA FIA #2124
Posts: 687
|
|
Not Ranked
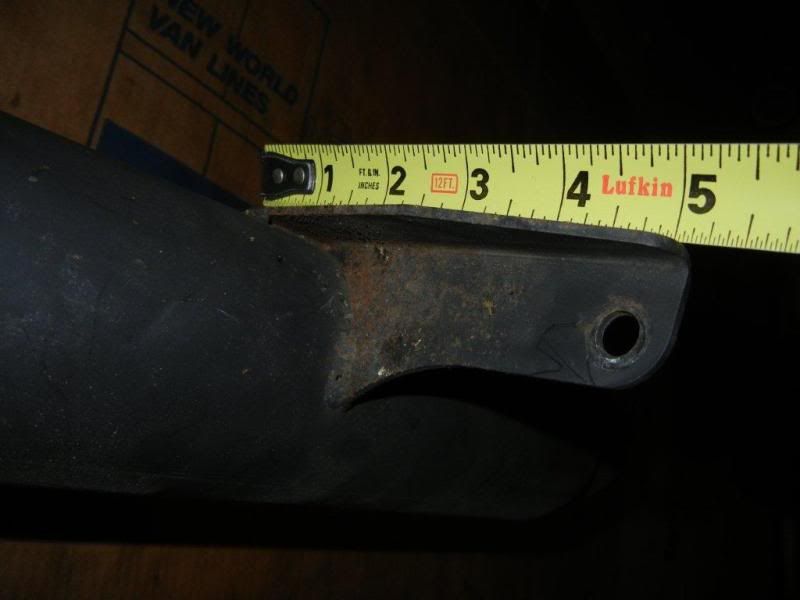
Tim:
Sure, no problem. I have the FIA side exhaust, but at least you can get an idea of what the design of the bracket coming off of the pipe looks like. I assume you would be able to do much the same with your set-up. I'll throw a tape measure on it so you can get the scale and post an update here:
- Allen.
Last edited by Fullchat289; 10-18-2011 at 05:07 AM..
|
10-18-2011, 05:14 AM
|
|
CC Member
|
|
|
Join Date: Mar 2003
Location: McConnellsburg,
PA
Cobra Make, Engine: ERA FIA #2124
Posts: 687
|
|
Not Ranked
^ Bump - updated with pic.
If you need anything else, Tim, just let me know.
- Allen.
|
10-18-2011, 09:10 AM
|
|
Senior Club Cobra Member
|
|
|
Join Date: Dec 2007
Cobra Make, Engine: ERA FIA 'Street' Build
Posts: 2,129
|
|
Not Ranked
Allen,
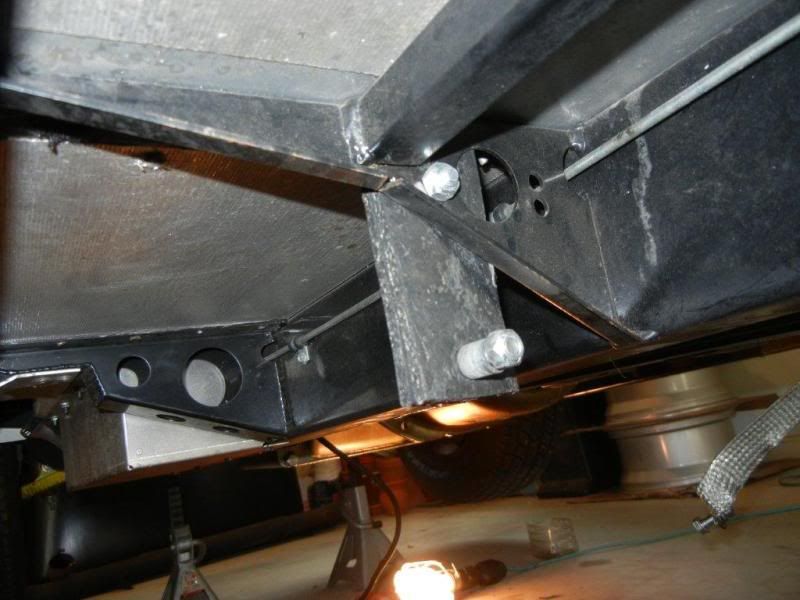
Thanks for the photo. The FIA side pipes are different setup, but correct me if I am wrong, a similar configuration with attachment to the header collector and one rubber isolated mount near the outlet, correct?
Was able to work on the exhaust last night. So far we have shortened the header collector 1" to bring the head pipe up closer to the car, probably have a bit more to take off. We have the muffler set between the frame outriggers and spaced about 3/4" from the floor, so the location of the muffler inlet, ultimately sets the length of the collector. Will have a rubber isolated hanger that attaches to the tail pipe near the output side of the muffler. I have a variety of hangers and will try to use an existing hole in the frame. Want to have the entire setup slip fit and bolted together for serviceability and modification down the road. Will post some pictures as things progress.
|
 Posting Rules
|
You may not post new threads
You may not post replies
You may not post attachments
You may not edit your posts
HTML code is Off
|
|
|
All times are GMT -7. The time now is 07:15 PM.
Links monetized by VigLink
|


 Linear Mode


