 
 Main Menu
|
|
Nevada Classics
|
|
Advertise at CC
|
|
March 2026
|
| S |
M |
T |
W |
T |
F |
S |
| 1 |
2 |
3 |
4 |
5 |
6 |
7 |
| 8 |
9 |
10 |
11 |
12 |
13 |
14 |
| 15 |
16 |
17 |
18 |
19 |
20 |
21 |
| 22 |
23 |
24 |
25 |
26 |
27 |
28 |
| 29 |
30 |
31 |
|
|
|
|
|
|
CC Advertisers
|
|

08-03-2010, 04:11 PM
|
|
CC Member

|
|
|
Join Date: May 2006
Location: St. Louisville,
Oh
Cobra Make, Engine: A&C 67 427 cobra SB
Posts: 2,445
|
|

 Not Ranked
If the torque on the other head never changed, why was the gasket leaking. Too high a pressure on the pressure test? Maybe.
I think you said that you put the heads on, but someone else assembled the short block. I have had builders claim they have never seen a new block that everything was in spec. Were the decks checked? I think I would give them a good look over. Straight edge and feeler gauges plus a look for scratches and what not.
You said you would have a kiss cut on the heads. Won't hurt anything and may help.
On the head studs, it would be interesting to screw a few in by finger and make sure they don't stop at the point where the bolts ended. If they go right in, the bolts never damaged them. I would still run the tap through them as recommended.
PS
If there is a big step where the bolts ended, you might want to run a regular tap past that point first to blend the step. Then run the bottom tap.
Last edited by olddog; 08-03-2010 at 04:22 PM..
Reason: PS
|
-
Advertising

08-03-2010, 04:19 PM
|
|
CC Member
|
|
|
Join Date: May 2006
Location: St. Louisville,
Oh
Cobra Make, Engine: A&C 67 427 cobra SB
Posts: 2,445
|
|
Not Ranked
Quote:
Originally Posted by Excaliber

There is always the potential for things to get ugly if you heli coil enough of those holes, binding, drilling off just a bit, helicoil sticks and won't thread correctly into the new hole. Maybe I'm just paranoid, but I've had a couple of heli coil installation jobs that took a left turn and ended up being a real nightmare. Less is better in my book, which is why I would probably try a chemical fix myself as the first step. Thats a hard call though, yeah, I might go helicoil first time in this case (for ONE hole).  |
I have done a few over the years. I usually have more issues with cutting good clean threads than anything else. Especially aluminum. It cuts so easy your tempted to turn too far before turning backward to cut the threads off. I do know that heli-coils need very good threads. |
08-03-2010, 07:54 PM
|
|
CC Member
|
|
|
Join Date: Dec 2004
Location: toronto,
ont
Cobra Make, Engine: 408w 500 h.p. 550 ft.lbs
Posts: 562
|
|
Not Ranked
Maybe the resident aluminum expert could offer some helpful advice at this point ??
Are you there David?
Craig
|
08-04-2010, 03:48 AM
|
 |
CC Member
|
|
|
Join Date: Jul 2005
Location: Virginia Beach, Va & Port Charlotte, Fl.,
Posts: 2,293
|
|
Not Ranked

Quote:
Originally Posted by olddog
If the torque on the other head never changed, why was the gasket leaking. Too high a pressure on the pressure test? Maybe.
I think you said that you put the heads on, but someone else assembled the short block. I have had builders claim they have never seen a new block that everything was in spec. Were the decks checked? I think I would give them a good look over. Straight edge and feeler gauges plus a look for scratches and what not.
You said you would have a kiss cut on the heads. Won't hurt anything and may help.
On the head studs, it would be interesting to screw a few in by finger and make sure they don't stop at the point where the bolts ended. If they go right in, the bolts never damaged them. I would still run the tap through them as recommended.
PS
If there is a big step where the bolts ended, you might want to run a regular tap past that point first to blend the step. Then run the bottom tap.
|
Quite honestly, under normal operation, I don't think the other head gasket would have been leaking. It was pressure tested to 30 psi, double max operating pressure. (the other head gasket started leaking at less tha 5 psi) At the point of that head's pressure test I'd already made my mind up to pull that head too, due to the head 000bolt issue. I just wanted to see what it did at various pressures. The leak was tiny with nitrogen. With water and it's larger molecular size it might not have leaked at 30 psi. When the engine experiences higher coolant system pressures it's typically already warm so the clamp on the gasket is a tiny bit greater. I do believe this is what pulled that head bolt loose. After seeing all this I've made up my mind that I'm going to put a small bead of RTV around all of the block to head coolant ports though...
As far as the short block, it was run through one of the finest FE builder's CNC block machine. It was also assembled by them.
In talking with Barry R I do have an item in the short block to check. It seems that Pond aluminum blocks have pressed in ductile iron sleeves. Barry has seen several blocks after a problematic tear-down where the sleeves weren't entirely seated on the bottom stepped groove. What happens is under operation and the clamp of the head gasket's compression ring the liner finally comes to rest. The problem is, now you have a liner below deck height and a head gasket compression ring that's no longer compressed. You end up having to re-deck the block (complete tear-down)  The positive side is, it does happen v-e-r-y infrequently and it's typically found after a leak from the compression side of the head gasket. I don't have any compression leaks, that I know of. Rest assured there will be a close inspection.
I will only have the heads cut if they show any signs of warping. I'm getting hold of a machinist's straight edge and I've got my feeler gauges in hand. The manifold's been cut to give me perfect port/block alignment so I really don't want to change things unless I have to. I will clean them up nicely though.
I will do a close inspect and test fit on the existing threads. They will be chased regardless.
I will make a 2 x 4 wood jig for the initial helicoil bore job. It will allow be to be 100% perpendicular to the deck surface when I hand drill it. Barry stressed this, big time. I'll be using my trusty 14.4 DeWalt for the drilling duties...  I would rather have the drill stall then grab 'n twist at an odd angle. I'll use plenty of drill/tap/thread cutting fluid during the operation, along with a operational wet/dry vac with it's nozzle duct taped at the drill site. After the helicoil's in I'll set a head on the block and run a test fit on the hole's new stud.
__________________
Too many toys?? never!
|
08-04-2010, 07:38 AM
|
 |
CC Member
|
|
|
Join Date: Jul 2005
Location: Bartlett,
Ill
Cobra Make, Engine: Everett-Morrison LS1
Posts: 2,448
|
|
Not Ranked
drilling block
Don't use a 2 x 4
get a piece of thick aluminum that is long enough to bolt down with one head bolt and a hole for the tap size drill at the proper spacing for drilling out the old hole---also drill another hole the same distance and actually run the helicoil tap thru it as a guide---1 inch thich is probably enough ,,, thicker is better(more guide)
|
08-04-2010, 09:04 AM
|
 |
CC Member
|
|
|
Join Date: Apr 2009
Location: Bethesda,
MD
Cobra Make, Engine: CSX 6022, navy blue, period correct 427 SO
Posts: 2,154
|
|
Not Ranked
They also make tap guides.....although probably not as good as a purpose cut piece of aluminum like Jerry suggested.
http://www.amazon.com/Big-Gator-Tool.../dp/B000ZN30U4
__________________
There are only three sports: bullfighting, motor racing, and mountaineering; all the rest are merely games.
www.partskeeper.com
(Less time searching, more time wrenching & driving)
|
08-06-2010, 12:25 PM
|
|
CC Member
|
|
|
Join Date: Jul 2005
Location: Virginia Beach, Va & Port Charlotte, Fl.,
Posts: 2,293
|
|
Not Ranked
Head studs are came in...
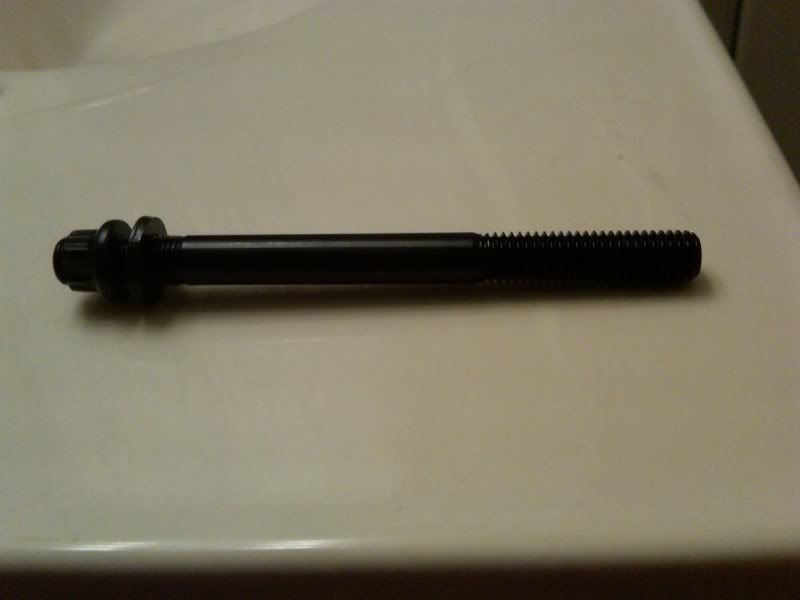
I got the special head studs from Keith today in time for Sunday's work (as usual excellent service!). It's really good see those 2" long block threads. These puppies should do the job! 
__________________
Too many toys?? never!
|
08-06-2010, 12:46 PM
|
 |
CC Member
|
|
|
Join Date: Oct 2002
Location: Eagle,
Ne.
Cobra Make, Engine: 1966 Lone Star 427SC.
Posts: 4,310
|
|
Not Ranked
Hey buddy, I'm curious. Why did you not use studs rather than bolts from the start ? If this question has already been asked, I apologize, I'm too lazy to read 17 pages. 
(it was great talking with you today) 
__________________
Regards,
Kevin
|
08-06-2010, 02:31 PM
|
 |
CC Member
|
|
|
Join Date: May 2001
Location: California,
Ca
Cobra Make, Engine: NAF 289 Slabside Early Comp Car with 289 Webers and all the goodies. Cancelling the efforts of several Priuses
Posts: 6,592
|
|
Not Ranked
ARP makes such nice stuff!
__________________
Rick
As you slide down the Banister of Life, may the splinters never be pointing the wrong way
|
08-06-2010, 02:33 PM
|
|
Senior Club Cobra Member
|
|
|
Join Date: Jul 2002
Cobra Make, Engine:
Posts: 15,712
|
|
Not Ranked
Studs can be a hassle (head, valve cover, oil pan, etc.). I have to remove a couple of mine to get the head off the engine when it's in the car. Taking the pan off with the studs is a pain. My motor came with studs all around, otherwise, I might well have considered bolts. I understand the value of studs but... they do have a down side. |
08-06-2010, 03:00 PM
|
|
CC Member
|
|
|
Join Date: Oct 2002
Location: Eagle,
Ne.
Cobra Make, Engine: 1966 Lone Star 427SC.
Posts: 4,310
|
|
Not Ranked
Hum,... never had much problems with studs. Guess I've been lucky.
The only semi-problematics, were some studs for the oil pan not matching the holes in the pan, and that was a simple file fix.
__________________
Regards,
Kevin
|
08-06-2010, 03:07 PM
|
|
Senior Club Cobra Member
|
|
|
Join Date: Jul 2002
Cobra Make, Engine:
Posts: 15,712
|
|
Not Ranked
Had head studs on my Healey 3000. That motor hadn't been apart for I guess 30 years. It wouldn't budge. Glued down real good, hand to hand to combat with those studs and getting the head to break loose and pull straight up over them. I've not had the best luck with studs over the years, but... you gotta love 'em. |
08-06-2010, 03:50 PM
|
|
CC Member
|
|
|
Join Date: Jul 2005
Location: Virginia Beach, Va & Port Charlotte, Fl.,
Posts: 2,293
|
|
Not Ranked
Quote:
Originally Posted by FUNFER2
Hey buddy, I'm curious. Why did you not use studs rather than bolts from the start ? If this question has already been asked, I apologize, I'm too lazy to read 17 pages.
(it was great talking with you today) |
Good talking with you too!
I didn't know about the stud requirement for the Pond block, nobody told me. I already had a set of almost new ARP head bolts so I reused them. As they say, hind sight's 20/20.
If you are going to run any aluminum block FE motor you might as well plan on running studs. The Shelby block's studs are set deeper in the block than Pond's. The Shelby studs are 75% more $$ that the Pond's studs.
I'm not really thrilled about the negative aspects of studs either... I do think they give better clamp though.
Ain't you glad now that you're going with Genesis Kev?? 
__________________
Too many toys?? never!
|
08-07-2010, 07:51 AM
|
|
CC Member
|
|
|
Join Date: Jul 2005
Location: Bartlett,
Ill
Cobra Make, Engine: Everett-Morrison LS1
Posts: 2,448
|
|
Not Ranked
Negative aspects????cause a oil pan don't have the bolt holes in right place??? or a cyl head has been on 30 years????Studs are so you can throw away the nuts every now and then instead of the block!!!! |
08-07-2010, 09:23 AM
|
|
Senior Club Cobra Member
|
|
|
Join Date: Jul 2002
Cobra Make, Engine:
Posts: 15,712
|
|
Not Ranked
The heads on my Cobra are fairly new, I still have to remove a couple of studs to remove the head. Clearly it's easier to take off parts without studs than it is with them, it's a simple observation of reality.
Which would you rather scrape old gasket material from? The bottom of a block (intake, top of the block, etc.) with studs or without studs? Or, would you remove the studs first so you can get the area nice and clean? Either way, leave them in or remove them to clean, it's certainly not a "positive aspect" of studs! |
08-07-2010, 05:59 PM
|
|
CC Member
|
|
|
Join Date: Jul 2005
Location: Bartlett,
Ill
Cobra Make, Engine: Everett-Morrison LS1
Posts: 2,448
|
|
Not Ranked
If you use the studs you probably wouldn't be changing gaskets
|
08-07-2010, 06:44 PM
|
|
CC Member
|
|
|
Join Date: Jul 2005
Location: Virginia Beach, Va & Port Charlotte, Fl.,
Posts: 2,293
|
|
Not Ranked
Quote:
Originally Posted by Jerry Clayton
If you use the studs you probably wouldn't be changing gaskets
|
True, very true...
__________________
Too many toys?? never!
|
08-07-2010, 07:54 PM
|
|
Senior Club Cobra Member
|
|
|
Join Date: Jul 2002
Cobra Make, Engine:
Posts: 15,712
|
|
Not Ranked
..if my current motor is anything like that Healey motor, I should be "good to go" for the next 20 years or so before it needs over haulin'. |
08-08-2010, 12:37 PM
|
|
CC Member
|
|
|
Join Date: Jul 2005
Location: Virginia Beach, Va & Port Charlotte, Fl.,
Posts: 2,293
|
|
Not Ranked
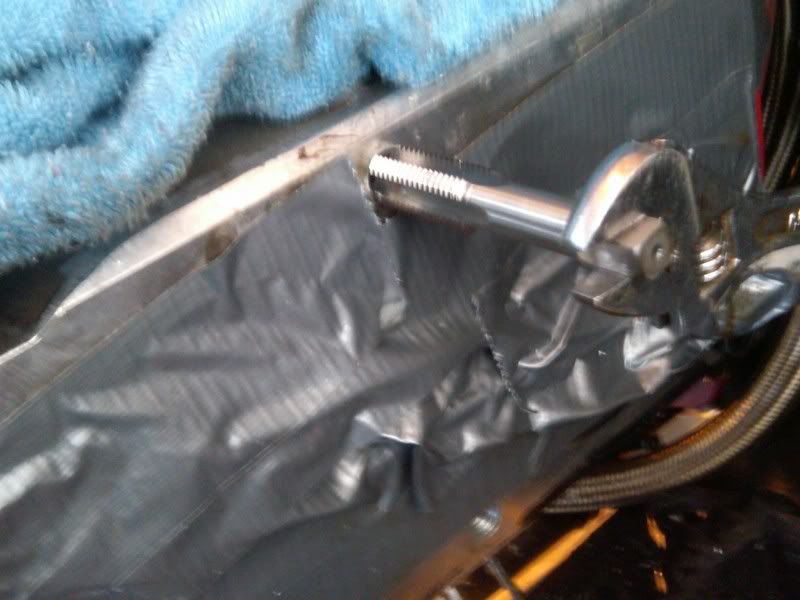
Let me apologize in advance for my poor picture quality. I'm tired, sweaty and not holding the Blackberry too steady either...
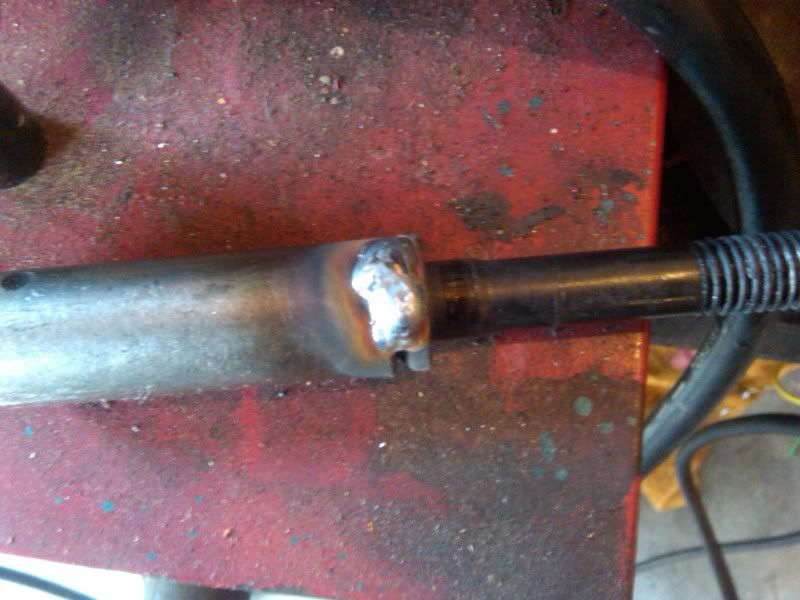
After splitting 2 sockets, to include an impact socket, getting all the existing head bolts out I ran into this last bolt. the head got rounded just enough where I couldn't get it out. I fired up the Mig welder and viola!, it came out after I welded the socket to the head ... in place no less. 
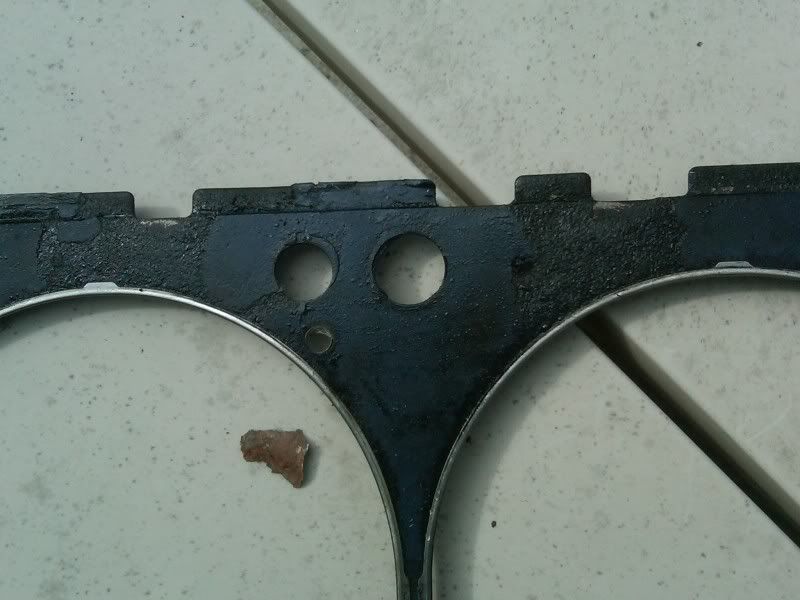
As you can see that head gasket where the stripped hole was leaked terribly. You can see the witness marks on the gasket too. The other head gasket looked perfecto!! It's plain to see where all my leakage was coming from. The Head gasket's compression ring still looked like it was sealing but probably wasn't.
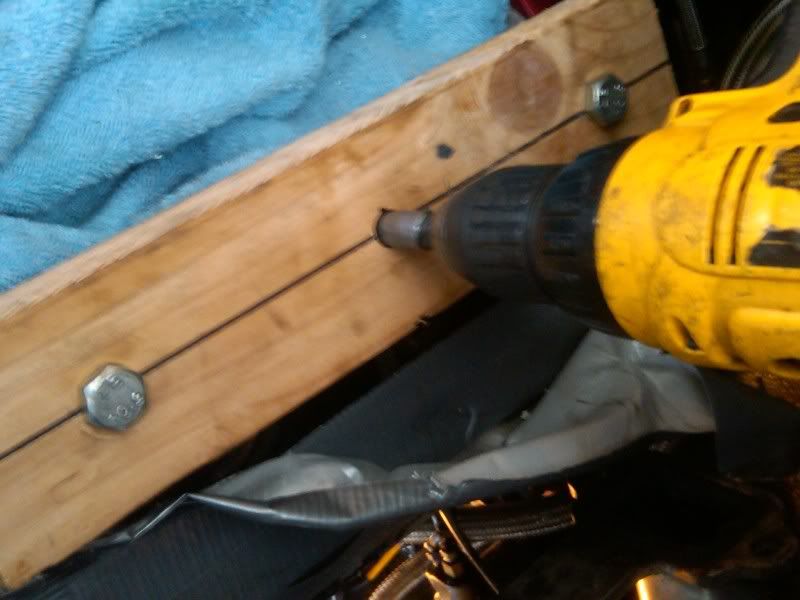
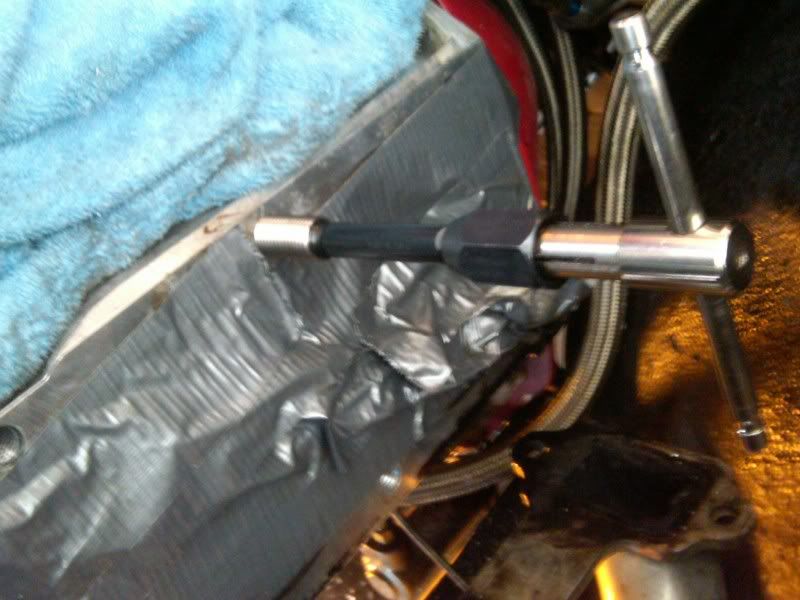
The 2x4 jig worked perfectly. It did a great job keeping things perpendicular. I test fit the head back on afterwords and ran the stud home. It was a tight fit but it went to the bottom of the hole. I anti-seized the threads, like I will do on all the studs on their bottom end. Operation success!! A little "McGuiver" action does it every time  ")
Next came tapping the hole for the helicoil. It was one of the few things today that ended up being a piece of cake.
Here I was using the helicoil insertion tool. It went down with no problem. I used a drift punch to knock the tang off the bottom.
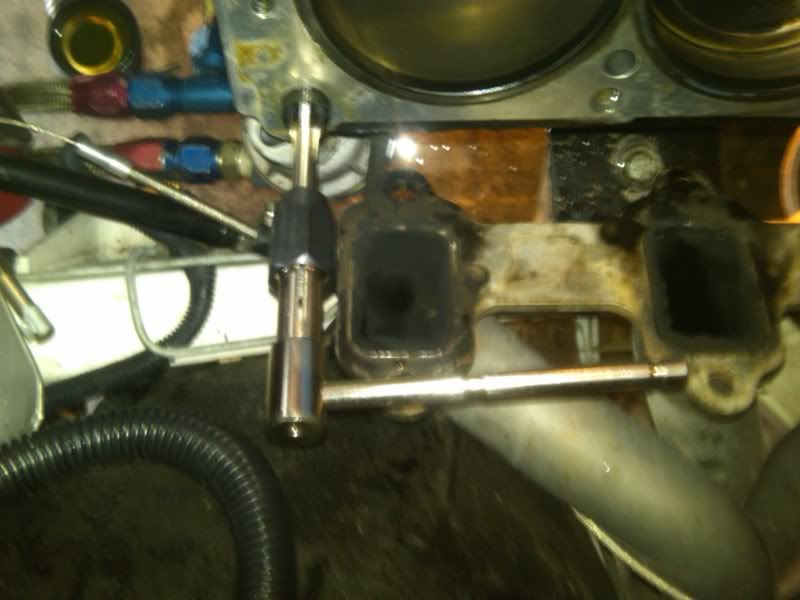
Last, but not least... I went around and chased the threads on all the remaining holes. There was no drag at all on the tap when It went by the point where the head bolt stopped. That tells me there was no/minimal thread deformation from the short bolts. The new studs now have smooth seamless holes to thread into. BTW... there were no other stripped holes, or even holes close to stripping.
Whew... The is ENOUGH for today. I've still have to go back to the garage and clean things up, blow out the least head's bolt holes and vacuum all the chips out, then put the short block up for the evening.
The heads will go to the machine shop tomorrow for checking and a skim cut (only if required). Next weekend starts the reassembly
Barry R, none of the cylinder liners have settled. The all are exactly even with the deck ... so ... no problems there. Thanks for all the help and tech advice. You are a stand-up guy and a credit to the FE world!! My hat's off to ya sir.
The saga continues... more to follow.
Dave
__________________
Too many toys?? never!
|
08-08-2010, 01:46 PM
|
|
CC Member
|
|
|
Join Date: May 2001
Location: California,
Ca
Cobra Make, Engine: NAF 289 Slabside Early Comp Car with 289 Webers and all the goodies. Cancelling the efforts of several Priuses
Posts: 6,592
|
|
Not Ranked
Those pictures are in Technicolor! 
Good job Dave, making use of tools at hand and doing it successfully.
__________________
Rick
As you slide down the Banister of Life, may the splinters never be pointing the wrong way
|
 Posting Rules
|
You may not post new threads
You may not post replies
You may not post attachments
You may not edit your posts
HTML code is Off
|
|
|
All times are GMT -7. The time now is 09:47 PM.
|


 Linear Mode


