 
 Main Menu
|
|
Nevada Classics
|
|
Advertise at CC
|
| S |
M |
T |
W |
T |
F |
S |
| |
|
|
|
|
|
1 |
| 2 |
3 |
4 |
5 |
6 |
7 |
8 |
| 9 |
10 |
11 |
12 |
13 |
14 |
15 |
| 16 |
17 |
18 |
19 |
20 |
21 |
22 |
| 23 |
24 |
25 |
26 |
27 |
28 |
29 |
| 30 |
|
|
|
|
|
|
|
|
CC Advertisers
|
|
 3Likes 3Likes

11-29-2007, 07:58 PM
|
 |
CC Member

|
|
|
Join Date: Feb 2006
Location: IGH, MN,
mn
Cobra Make, Engine: scratch build self design 4.6l DOHC
Posts: 769
|
|

 Not Ranked
Man this is going to take a while. Current estamtes tell me that I should be finished reloading my pics next sunday(9 days from now). Man is there anyway I could bribe someone to wave the ten pic rule till I get my gallery reloaded.
Patrick
|
01-14-2008, 04:36 PM
|
|
CC Member
|
|
|
Join Date: Feb 2006
Location: IGH, MN,
mn
Cobra Make, Engine: scratch build self design 4.6l DOHC
Posts: 769
|
|
Not Ranked
 This may be out of sequence
Well thank all of you for your input. Here is what I came up with. I have eight points that will be glassed into the body for hidden mounts,plus the three points around the door sill (anti intrusion pins through the body) and the bumper mounts.


Now I can mix up some goo and fix the pads to the body and continue with the panel construction portion of this build; Patrick |
01-14-2008, 04:40 PM
|
|
CC Member
|
|
|
Join Date: Feb 2006
Location: IGH, MN,
mn
Cobra Make, Engine: scratch build self design 4.6l DOHC
Posts: 769
|
|
Not Ranked
This happened before the last post
Most of you,(Okay some of you) know that I'm building my cobra the hard way, from scratch. Well here are some pics of the rear wheel well panels I've been working on. Working with glass is not fun, but forming sheet metal into these shapes would require way to much work.


Now I was hoping that I could get a good pic of what it looks like from the front wheel well toward the front and toward the exhaust, with the body mounted. I need to start plotting the panels for the front wheel wells and could use some ideas.
Patrick |
01-17-2008, 06:59 AM
|
 |
CC Member
|
|
|
Join Date: Feb 2001
Location: Leechburgastain,
PA
Cobra Make, Engine: Myself/Body from CSX-2575 & hand built Birdcage
Posts: 676
|
|
Not Ranked
Quote:
|
Originally Posted by fasterpatrick
Well thank all of you for your input. Here is what I came up with. I have eight points that will be glassed into the body for hidden mounts,plus the three points around the door sill (anti intrusion pins through the body) and the bumper mounts.
Now I can mix up some goo and fix the pads to the body and continue with the panel construction portion of this build; Patrick |
I think you'll find on the first hot sunny day this car sits out and the body gets hot you'll see the round imprints where you laminated the support disc. On the lower sides i don't think it's a problem but on top it's gonna sag..
Mike
__________________
6S1941
Allied 289 Slab Side
73 2.3 turbo pinto
|
01-17-2008, 09:02 AM
|
|
CC Member
|
|
|
Join Date: Nov 2003
Location: New Britain,
CT
Cobra Make, Engine: Size 10 Feet
Posts: 3,029
|
|
Not Ranked
Mike is right, except you won't necessarily need a hot day, just a little time. Support the body along the hidden edges of the openings to avoid distortion.
|
01-17-2008, 09:22 AM
|
|
CC Member
|
|
|
Join Date: Feb 2001
Location: Leechburgastain,
PA
Cobra Make, Engine: Myself/Body from CSX-2575 & hand built Birdcage
Posts: 676
|
|
Not Ranked
I had the same problem with my Allied body, It suppose to lay on & be attached to a OEM cobra chassis and glassed around the tubes. That's kinda tough to do so what i did was hand form aluminum jams, hood/doors/trunk/rockers and epoxied the aluminum to the glass body hammered /formed then riveted the aluminum to the birdcage chassis just like AC cars did on the original cobra. Kinda throws a curve at the people that checking a parked cobra for a riveted body. I'll get a few pics..
Mike


__________________
6S1941
Allied 289 Slab Side
73 2.3 turbo pinto
Last edited by map; 01-17-2008 at 10:54 AM..
|
01-17-2008, 03:16 PM
|
|
CC Member
|
|
|
Join Date: Aug 2004
Location: Tarpon Springs,
fl
Cobra Make, Engine: scratch building
Posts: 182
|
|
Not Ranked
Mount
Allied
I like that idea..looks good
|
01-17-2008, 07:53 PM
|
|
CC Member
|
|
|
Join Date: Feb 2006
Location: IGH, MN,
mn
Cobra Make, Engine: scratch build self design 4.6l DOHC
Posts: 769
|
|
Not Ranked
Sag?
Sag?  , the body is resting on the framework at the front of the hood, rear of the hood, around the cockpit, at the top of the trunk, and along the valleys in the body. The pads in question will have negative pressure pulling the body into the frame, not resting on them. I'm more worried about pulling them off the body. plan is to paint the body with black primer and roll whole car out in the hot Aug. sun and bake before doing the final body work to cure and settle.
Though I like the aluminum edge fake out thats got to keep them guessing. My body has to be removable I don't think I could pull the engine without cutting it up. So to be safe I can't permanently attach it.
Patrick |
01-18-2008, 03:03 AM
|
|
CC Member
|
|
|
Join Date: Mar 1999
Location: penn.,
Posts: 2,561
|
|
Not Ranked
Steel and glass expand/contract at different rates, any pulling/pushing forces are going to result with "ghosting" of those brackets thu the body. Better to design a thu bolt system thu the opening flanges around the hood/doors/trunk.Hate to have to say "We told you so " after you put a paint job on it next summer.
|
01-18-2008, 08:40 AM
|
|
CC Member
|
|
|
Join Date: Oct 2006
Location: Yorba Linda,
ca
Cobra Make, Engine:
Posts: 254
|
|
Not Ranked
I'm afraid Mr. B is correct. Most of the experienced mfgs bond long 90-degree glass panels to the underside of the bodies and bolt through those. Some have extended hood, trunk, and door jambs that they bolt through.
Or you could take the FFR approach and just drill right through the body .
Brian |
01-18-2008, 08:45 AM
|
|
CC Member
|
|
|
Join Date: Oct 2006
Location: Yorba Linda,
ca
Cobra Make, Engine:
Posts: 254
|
|
Not Ranked
Also, don't forget that you are going to have some through-body brackets later - door strickers, bumper/quick jacks, etc,. that will add to the mounting strength indirectly.
|
01-26-2008, 10:09 PM
|
|
CC Member
|
|
|
Join Date: Feb 2006
Location: IGH, MN,
mn
Cobra Make, Engine: scratch build self design 4.6l DOHC
Posts: 769
|
|
Not Ranked
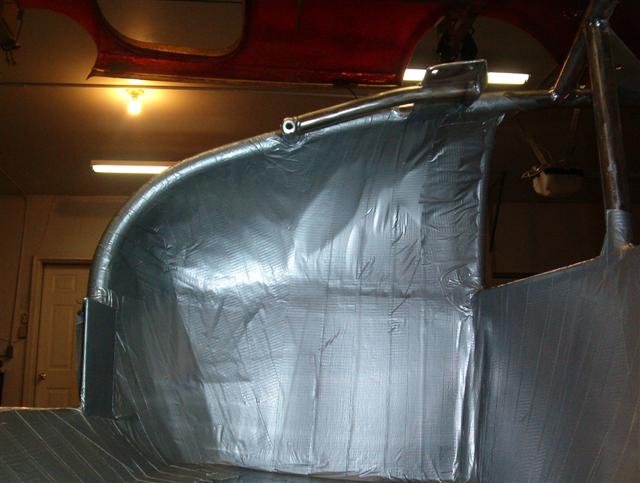
Well I managed to get a couple more panels finished for the rear of my scratch build, and it's starting to look like something. Now I think I'm getting the hang of this stuff and just to show how and what you have to do sometime.
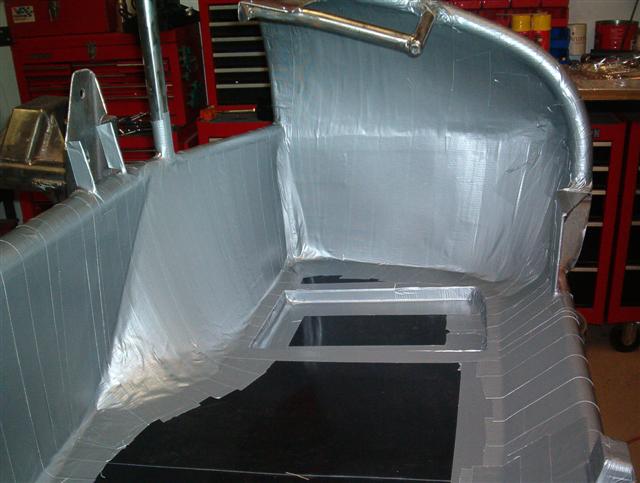
The mold

The business side is covered with the wounder material ductape.
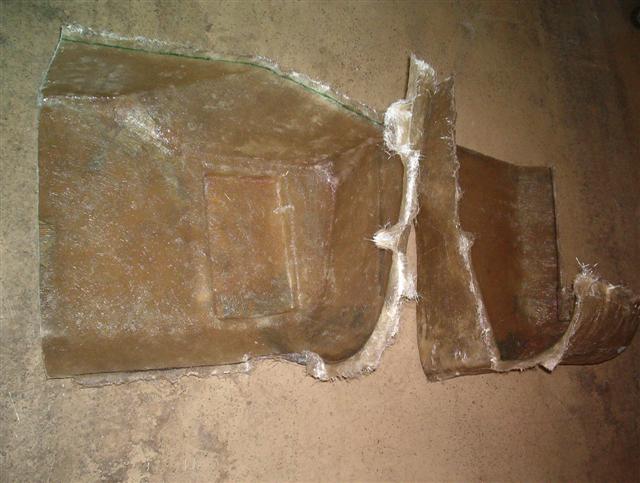
The layup

Now prying this off the mold was a PITA but it's a weird shape.
Trimmed and refit

It fit back easier after trimming
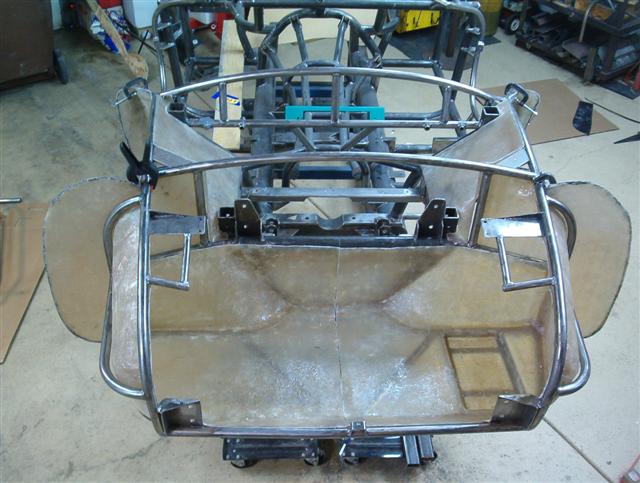
With friends

Now it looks like progress. I think I will work on the trunk next, until later see ya.
Patrick |
02-01-2008, 09:12 PM
|
|
CC Member
|
|
|
Join Date: Feb 2006
Location: IGH, MN,
mn
Cobra Make, Engine: scratch build self design 4.6l DOHC
Posts: 769
|
|
Not Ranked
 RED GREEN would be proud
Hey, check out my new duct tape trunk!
 Naw, It's just the next mold for my glass Odyssey.
Now with a little luck I'll has pieces by Sun. eve;
Patrick |
02-02-2008, 06:19 PM
|
 |
CC Member
|
|
|
Join Date: Apr 2006
Location: West Monroe,
LA
Cobra Make, Engine: Joey Manufacturing Inc.
Posts: 343
|
|
Not Ranked
Looking good P!
I love the smell of fresh resin in the morning!
__________________
"Me fodder was King Neptune, me mudder was a mermaid. I was born on the crest of a wave and rocked in the cradle of the deep. Me hair is like hemp, me arms are like spars. When I spits, I spits tar. I'm hard, I am, I is, I are. "
|
02-02-2008, 07:19 PM
|
 |
Senior Club Cobra Member
|
|
|
Join Date: Dec 2001
Location: Glendale,
AZ.
Cobra Make, Engine: Cobray-C3, The 60's body lines on todays chassis technology
Posts: 2,302
|
|
Not Ranked
Patrick,
I saw your trunk lay up and photo with the duct tape. You might want to try (campaign signs) for one off or fabs like you are doing. Those VOTE FOR signs are a type of plastic and about 0.060" thick, resign won't stick to them and in sizes up to 4 x 8 foot sheets. The ink or printing on them may run a bit but black pigment in the resign of last layer fixes that. Use a pneumatic nibbler or tin snips to cut patterns with ease. I guess you could buy at a sign shop but I have a pile collected a while ago after the elections stashed. My last fab secret I am willing to leak is to try a hot glue gun to build the patterns too. Good luck and have fun ........... PS don't tell anybody my tricks one off fabs
|
02-02-2008, 07:40 PM
|
|
CC Member
|
|
|
Join Date: Feb 2006
Location: IGH, MN,
mn
Cobra Make, Engine: scratch build self design 4.6l DOHC
Posts: 769
|
|
Not Ranked
Ya, I have some of those and use them when I can but some of the curves I working against don't like their corrugated nature. the duct-tape works well for that, but cleanup is a mess.
Patrick
|
02-03-2008, 11:38 AM
|
|
Senior Club Cobra Member
|
|
|
Join Date: Dec 2001
Location: Glendale,
AZ.
Cobra Make, Engine: Cobray-C3, The 60's body lines on todays chassis technology
Posts: 2,302
|
|
Not Ranked
Patrick,
Your mention of the corrugation is right on but those are like 3/16" thick, there are pure plastic (of some type) material signs that are much thinner and thus easy to do smooth cures with.
In spots you need to use tape or whatever works try spraying surface with PVA or polyvinyl acetate. PVA is water soluble so clean up is easy or hit it with high pressure air gun (but that makes shop clean up instead of object clean up). Have fun
|
02-03-2008, 12:27 PM
|
|
CC Member
|
|
|
Join Date: Feb 2006
Location: IGH, MN,
mn
Cobra Make, Engine: scratch build self design 4.6l DOHC
Posts: 769
|
|
Not Ranked
Hey, everything worked well and I now have a trunk. pieces all trimmed and refit. now I knew I would have to cut it in half to get it to work but I will fasten them together during final assembly.


Now to move forward. rear cockpit wall, tunnel, and custom dash are left.
Lurkers, I know this thread gets lots of traffic, so speak up good or bad I would love to have your opinions. Plus I don't get out to much so this is as close to contact as I get sometimes  ;
Patrick |
02-03-2008, 07:21 PM
|
 |
CC Member
|
|
|
Join Date: Mar 2007
Location: Alpena,
Mi
Cobra Make, Engine: Scratch building frame,FFR Mkll body ,302w, and T5 trans, 3.0 rear.
Posts: 416
|
|
Not Ranked
Patrick, I am following your build and getting more ideas for my build. Have the front suspension mounted (tacked ) and am starting the rear brackets in the morning, will try posting some pics tomorrow. Your work is awsome. Carl.
__________________
1963 Mercury Monterey 460+ .060 .//Cobra clone, Scratch build frame /302/ T-5 WC / 3.00-9in/FFR mkll body (Broken but repairable) /91 Lincoln Wire Wheels   //  : N.S.M.C Charter/Life Member// Die Hard Blue Oval Nut  
The finish is better than the beginning. Ecc7:8
|
02-04-2008, 10:14 AM
|
|
CC Member
|
|
|
Join Date: Apr 2006
Location: West Monroe,
LA
Cobra Make, Engine: Joey Manufacturing Inc.
Posts: 343
|
|
Not Ranked
Carl's build
Quote:
Originally Posted by 63mercury

Patrick, I am following your build and getting more ideas for my build. Have the front suspension mounted (tacked ) and am starting the rear brackets in the morning, will try posting some pics tomorrow. Your work is awsome. Carl.
|
Carl,
did you get those pictures?
how about starting a "Carl's build thread"?
__________________
"Me fodder was King Neptune, me mudder was a mermaid. I was born on the crest of a wave and rocked in the cradle of the deep. Me hair is like hemp, me arms are like spars. When I spits, I spits tar. I'm hard, I am, I is, I are. "
|
 Posting Rules
|
You may not post new threads
You may not post replies
You may not post attachments
You may not edit your posts
HTML code is Off
|
|
|
All times are GMT -7. The time now is 08:30 PM.
Links monetized by VigLink
|


 Hybrid Mode

