 
 Main Menu
|
|
Nevada Classics
|
|
Advertise at CC
|
| S |
M |
T |
W |
T |
F |
S |
| |
1 |
2 |
3 |
4 |
5 |
6 |
| 7 |
8 |
9 |
10 |
11 |
12 |
13 |
| 14 |
15 |
16 |
17 |
18 |
19 |
20 |
| 21 |
22 |
23 |
24 |
25 |
26 |
27 |
| 28 |
29 |
30 |
31 |
|
|
|
|
|
CC Advertisers
|
|
 323Likes 323Likes

07-23-2017, 07:17 PM
|
 |
CC Member

|
|
|
Join Date: Aug 2013
Location: Canandaigua,
NY
Cobra Make, Engine: SPF MKII Riverside Racer FIA
Posts: 2,507
|
|

 Not Ranked
 Getting closer
Waiting on some fittings for the oil cooler, that will not arrive until Wednesday, so spent my time working on some small projects.
Hooked up the linkage for the carb, still need to add one more retaining bolt to the linkage, will pick that up tomorrow.
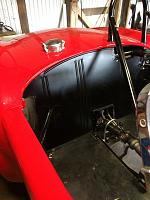
Then I moved on to address a concern regarding the gas cap. Being that the car is a vintage race car, I did not have the fuel tank installed as the race groups require a fuel cell. So, I have an opening cut out for the gas cap and an open area over the differential where the fuel tank would go.
 
I thought that the gas cap would have a gasket that would fit underneath it and I could just seal the cap to the bodywork. However, when I went to fit the gas cap I realized that the cap fit inside the hole in the bodywork and rested on top of the nonexistent gas tank for it's support  Now what do I do? 
The solutions that I was finding were to install a rubber plug, but that was not going to work and I was not happy with the look. I could adhere some aluminum from the underside to fill the hole, but that did not seem to be what I wanted to do either.
I really wanted to have the vintage look of the Monza gas cap, even though it wold not be functional. Eventually I came upon a decision that seemed to be workable. I took some measurements and then fabricated some spare sheet metal and a piece of aluminum to cover the hole and provide support from the frame. I then marked and drilled holes for the screws that mount the gas cap and then painted the sheet metal red in case some of it showed.
 
I then fitted the contraption into place and secured the gas cap and voila!
  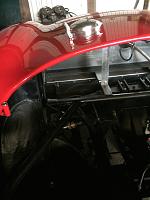
Hopefully it will work!
This coming week I am going to do a leak test of the fuel system and then hopefully by weeks end do an initial start-up. Will also be installing the passenger seat and the inner body panels.
Jim
__________________

Last edited by 1795; 07-24-2017 at 05:28 AM..
Reason: damn auto-correct!
|
07-24-2017, 06:46 PM
|
|
CC Member
|
|
|
Join Date: Aug 2013
Location: Canandaigua,
NY
Cobra Make, Engine: SPF MKII Riverside Racer FIA
Posts: 2,507
|
|
Not Ranked
Moving forward
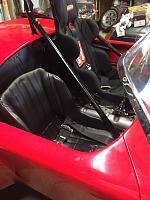
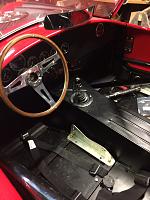
Got a couple of things accomplished today. Spent a couple of hours with the tin snips cutting the rear panel to accommodate the changes due to the roll cage additions.
I also installed the side view mirrors and have a larger rear view mirror installed as well.

Then I figured, well, if you are going to be able to test start the car soon, it would be nice to have a seat installed.....so

Will be working more on the throttle cable and finishing some small things off, in addition to installing the passenger seat and transmission tunnel over the next couple of days.
Jim
__________________
|
07-24-2017, 09:35 PM
|
 |
CC Member
|
|
|
Join Date: Jul 2006
Location: Redding,
CA
Cobra Make, Engine: FFR chassis and suspension, Mr. Bruce 289 FIA body
Posts: 1,066
|
|
Not Ranked
Well done
|
07-25-2017, 04:59 PM
|
|
CC Member
|
|
|
Join Date: Aug 2013
Location: Canandaigua,
NY
Cobra Make, Engine: SPF MKII Riverside Racer FIA
Posts: 2,507
|
|
Not Ranked
Today started with running the crankcase vent lines from the valve covers to the catch can, a relatively simple task. All racing groups pretty much require that any potential fluid that could end up on the track via a vent needs to be directed towards a 1 quart catch can.

I then moved onto installing the passenger seat. While I could run without a passenger seat, it was common during the time that these cars were raced to have a passenger seat. In addition, if you run without a passenger seat you have a 25lb weight penalty that you have to add to the car. It was a little easier than the drivers seat, in that I did not have as much roll cage to deal with and it is a smaller seat. I like the looks of the seat and thought about using it for the driver, but I need more protection and the vintage rules would have required me to infall a padded head support as there is none on the passenger seat.
It looked great, then it was time to install the transmission tunnel. Unfortunately, you have to remove the seats in order to install the tunnel ! So, out they came. One might say, well why did't you install the tunnel first? The reason is that with the race seats my mounting points and support were different than the stock mounting and I had to make sure that the seats fit. I could always adjust the tunnel (which it needed a lot of cutting) but was limited in how I could adjust the seat mounting.
After numerous progressive adjustments to the tunnel cover, it was finally in place and the shifter worked in all gears without binding. 
That is enough for tonight. Tomorrow I will re-install the seats and install the oil cooler lines when the fittings arrive. We are almost there!
Jim
__________________
Last edited by 1795; 07-25-2017 at 05:18 PM..
|
07-25-2017, 05:12 PM
|
|
Senile Club Cobra Member
|
|
|
Join Date: Feb 2001
Location: Buffalo, NY USA,
NY
Cobra Make, Engine: Superformance
Posts: 4,566
|
|
Not Ranked
Ah yes, the joys of race car building! "Install....remove, install, remove. Repeat ten times"
__________________
"I'm high all right, but on the real thing....powerful gasoline and a clean windshield..."
rick@autoventureusa.net
|
07-25-2017, 05:19 PM
|
|
CC Member
|
|
|
Join Date: Aug 2013
Location: Canandaigua,
NY
Cobra Make, Engine: SPF MKII Riverside Racer FIA
Posts: 2,507
|
|
Not Ranked
Yes, if you have not installed and re-installed something at least a couple of times, you have not been doing it right! ")
__________________
|
07-25-2017, 10:23 PM
|
|
CC Member
|
|
|
Join Date: Aug 2008
Location: Tahoe/Truckee,
ca
Cobra Make, Engine: Ford Racing 363/8-stack injection, SPFR0012
Posts: 260
|
|
Not Ranked
Can I make a suggestion?
When at the Cobra Experience I saw a (original) FIA and the mirrors are mounted to the rear of the windshield pillars (by just reversing the mounts). Trust me when I say you can not see anything in the customary forward mount, but in the rear mount they work. Try it. I can email you a photo of the Original FIA. I'v done it to 0012, now they are useable.
Mark.
|
07-26-2017, 05:09 AM
|
|
CC Member
|
|
|
Join Date: Aug 2013
Location: Canandaigua,
NY
Cobra Make, Engine: SPF MKII Riverside Racer FIA
Posts: 2,507
|
|
Not Ranked
Mark,
Thanks, I would appreciate that. Was considering it as I was looking at the car and wondered how useable they would be in the current orientation.
Jim
__________________
|
07-26-2017, 06:28 PM
|
|
CC Member
|
|
|
Join Date: Aug 2013
Location: Canandaigua,
NY
Cobra Make, Engine: SPF MKII Riverside Racer FIA
Posts: 2,507
|
|
Not Ranked
Todays work
Had a fairly productive day today. Re-intalled the seats and finished up the interior.
 
Then I took a look at Mark's suggestion about reorienting the side view mirrors to be more useful.
 
While that allowed for the mirrors to be more easily seen by the driver, when the frames are installed backwards it leaves a large piece of metal going towards the front of the car from the windshield. Not the best looking and a serious negative impact on wind resistance. So, I marked where the frames needed to be cut and then cut and replaced them. Much better.
 
While waiting for UPS to deliver the fittings for the oil cooler, I pressurized the fuel system and checked for leaks. No leaks and the pressure gauge stayed solid at 4psi.
UPS arrived later than normal, but in time for me to install the oil cooler lines. The oil flow will be from the oil pump to the remote filter and then to the oil cooler and back to the block.
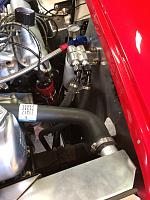 
Cleaned up the engine bay, installed the oil temp sensor and tomorrow will start filling the engine and oil cooler lines with oil. I plan on trying to get as much oil into the lines and oil cooler as possible to ensure that I can get oil pressure as soon as possible. I will be using the starter to run the oil pump without plugs in place to minimize strain on the starter.

Jim
__________________
|
07-27-2017, 07:23 AM
|
|
CC Member
|
|
|
Join Date: Jul 2006
Location: Redding,
CA
Cobra Make, Engine: FFR chassis and suspension, Mr. Bruce 289 FIA body
Posts: 1,066
|
|
Not Ranked
That is looking fantastic! I need to get back to work on my build. This is motivation
|
07-27-2017, 09:31 AM
|
|
CC Member
|
|
|
Join Date: Aug 2008
Location: Tahoe/Truckee,
ca
Cobra Make, Engine: Ford Racing 363/8-stack injection, SPFR0012
Posts: 260
|
|
Not Ranked
Jim, are you running a thermostat for the oil cooler? Mirrors look good, better yet they are now useful. We too will be going to a larger mirror (maybe even a day/night) on the cowl.
Mark. |
07-27-2017, 11:47 AM
|
|
CC Member
|
|
|
Join Date: Aug 2013
Location: Canandaigua,
NY
Cobra Make, Engine: SPF MKII Riverside Racer FIA
Posts: 2,507
|
|
Not Ranked
Quote:
Originally Posted by Moto One

Jim, are you running a thermostat for the oil cooler? Mirrors look good, better yet they are now useful. We too will be going to a larger mirror (maybe even a day/night) on the cowl.
Mark. |
Mark,
No thermostat on the oil cooler. The engine will be running between 4,000-7,000 rpms during each race, with most of the time being in the 5,500-6,500 range. Between warming the car up on the grid and during the pace lap, the oil will easily reach temp and I want a clear flow of oil through the cooler. You would not run your car this way on the road.
Jim
__________________
|
07-27-2017, 06:10 PM
|
 |
CC Member
|
|
|
Join Date: Aug 2009
Location: Adelaide,
SA
Cobra Make, Engine: AP 289FIA 'English' spec.
Posts: 13,152
|
|
Not Ranked
Bill is right....excellent motivation for us builders!
Great progress Jim.
Cheers,
Glen
|
07-27-2017, 06:55 PM
|
|
CC Member
|
|
|
Join Date: Aug 2013
Location: Canandaigua,
NY
Cobra Make, Engine: SPF MKII Riverside Racer FIA
Posts: 2,507
|
|
Not Ranked
Almost there
No pictures today, filling oil lines and pulling spark plugs is not that exciting. When I had the 428 Cobra Jet in my ERA I thought that it was a pain to do spark plugs, especially on number 8. Well, a 289 FIA is no better. Still a tight fit and the forward brace tubes can be in the way at times.
Pulled all of the plugs, disconnected the coil and after fill in the oil filter, oil pan and getting as much in the lines as I could. Started cranking with the starter. Did short bursts to avoid over heating the solenoid or the starter. After a few attempts, started seeing some oil pressure. gave it a rest and then was able to get 50 psi with the starter motor and no leaks!
Getting late, so it looks like tomorrow I will give it a test start. Still need to bleed the clutch and hook-up the HTOB. Will see if I can elicit some help for that, as I would like to have the HTOB and clutch operating before I test start.
Jim
__________________
Last edited by 1795; 07-27-2017 at 07:55 PM..
|
07-28-2017, 01:28 PM
|
|
CC Member
|
|
|
Join Date: Aug 2013
Location: Canandaigua,
NY
Cobra Make, Engine: SPF MKII Riverside Racer FIA
Posts: 2,507
|
|
Not Ranked
Waiting a little bit...
While I really wanted to start the car today, discretion and the tough of potentially harming things got the better of me. I decided to wait until I get the exhaust installed next Tuesday to wait for the start up. Did not want flames shooting out of those open headers and damaging anything. Also, did not want to take a chance on damaging the exhaust valves either.
so, I worked on bleeding the hydraulic clutch, still getting tiny bubbles. So will work on that some more this weekend. Placed pieces of leftover hose around oil lines where they were close to metal, and at Blas' suggestion installed some heat shield over the fuel line near the header.

I also re-installed the heat shields under the car and a few other minor things. I will need to find a couple of people this weekend to help me get the hood back on.
Jim
__________________
|
07-28-2017, 02:09 PM
|
|
CC Member
|
|
|
Join Date: Dec 2001
Location: Louisville,
KY
Cobra Make, Engine: I'm Cobra-less!
Posts: 9,417
|
|
Not Ranked
I would not use the starter to prime the oil system. That engine has been sitting long enough that it will be dry all over. Use a priming tool on the pump shaft to build oil pressure.  |
07-28-2017, 05:02 PM
|
|
CC Member
|
|
|
Join Date: Aug 2013
Location: Canandaigua,
NY
Cobra Make, Engine: SPF MKII Riverside Racer FIA
Posts: 2,507
|
|
Not Ranked
Thanks for the suggestion Brent. I did remove the valve covers and our some oil around the pushrods to try to get some oil down to the camshaft. Will take that into consideration the next time that I have to have the engine out.
You are a quality person and your reputation is well deserved. I appreciate it.
Jim
__________________
Last edited by 1795; 07-28-2017 at 05:47 PM..
|
07-29-2017, 06:47 AM
|
 |
CC Member
|
|
|
Join Date: Jun 2010
Location: North of Toronto,
Ont
Cobra Make, Engine: Superformance #1950, Roush 402R, TKO600
Posts: 552
|
|
Not Ranked
Jim I can't wait to hear that beast roar to life! Fantastic job thus far!
Stu.
|
07-30-2017, 10:04 AM
|
|
CC Member
|
|
|
Join Date: Aug 2008
Location: Tahoe/Truckee,
ca
Cobra Make, Engine: Ford Racing 363/8-stack injection, SPFR0012
Posts: 260
|
|
Not Ranked
Keep up the good work. Alway interested in learning, and I'm learning a lot from this.
Thanks Jim.
Mark.
|
07-30-2017, 03:22 PM
|
|
CC Member
|
|
|
Join Date: Aug 2013
Location: Canandaigua,
NY
Cobra Make, Engine: SPF MKII Riverside Racer FIA
Posts: 2,507
|
|
Not Ranked
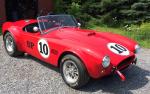
Graphics
So, as I was waiting today, decided to clean the car and attach the vehicle graphics that have. Any suggestions or sponsorship graphics that anyone want to send me would be greatly appreciated..  Donations gladly accepted..
So this is what I have so far.
  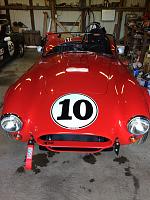
Getting there.
Jim
__________________
Last edited by 1795; 07-30-2017 at 04:40 PM..
|
 Posting Rules
|
You may not post new threads
You may not post replies
You may not post attachments
You may not edit your posts
HTML code is Off
|
|
|
All times are GMT -7. The time now is 06:15 PM.
Links monetized by VigLink
|


 Linear Mode


