 
 Main Menu
|
|
Nevada Classics
|
|
Advertise at CC
|
| S |
M |
T |
W |
T |
F |
S |
| |
|
|
|
|
1 |
2 |
| 3 |
4 |
5 |
6 |
7 |
8 |
9 |
| 10 |
11 |
12 |
13 |
14 |
15 |
16 |
| 17 |
18 |
19 |
20 |
21 |
22 |
23 |
| 24 |
25 |
26 |
27 |
28 |
29 |
30 |
| 31 |
|
|
|
|
|
|
|
|
CC Advertisers
|
|
 1Likes 1Likes

11-30-2009, 09:12 PM
|
|
CC Member

|
|
|
Join Date: Nov 2006
Location: Sacramento,
ca
Cobra Make, Engine: classic roadesters ltd, 302, T5
Posts: 318
|
|

 Not Ranked

James;; I have done this a few times, but not enough to keep the butterflies away when spraying basecoat and clearcoat, but I figure that if I can keep the butterflies flying in formation it might be a little easier. Really it never gets easy.
Update: 58 hours into final phase, 10 days down, 80 to go.
I am happy about todays progress, paint came out about as good as you can expect, seeing as how I did not really clean the shop that well, did not remake my exhaust fan system etc.... It will do just fine. Got a few things reattached, got the new arms painted and installed, got the brake lines cleaned and ready for install tomorrow after I retouch the front frame.
While waiting between coats managed to call an exhaust coating company. i have settled on a new celgin exhaust coating system. Still in the developmental stages but supposedly the next great coating system to come along. Made by Tech Line, air dries, so looks like the powdercoating oven i built may not be needed on this build. Suppose I will have to coat something just to say I did. That is the way it goes with these builds, you think you got it figured out and then you turn a corner and everything changes.
Ray

|
12-01-2009, 09:55 PM
|
|
CC Member
|
|
|
Join Date: Nov 2006
Location: Sacramento,
ca
Cobra Make, Engine: classic roadesters ltd, 302, T5
Posts: 318
|
|
Not Ranked
64 hours, 11 days, 79 days to go:
got the rest of the frame painted, removed fuel tank for painting, removed all the rest of lines from rear half of car.
Ray
|
12-02-2009, 06:23 AM
|
 |
CC Member
|
|
|
Join Date: May 2006
Location: Portland,
OR
Cobra Make, Engine: ERA FIA, 1964 289->Webers
Posts: 3,689
|
|
Not Ranked
Doing good! Keep up the hard work!
__________________
ERA FIA 2088
|
12-02-2009, 06:14 PM
|
|
CC Member
|
|
|
Join Date: May 2008
Location: Sacramento,Ca.,
Ca.
Cobra Make, Engine: Midstates (2001)
Posts: 1,724
|
|
Not Ranked
It will be worth all that hard work Ray............
|
12-02-2009, 11:12 PM
|
|
CC Member
|
|
|
Join Date: Nov 2006
Location: Sacramento,
ca
Cobra Make, Engine: classic roadesters ltd, 302, T5
Posts: 318
|
|
Not Ranked
Thanks for the encouragement guys; I can only hope it is worth it, I have to admitt a few times I have been tempted to cut corners. My buddy (craig)came down yesterday and informed me that he was going to put mirrors under the car at autorama and that I had no choice but to make it respectable.
A couple days ago I said that sometimes you go around a corner, find something new or different and suddenly things change. Well this time it was Craig coming around the corner and badmouthing my chevette steering column. I do have to admitt that I would have picked something else, but I was thinking of leaving it in anyway. Well, I knew I had this 67 mustang column in the barn from another strip fest about 15 years ago. So I guess we now gotta marry the chevette column to the mustang column, and put a key on the dash. I told him that since it was his idea he had to get some seat time with the new cutters and welders so he was gonna do the work.
UPDATE: 68 hours, 12 days down, 78 to go;
Did not get out to shop until 7pm tonite, since yesterday was also short I felt I had to get some time in.
Removed the rear-end, cleaned it and painted it and reinstalled it, plus painted the arms with it and touched up the frame around the connecting points. I also wired brushed the bolts and nuts, installed new washers.
Here is a pix of the new upper A-arms, I am very pleased with them, got them from Southern Rods in North Carolina, 130.00 a pair.
http://farm3.static.flickr.com/2497/...6f60cb3d_b.jpg
Hey RustyBob, here is your silver against black, I was almost cussing you because you would not let me have a two tone frame, see that flashlight in the background, it took that and me getting into some weird positions to paint all the strange places on that frame. But I do know it was the right thing to do.
http://farm3.static.flickr.com/2761/...1cd944fa_b.jpg
OK, so I broke down and got some bling, (sort of), In order to stay with Bob's theme color I bought some stainless steel allen bolts for the rearend cover. Guess that extra 5 bucks wont break the bank. It does look very nice even if i did do it myself. I am going to carry these through to the intake, valve covers, and maybe exhaust bolts.
http://farm3.static.flickr.com/2610/...8aa3a29d_b.jpg
Here is another rear-end shot, i spent about an hour polishing the brake lines with steel wool.
These photos will be very valuable to the judges, this will show them the detail that was carried out in the places they can not see.
http://farm3.static.flickr.com/2727/...5c3f3ca0_b.jpg
I want to do an analysis on the project, I am about half way through the estimated 500 hours for the build. i need to chart a course ahead, and add up my late purchases to check in on build cost. Maybe tomorrow for that, been a long day and gonna hit the hay.
Ray
|
12-03-2009, 06:16 AM
|
|
CC Member
|
|
|
Join Date: May 2006
Location: Portland,
OR
Cobra Make, Engine: ERA FIA, 1964 289->Webers
Posts: 3,689
|
|
Not Ranked
Always need someone in your corner to keep you honest! 
__________________
ERA FIA 2088
|
12-03-2009, 06:45 AM
|
|
CC Member
|
|
|
Join Date: May 2008
Location: Sacramento,Ca.,
Ca.
Cobra Make, Engine: Midstates (2001)
Posts: 1,724
|
|
Not Ranked
Ray it looks awesome and the judges are going to notice all that hard work.........
anybody can paint everything black and call it good but to me that shows "no effort".
and yes i used a ton of stainless steel button head bolts to put my car together and you would be supprised on how many people notice it....I'm on a first name basis with the guys at Fastenol because of it.........
|
12-03-2009, 10:50 AM
|
|
CC Member
|
|
|
Join Date: Nov 2006
Location: Sacramento,
ca
Cobra Make, Engine: classic roadesters ltd, 302, T5
Posts: 318
|
|
Not Ranked
Rear shocks as supplied by CR
Hey Gang:
Question: Prior to me cleaning and repainting the stock shocks that CR sent out with these kits I have a question for you. Are these shocks ok. Remember I must have somewhat a medium ride comfort. if the car is too rough my wife will not ride with me. And I also want a soft to medium ride.
I would not mind a bolt in adjustable shock, but finances for now would prohibit going over the top for this.
Any insights would be appreciated. of course the easy way is to paint these and install and change out later. But if there is a better shock that are around 50bucks each I would go ahead and make the switch now. Most of you guys may have stiffer performance shocks.
Ray.
|
12-03-2009, 11:49 AM
|
 |
CC Member
|
|
|
Join Date: Nov 1999
Location: Pentwater,
Mi
Cobra Make, Engine: Professional Cobra & Streetrod Builder
Posts: 5,352
|
|
Not Ranked
Ray,
If you have the stock supplied shocks from the early kits, you will most likely want to stiffen them up fairly soon. These are "soft!"
DV
|
12-03-2009, 12:25 PM
|
|
CC Member
|
|
|
Join Date: Nov 2006
Location: Sacramento,
ca
Cobra Make, Engine: classic roadesters ltd, 302, T5
Posts: 318
|
|
Not Ranked
They are the yellow monroe gas-matic shock. same shocks came with all three kits so I assume this is what they sent out.
Of course I know with this short wheel base the car is always going to ride a little rough no matter how you spring and shock it.
Thanks for response DV.
Ray
|
12-03-2009, 07:21 PM
|
|
CC Member
|
|
|
Join Date: May 2008
Location: Sacramento,Ca.,
Ca.
Cobra Make, Engine: Midstates (2001)
Posts: 1,724
|
|
Not Ranked
put them on and drive it for a while and if you dont like the ride then change them..
|
12-03-2009, 08:47 PM
|
|
CC Member
|
|
|
Join Date: Nov 2006
Location: Sacramento,
ca
Cobra Make, Engine: classic roadesters ltd, 302, T5
Posts: 318
|
|
Not Ranked
Bob: You always have such pratical advice, and I really like it when it does not involve more money or more work.
Tip for some of you, Because my shop is heated with propane bottles, and since they charge about 4$ a gallon for it at the local shops, I had this wet leg put on my propane tank for the house. This way I can fill my own bottles.
This can easily be done with any propane permanent placed tank.
Here is a pix of it.
http://farm3.static.flickr.com/2635/...2bcb9a20_b.jpg
For other trivia, as you can see I love reusing old stuff. here is one of my shop buildings, it was a metal semi truck paint booth, I assembled it and then covered it with free wood that i got from local granite supply store to make it look old. My other cobra, boat, and 74 vette are stored in it plus motors and stuff.
http://farm3.static.flickr.com/2668/...d6ac497d_b.jpg
Now to get to cobra update:
76 hours, 13 days, 77 days to go:
Got all the hard lines back on car and placed permanently.
Started the wiring, got the back leg roughed in, got the front leg started.
I think I am ok on back, the manual shows routing fairly good. Front did not provide clear detail as to routing. Below are a couple of pictures, please let me know how to change so body will fit fine.
Not sure if the wire should run to outside of frame rail or to the inside.
http://farm3.static.flickr.com/2768/...32db8292_b.jpg
http://farm3.static.flickr.com/2501/...7d8db7cb_b.jpg
Does this wire run like this, or under the rail and to the outside.
http://farm3.static.flickr.com/2705/...4a4edc6b_b.jpg
Regards and thanks for the help. Ray
PS: I just spent an hour online trying to find a cobra air cleaner lid, anyone know where to check.
Last edited by Hray; 12-03-2009 at 10:49 PM..
|
12-04-2009, 02:02 AM
|
|
CC Member
|
|
|
Join Date: Nov 1999
Location: Pentwater,
Mi
Cobra Make, Engine: Professional Cobra & Streetrod Builder
Posts: 5,352
|
|
Not Ranked
Tony Brandon, or Finishline will get you in touch with the appropriate Cobra Air Cleaner.
Wiring: Good Ray, leave enough slack on the sides where the wiring starts starts going straights up -toward the headlight harness.
If you decide to put the aluminum nose in place then it will trap the front wiring, make it sightless and pretty!

DV
Last edited by Double Venom; 12-04-2009 at 02:11 AM..
|
12-04-2009, 12:08 PM
|
|
CC Member
|
|
|
Join Date: Nov 2006
Location: Sacramento,
ca
Cobra Make, Engine: classic roadesters ltd, 302, T5
Posts: 318
|
|
Not Ranked
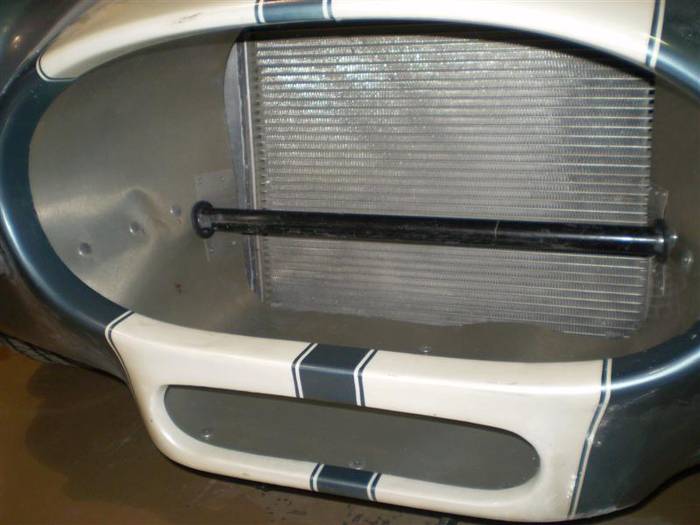
DV: Thanks for feedback, since my radiator is black, I was thinking of blacking out the grill area, maybe even using undercoating on it, or at the least flat or satin black.
Now another question, or maybe a checking on my understanding. I pretty much have used all mechanical guages up to now. it looks like I need to put this into my plain english to understand. I like to understand exactly what is happening to make things work.
My analogy and most of my experience is with house wiring. I know a person can switch the hot, or switch the ground. If a person switched the ground and used a dimmer switch then the light would work just fine and be bright and dim.
So, in the case of electrical gauges do they run hot to one side of the guage, then run the ground (the other terminal at the gauage) to the sending unit and the sending unit functions like the dimmer switch on the house, the more resistance or pressure (or whatever happens in that sender) the gauage reads this resistance and displays that in terms of oil pressure, or heat, or fuel level.
I came to this analogy as i was tagging all the wires to the cobra, there were several that were identified as 'gauage power', and others gauge sender.
I am down to now trying to find places for the last two or three pigtails to plug in, hopefully, I can figure them out, if not then pics will be coming.
I also found that air cleaner at summit, I think it matches the valve covers that came with the car.
UPDATE: 78 hours, 14 days, 76 to go:
Got all the wires accounted for and tagged, ready to start hooking up of dash components to wiring and actuall making connections.
This decision to install mustang column and not the chevette is going to cost about 8 hours of extra wiring as I figure out what to do with all the wires that were going into the column.
got holiday stuff to attend to so short day.
Ray
Last edited by Hray; 12-04-2009 at 03:41 PM..
Reason: update progress;
|
12-06-2009, 09:11 PM
|
|
CC Member
|
|
|
Join Date: Nov 2006
Location: Sacramento,
ca
Cobra Make, Engine: classic roadesters ltd, 302, T5
Posts: 318
|
|
Not Ranked
Greetings My Family:
Well, I would say that we are one big happy family here on club cobra, ok, maybe I do not know enough about everyone to say "happy', so I will settle for a big family. As a family when one hurts they all hurt, so therefore I can share with you some of my medical problems. At about thirty I was diagnosed with this disease that normally just attackes people above age 60. The Doctor said it was not necessarily life threating. I was diagnosed with AAADD. Now most of the time anything with double DD's is very pleasant and most likely enjoyable. But in my case it is a 'deficet disorder'. Premature Age Activated Attention Deficiet Disorder normally referred to as triple A Double D.
Well during breakfast yesterday I told my wife that I think after years of precautions I was cured. She asked how I based my accessement. I told her that I just spent almost four hours grinding, shaping and painting one brake caliper. Therefore, anyone with attention disorder would not be able to focus that long. She informed me that perhaps another disease has taken its place and that perhaps I would go get checked for OCD, Obsessive Compulsive Disorder. I assured her that it was not necessary.
So therefore I am checking in here with the rest of my family for your observations. Here is the lone single caliper that I spent such care and love on.
http://farm3.static.flickr.com/2631/...7db92a30_b.jpg
Update: 94 hours, 16 days, 74 days to go (sunday)
We got the repainted tank and straps back on car,
http://farm3.static.flickr.com/2578/...cea95fd8_b.jpg
Here is picture of tank wired up, I think I read on another thread that I could as a precaution run a ground from a screw on the sending unit to the frame. if I messed this up please let me know.
http://farm3.static.flickr.com/2561/...23011045_b.jpg
We sealed up the trans, bead blasted it then painted. It is ready for the reinstall.
http://farm3.static.flickr.com/2775/...d30fdb28_b.jpg
I routed all the wires, as as routing tagged each wire with masking tape and indicated where it was supposed to go. This way I will not have to keep referring to the manual and diagrams.
http://farm3.static.flickr.com/2556/...63df66fa_b.jpg
My friend Craig redid the tank, trans, and brake master cylinder. I am sure he spent at least 6 hours, I went ahead and included those hours above. Thanks Craig; but I know i will repay once we start on your 65 Riveria next spring.
Well needless to say with the attention to detail we are giving this build we are going to go over the estimated 500 hours for the total build. While the Autorama was just a date set to have it done I was not intending on doing it to this level of detail. The progect just sort of took on a life of its own and seemed to dictate to me that I must ratchet it up a notch. I do think we will come in under 600 hours. Time will tell. So far nothing seems to indicate we will be over budget of 11.5K.
PS: Thanks for the arm chair diagnosis that I am not totally insane.
Later Ray
Last edited by Hray; 12-06-2009 at 09:35 PM..
Reason: post pics, finish update
|
12-07-2009, 04:37 AM
|
 |
CC Member
|
|
|
Join Date: May 2008
Location: Wilmington,
DE
Cobra Make, Engine: Classic Roadster, 302, roller cam, Holley 650
Posts: 553
|
|
Not Ranked
Ray, I think you suffer from GWE another psychological term. (Good Work Ethic). "Keep On Keepin' On" 
__________________
The one line never heard in heaven; "Gee, I wish I had spent more time in the office."
|
12-07-2009, 08:27 AM
|
|
CC Member
|
|
|
Join Date: May 2008
Location: Sacramento,Ca.,
Ca.
Cobra Make, Engine: Midstates (2001)
Posts: 1,724
|
|
Not Ranked
Ray, there's nothing wrong with you that a pizza and a picture of beer wont cure....
keep up the good work............it will pay off..........
|
12-07-2009, 08:57 AM
|
 |
CC Member
|
|
|
Join Date: Jun 2005
Location: Fairfield,
ca
Cobra Make, Engine: CRII with a Stroked Windsor
Posts: 976
|
|
Not Ranked
Ray
Are you looking for the oblong black cobra air cleaner? I have one out in the garage that I will never use..
|
12-07-2009, 09:49 AM
|
|
CC Member
|
|
|
Join Date: Nov 2006
Location: Sacramento,
ca
Cobra Make, Engine: classic roadesters ltd, 302, T5
Posts: 318
|
|
Not Ranked
OFM: That is exactly what I am looking for, my valve covers are mostly black. I will be glad to pay you for it. Not in a hurry for it, I can come pick it up, or one of these days get your work cloths on and come help out. or just come by for a beer and a chat.
Ray
|
12-07-2009, 10:19 PM
|
|
CC Member
|
|
|
Join Date: Nov 2006
Location: Sacramento,
ca
Cobra Make, Engine: classic roadesters ltd, 302, T5
Posts: 318
|
|
Not Ranked
UPDATE: Monday
106 hours, 17 days down, 73 till done.
Sent in my application for the Autorama, I am feeling fairly confident that I will make it.
Got the new steering column welded up today, Craig is making it pretty.
Went and picked up the copper slag media blasting material today to blast the exhaust and side pipes. The Cilgen satin aluminum coating arrived today. This will do exhaust and roll bar.
Reconnected the emergency brake system today.
Made several electrical connections and started connecting the gauges.
|
 Posting Rules
|
You may not post new threads
You may not post replies
You may not post attachments
You may not edit your posts
HTML code is Off
|
|
|
All times are GMT -7. The time now is 05:59 PM.
Links monetized by VigLink
|


 Linear Mode


