Welcome to Club Cobra! The World's largest
non biased Shelby Cobra related site!
- » Representation from nearly all
Cobra/Daytona/GT40 manufacturers
- » Help from all over the world for your
questions
- » Build logs for you and all members
- » Blogs
- » Image Gallery
- » Many thousands of members and nearly 1
million posts!
YES! I want to register an account for free right now!
p.s.: For registered members this ad will NOT show
 
 Main Menu
|
|
Nevada Classics
|
|
Advertise at CC
|
|
April 2026
|
| S |
M |
T |
W |
T |
F |
S |
| |
|
|
1 |
2 |
3 |
4 |
| 5 |
6 |
7 |
8 |
9 |
10 |
11 |
| 12 |
13 |
14 |
15 |
16 |
17 |
18 |
| 19 |
20 |
21 |
22 |
23 |
24 |
25 |
| 26 |
27 |
28 |
29 |
30 |
|
|
|
|
CC Advertisers
|
|
 349Likes 349Likes

04-26-2014, 05:58 AM
|
 |
CC Member

|
|
|
Join Date: Aug 2001
Location: Melbourne, Australia,
Vic
Cobra Make, Engine: G-Force Mk I, 5L Windsor, TKO 600, enhanced Jag / Koni suspension & LSD Diff.
Posts: 2,304
|
|

 Not Ranked
 1 step forward....3 back
Finally shaking my chest infection and have managed some cursing time in the shed over the past couple of days.
Received the reversing plug for the tremec and fitted that up nicely, got a few other small jobs done and thought I'd start bleeding the brakes late Friday.
Discovered a knackered aluminium fitting on the passenger front brake but found a steel spare and with a bit of tinkering finally got it back together again but too late in the day for more.
Back under the car today and despite lengthy leg work on the brake pedal by my son, at best I'd only get fits and spurts of brake fluid from any of the four corners.
Might be something seized in the master/booster so I've pulled them out to have them checked. Ho Hum but better the brakes work properly than not.
So started to play with my replacement accelerator pedal. A rodeo pedal as suggested by Marty. With some applied heat and bending I have refabricated its layout to suit my cockpit as per the photo below.

Have lost some leverage off the pedal as it has been bent up to clear the floor and match the brake pedal but I don't anticipate this being an issue in operation.
I've been able to position the assembly to pick up the old accelerator cable location and will simply be able to bolt onto the firewall.
So progress continues......sort of!
Cheers
Steve
__________________
slowy
|
-
Advertising

05-04-2014, 02:01 AM
|
|
CC Member
|
|
|
Join Date: Aug 2001
Location: Melbourne, Australia,
Vic
Cobra Make, Engine: G-Force Mk I, 5L Windsor, TKO 600, enhanced Jag / Koni suspension & LSD Diff.
Posts: 2,304
|
|
Not Ranked
A really bad day in the shed
More steps backwards today sadly.
Had a go bleeding brakes and almost had them there and thought I'd finish a couple of items under the car and finish replacing proper lock nuts on the jag inner drive shafts.
Was tightening the third stud nut and the torque wrench didn't trigger.
Managed to snap what I've learnt are bolts through the drive flange on the diff. I tapped the remainder of the bolt back through the flange and found a very close replacement. But have found, I think, that I need to pull the flange off to replace the bolt.
Lots of swearing at the stage....both at the Tigers on the radio and at myself.
Can anyone familiar with the jag set up confirm for me if I now need to get the flange out of the diff?
With the body on I am struggling to get any access at all to the bolts holding the disc calliper in place. I need this off to then drop off the disc and get closer to the diff flange.
Have made up my door switch holders and know what wiring is needed to get cabin lighting functioning but this has all been lost in this setback.
Anyway if anyone has some advice I am all ears.
Cheers
Steve
__________________
slowy
|
05-04-2014, 04:10 AM
|
|
CC Member
|
|
|
Join Date: Apr 2006
Cobra Make, Engine:
Posts: 92
|
|
Not Ranked
Slowly
Can you cut an access hole in the back wall of the cabin to remove the caliper bolts? If not then you will need to remove the diff and then the lower control arm and then caliper and rotor, stub axle and then dismantle the stub axle assembly so that the new bolt can be put in,The bolt you have broken is a fitted bolt and will need to be replaced with another fitted bolt,They are a knock in / tight fit bolt.
Good luck with your projects
Iva Bigan
|
05-04-2014, 04:40 AM
|
 |
CC Member
|
|
|
Join Date: Jun 2009
Location: Sydney,
NSW
Cobra Make, Engine: RCM, Jag front and rear, LS3
Posts: 1,640
|
|
Not Ranked
yes, it has to come out to remove the bolt. 7/16 UNF from memory. I used standard grade 8 bolts to replace mine. If you can source those suggested by Iva Bigan it would make tightening easier. Otherwise regular bolts work its just fiddly holding a spanner back their. Replace the nuts with crushed nuts whilst at it. I wouldn't use nyloc there cause of heat.
|
05-04-2014, 08:01 PM
|
|
CC Member
|
|
|
Join Date: Aug 2001
Location: Melbourne, Australia,
Vic
Cobra Make, Engine: G-Force Mk I, 5L Windsor, TKO 600, enhanced Jag / Koni suspension & LSD Diff.
Posts: 2,304
|
|
Not Ranked
Thanks guys.
I was in the process of changing over nylocs for crush nuts that lead to this misfortune.
I did too discover that slight variance in bolts as I found an almost exact match bolt the only difference being a non-interferrence fit into the stub axle hole.
Given I am likely to have to completely remove the diff or thereabouts, I might contemplate complete change over of all the bolts to fresh ones to avoid this recurring.
The specified torque was 75Nm and am sure the offending bolt had already suffered weakness from previous tightening. But I didn't recognise this as I tried to reach the prescribed tension and the bolt wouldn't attain the torque setting and simply let go when it had had enough!
Iva if I could clear the disc clutter from the side face of the diff, does this mean that simply undoing that large locking nut on the outboard face of the stub axle would free it in the diff?
Trying to keep the pain of disassembly to a minimum but if there also needs some applied force to get the stub axle out, this might force me to drop the whole unit.
Any further feedback you can offer would be great.
Cheers
Steve
__________________
slowy
|
05-04-2014, 09:44 PM
|
|
CC Member
|
|
|
Join Date: May 2004
Location: Melbourne,
Vic
Cobra Make, Engine: Cobra RMC 377ci Windsor, Harrison Daytona Coupe, Ford XC Coupe.
Posts: 1,588
|
|
Not Ranked
Bolts
Slowly,
Its only a 5 Litre without sticky tyres....................
Wait for it to break, 
STIFFY |
05-04-2014, 10:35 PM
|
|
CC Member
|
|
|
Join Date: Aug 2001
Location: Melbourne, Australia,
Vic
Cobra Make, Engine: G-Force Mk I, 5L Windsor, TKO 600, enhanced Jag / Koni suspension & LSD Diff.
Posts: 2,304
|
|
Not Ranked
Would love to Stiff but I could see a far worse mess if I left it and it all let go.
Thought did go through my mind if I could reverse the bolt, but the clearances are too tight for the nut inside to work.
Have now realised using cone nuts that all I needed to do was get some firm tensioning in there not torquing to a setting. Good advice all too late.
And a bit of researching prior to this has me thinking whether I set up the disc calipers properly too. Am going to drop the lot and check properly for piece of mind.
In terms of the Melbourne Jag repairer out there, any recommendations on who might be the best to go visit. Know of Roddy and Spiteri and would probably use the latter here. Any others?
__________________
slowy
|
05-05-2014, 02:24 AM
|
|
CC Member
|
|
|
Join Date: Jun 2009
Location: Sydney,
NSW
Cobra Make, Engine: RCM, Jag front and rear, LS3
Posts: 1,640
|
|
Not Ranked
Quote:
Originally Posted by stephen low

Thanks guys.
Iva if I could clear the disc clutter from the side face of the diff, does this mean that simply undoing that large locking nut on the outboard face of the stub axle would free it in the diff?
Trying to keep the pain of disassembly to a minimum but if there also needs some applied force to get the stub axle out, this might force me to drop the whole unit.
Any further feedback you can offer would be great.
Cheers
Steve
|
From memory you have to undo the bolts that are behind the disc bolts. Ie the bolt heads that sit back to back with the disc bolt heads (think there are 4 or 5). That removes a whole cover plate that includes a seal and the bearing. The whole lot just slides out. |
05-05-2014, 02:29 AM
|
|
CC Member
|
|
|
Join Date: Jun 2009
Location: Sydney,
NSW
Cobra Make, Engine: RCM, Jag front and rear, LS3
Posts: 1,640
|
|
Not Ranked
Part 12 in this diagram is what you want to remove, then the nut part number 8 and it all comes apart.
http://1.bp.blogspot.com/-DVcPRXFMyG...l_assembly.JPG |
05-05-2014, 06:10 AM
|
|
CC Member
|
|
|
Join Date: Aug 2001
Location: Melbourne, Australia,
Vic
Cobra Make, Engine: G-Force Mk I, 5L Windsor, TKO 600, enhanced Jag / Koni suspension & LSD Diff.
Posts: 2,304
|
|
Not Ranked
Thanks guys, yes that matches advice from at least one local Jag repairer in terms of what I pull out of the diff housing.
So I am now up for a complete diff drop out of the car.
Am told sourcing the bolt I broke is quite difficult so they are a bit pricey and second hand anyway. Still they are obtainable.
Only scheduled to audit a client tomorrow so I might have to "work" from home later in the week. Can see a lot of non-auditor work getting done - lol
Will take a few pics of progress for posterity as I go.
Cheers
__________________
slowy
|
05-05-2014, 06:41 PM
|
|
CC Member
|
|
|
Join Date: Mar 2014
Location: Melbourne,
VIC
Cobra Make, Engine: RMC
Posts: 31
|
|
Not Ranked
Looking good up until your bolt issue Slowly. Love the pics keep em coming.
__________________
"It's better to burn out, than to fade away"
|
05-06-2014, 02:10 AM
|
|
CC Member
|
|
|
Join Date: Aug 2001
Location: Melbourne, Australia,
Vic
Cobra Make, Engine: G-Force Mk I, 5L Windsor, TKO 600, enhanced Jag / Koni suspension & LSD Diff.
Posts: 2,304
|
|
Not Ranked
Ha you can say that again.
Still it hasn't killed me yet.....so I must be stronger!!
We live and learn...to swear too
Cheers
__________________
slowy
|
05-08-2014, 02:24 AM
|
|
CC Member
|
|
|
Join Date: Aug 2001
Location: Melbourne, Australia,
Vic
Cobra Make, Engine: G-Force Mk I, 5L Windsor, TKO 600, enhanced Jag / Koni suspension & LSD Diff.
Posts: 2,304
|
|
Not Ranked
Reverse auditor's luck
Was working from home today and actually got time to really work from home on the beast!
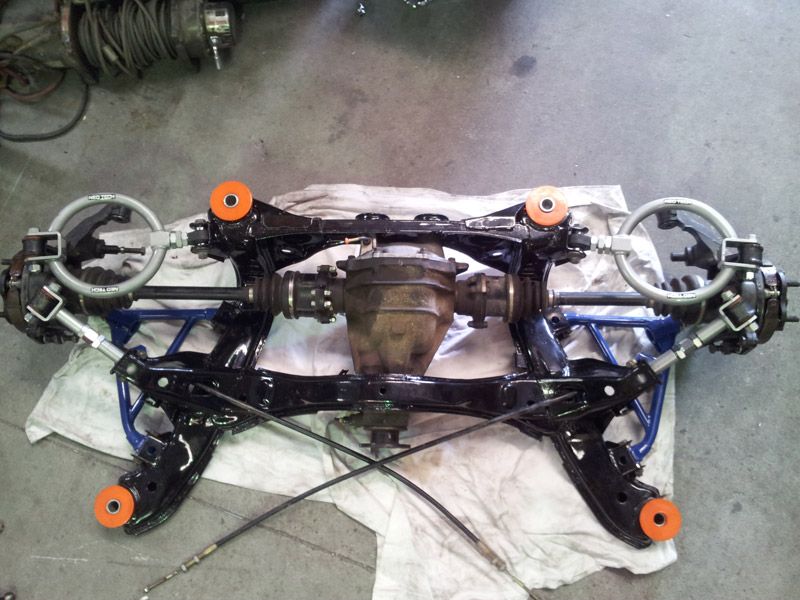
Last thing I did last Sunday was to drop the drive shaft to give me some more room in advance of further investigations. My first visit under the car was to gauge how much work was in dropping the whole diff. A ****e load it appeared.
I then got into the space vacated by the prop shaft and hello that upper calliper bolt was not only visible but accessible.
I joke with clients about auditor's luck finding issues of non-conformance simply by luck. So the discovery of a means to remove the calliper and disc has to be reverse luck.
Anyway the photos show a good result though with one small hurdle to over come.
Anyway the issue as I was first looking at it.

With a bit of work, what I was left with - woo hoo!!

However jag advice I did get was to remove the drive shaft complete with its mounting flange and not via the large central nut, both as can be seen here

Removed the flange nuts plus three associated with a calliper fitting, however I've had no luck pulling the stub flange out.
Can anyone advise on my next best step to remove the flange and so be able to reinsert a replacement bolt?
This has saved me a huge amount of lost time so I am really happy but don't want to gallop into further parts removal and cause myself some more grief.
Any and all suggestions would be appreciated.
Cheers gang
Steve
__________________
slowy
|
05-08-2014, 05:49 PM
|
 |
CC Member
|
|
|
Join Date: Jan 2007
Location: Melbourne,
VIC
Cobra Make, Engine: Harrison, 6.0L Chev
Posts: 2,513
|
|
Not Ranked
Quote:
Originally Posted by stephen low
Any and all suggestions would be appreciated.
|
OK... I have a spare one of these at home, including diff. 
__________________
"A spectacularly fast car in a grand if dated tradition."
|
05-08-2014, 08:07 PM
|
 |
CC Member
|
|
|
Join Date: Sep 2004
Location: Canberra,
ACT
Cobra Make, Engine: G-Force Cobra '68 302, T-5, Jag 3.77 LSD.
Posts: 993
|
|
Not Ranked
Slowy, I've not personally dismantled one of these either however I can impart some relevant experience.
On some diff setups, the splined axle end has a retaining where it passes through the sun gears within the diff centre (item 23 on the exploded diagram in Zedn's post). However I can't see one on this diagram, so I suggest it is just tight on the bearing to housing surface and what ever gasket cement has been used of the flange.
This simply means prising it out with a lever, as it appears there are no jacking bolt holes to use. Firstly with something sharp like a wood chisel, gently drive it between the carrier flange and the diff housing to break the gasket seal. Maybe start at a spot where there is a casting gap between the flange and diff. once you've moved this a bit get a prybar or tyre lever in the gap and work it out.
If you work you're way around the flange with the chisel, it should eliminate the risk of cracking. Be sure though to clean up any burrs this creates.
__________________
SLIPRY
|
05-08-2014, 08:20 PM
|
|
CC Member
|
|
|
Join Date: Aug 2001
Location: Melbourne, Australia,
Vic
Cobra Make, Engine: G-Force Mk I, 5L Windsor, TKO 600, enhanced Jag / Koni suspension & LSD Diff.
Posts: 2,304
|
|
Not Ranked
Thanks David
Sort of tried this by tapping the flange which rotated it only slightly around with some modest banging.
This told me it the flange is well located however wasn't sure if there was some other internal mechanical link I might be affecting so I stopped.
Did also mildly try the seperation exercise with some screw drivers. There is very limited space to make these fit into gaps and I think the chisel with a finer point will be better.
By my reading there are two steel flange gaskets in place but no great evidence of gasket goo.
Am going past V&A Spiteri's shop later today with the offending bolt sample and some of those photos to talk about all this.
Will let you know what the experts say tonight with luck.
Thanks for the input.
Steve
__________________
slowy
|
05-08-2014, 08:27 PM
|
|
CC Member
|
|
|
Join Date: Sep 2004
Location: Canberra,
ACT
Cobra Make, Engine: G-Force Cobra '68 302, T-5, Jag 3.77 LSD.
Posts: 993
|
|
Not Ranked
Had another look at the diagram, there's an o-ring that seals it rather than gaskets, i'd say it's just tight on this.
__________________
SLIPRY
|
05-09-2014, 05:41 AM
|
|
CC Member
|
|
|
Join Date: Jun 2009
Location: Sydney,
NSW
Cobra Make, Engine: RCM, Jag front and rear, LS3
Posts: 1,640
|
|
Not Ranked
I dont recall there being anything else holding it together. Get a bigger hammer! When you say flange nuts, do you mean flange bolts? They are still installed on that photo.
|
05-09-2014, 06:00 AM
|
|
CC Member
|
|
|
Join Date: Aug 2001
Location: Melbourne, Australia,
Vic
Cobra Make, Engine: G-Force Mk I, 5L Windsor, TKO 600, enhanced Jag / Koni suspension & LSD Diff.
Posts: 2,304
|
|
Not Ranked
Thanks for the comments guys.
The professional advice, as expected from a bit of diagram reading, was that the flange is indeed sealed by a rubber O ring and a tight little begga it has made.
Using stilsons I was only able to partly rotate the backing flange but never got close to moving it off the steel gaskets.
I ended up grinding one side of the bolt head and managed to reinsert the bolt to get it all fitted up. I figured the interference fit of these bolts, the remaining 3/4 of the bolt head supported by 3 other bolts wasn't going to see an issues down the track. Would have preferred to have partly pulled the backing flange but it wasn't budging. So I ended with this view:

Had to refill the diff and a few other bits and piece and ended the night thus:

Which translates to very happy.
Mind you I've yet to tighten the output shafts up again - DoH
But only hand tight hard given the cone nuts in use I was told. That I can do and not flock it up!!
Cheers
__________________
slowy
|
05-09-2014, 02:55 PM
|
|
CC Member
|
|
|
Join Date: Jul 2009
Location: Redland Bay,
QLD
Cobra Make, Engine: Harrison #100 under construction
Posts: 1,109
|
|
Not Ranked
" But only hand tight hard given the cone nuts in use I was told. That I can do and not flock it up!! "
Arrhh.... flock it up ?....must be a bunch of them then ! 
__________________
Rog 246
Harrison #100
|
 Posting Rules
|
You may not post new threads
You may not post replies
You may not post attachments
You may not edit your posts
HTML code is Off
|
|
|
All times are GMT -7. The time now is 11:51 PM.
|
|


 Linear Mode


